DIY Gaming Headset

A friend of mine recently bought a PS4 ( yes … weeks before the PS5 launch, but this was a pre-loved set for half the price) and we’ve been playing on-line together. Which means for the first time I’m using headaphones and a microphone while on my PS4.
I started out with the free AKG earbuds that came with my Samsung S8+. These are the only ones I have with a 4-part plug as used on the PS4. The AKG earbuds are of the in-the-ear type, and while they provide good noise isolation because they block most outside noise from your ears, when you speak, it feels like your talking underwater. That’s not an issue when listening to music, but is irritating when talking.
But a bigger issue was that the microphone didn’t really do a good job of picking up my voice. In the heat of battle we’d often be screaming “what? say again! I can’t hear you!”.
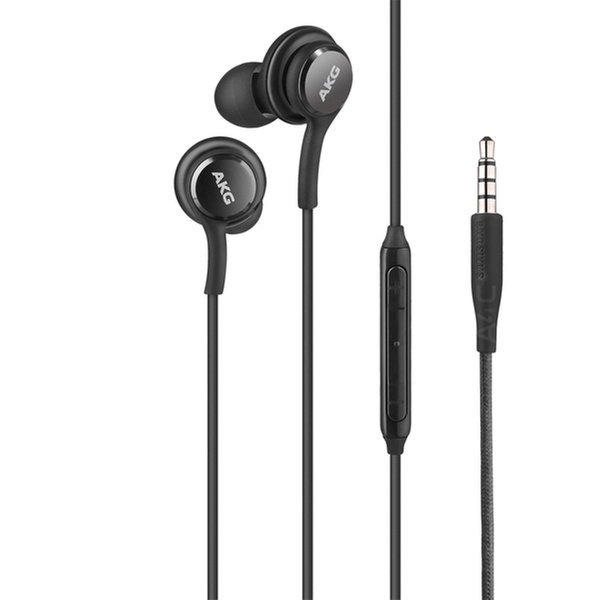
It turns out that while most microphones (even at the lower end of the market) are quite capable at capturing gaming speech, the positioning of the microphone has a large impact on how well they perform. With the inline microphones, they’re dependent on where the cable dangles. The ideal position for a microphone is directly in front or close to the front of your mouth, and the inline microphones on these types of earbuds struggle with that.
Most gaming headphones (and even aviation headphones, come to think of it) have the microphone on a flexible or swing arm, where it can be placed directly close to the front of your mouth. I could just buy one of those and end the story here. You can get them as cheap as RM10, so money is not an issue.
However, to address the “speaking while underwater” issue, I also want a pair of headphones that are “open-backed”. Open-backed means the outside cover of the headphone will allow air to pass through. This lets you hear the ambient sound, including the external sound of your voice (as opposed to just the “internal” sound of your voice, which leads to that “underwater” problem). I also want open-back headphones that are sensitive enough to play sounds loudly, as, unlike closed-back headphones or in-the-ear earbuds, the sounds from the headphones has to compete with ambient sounds too.
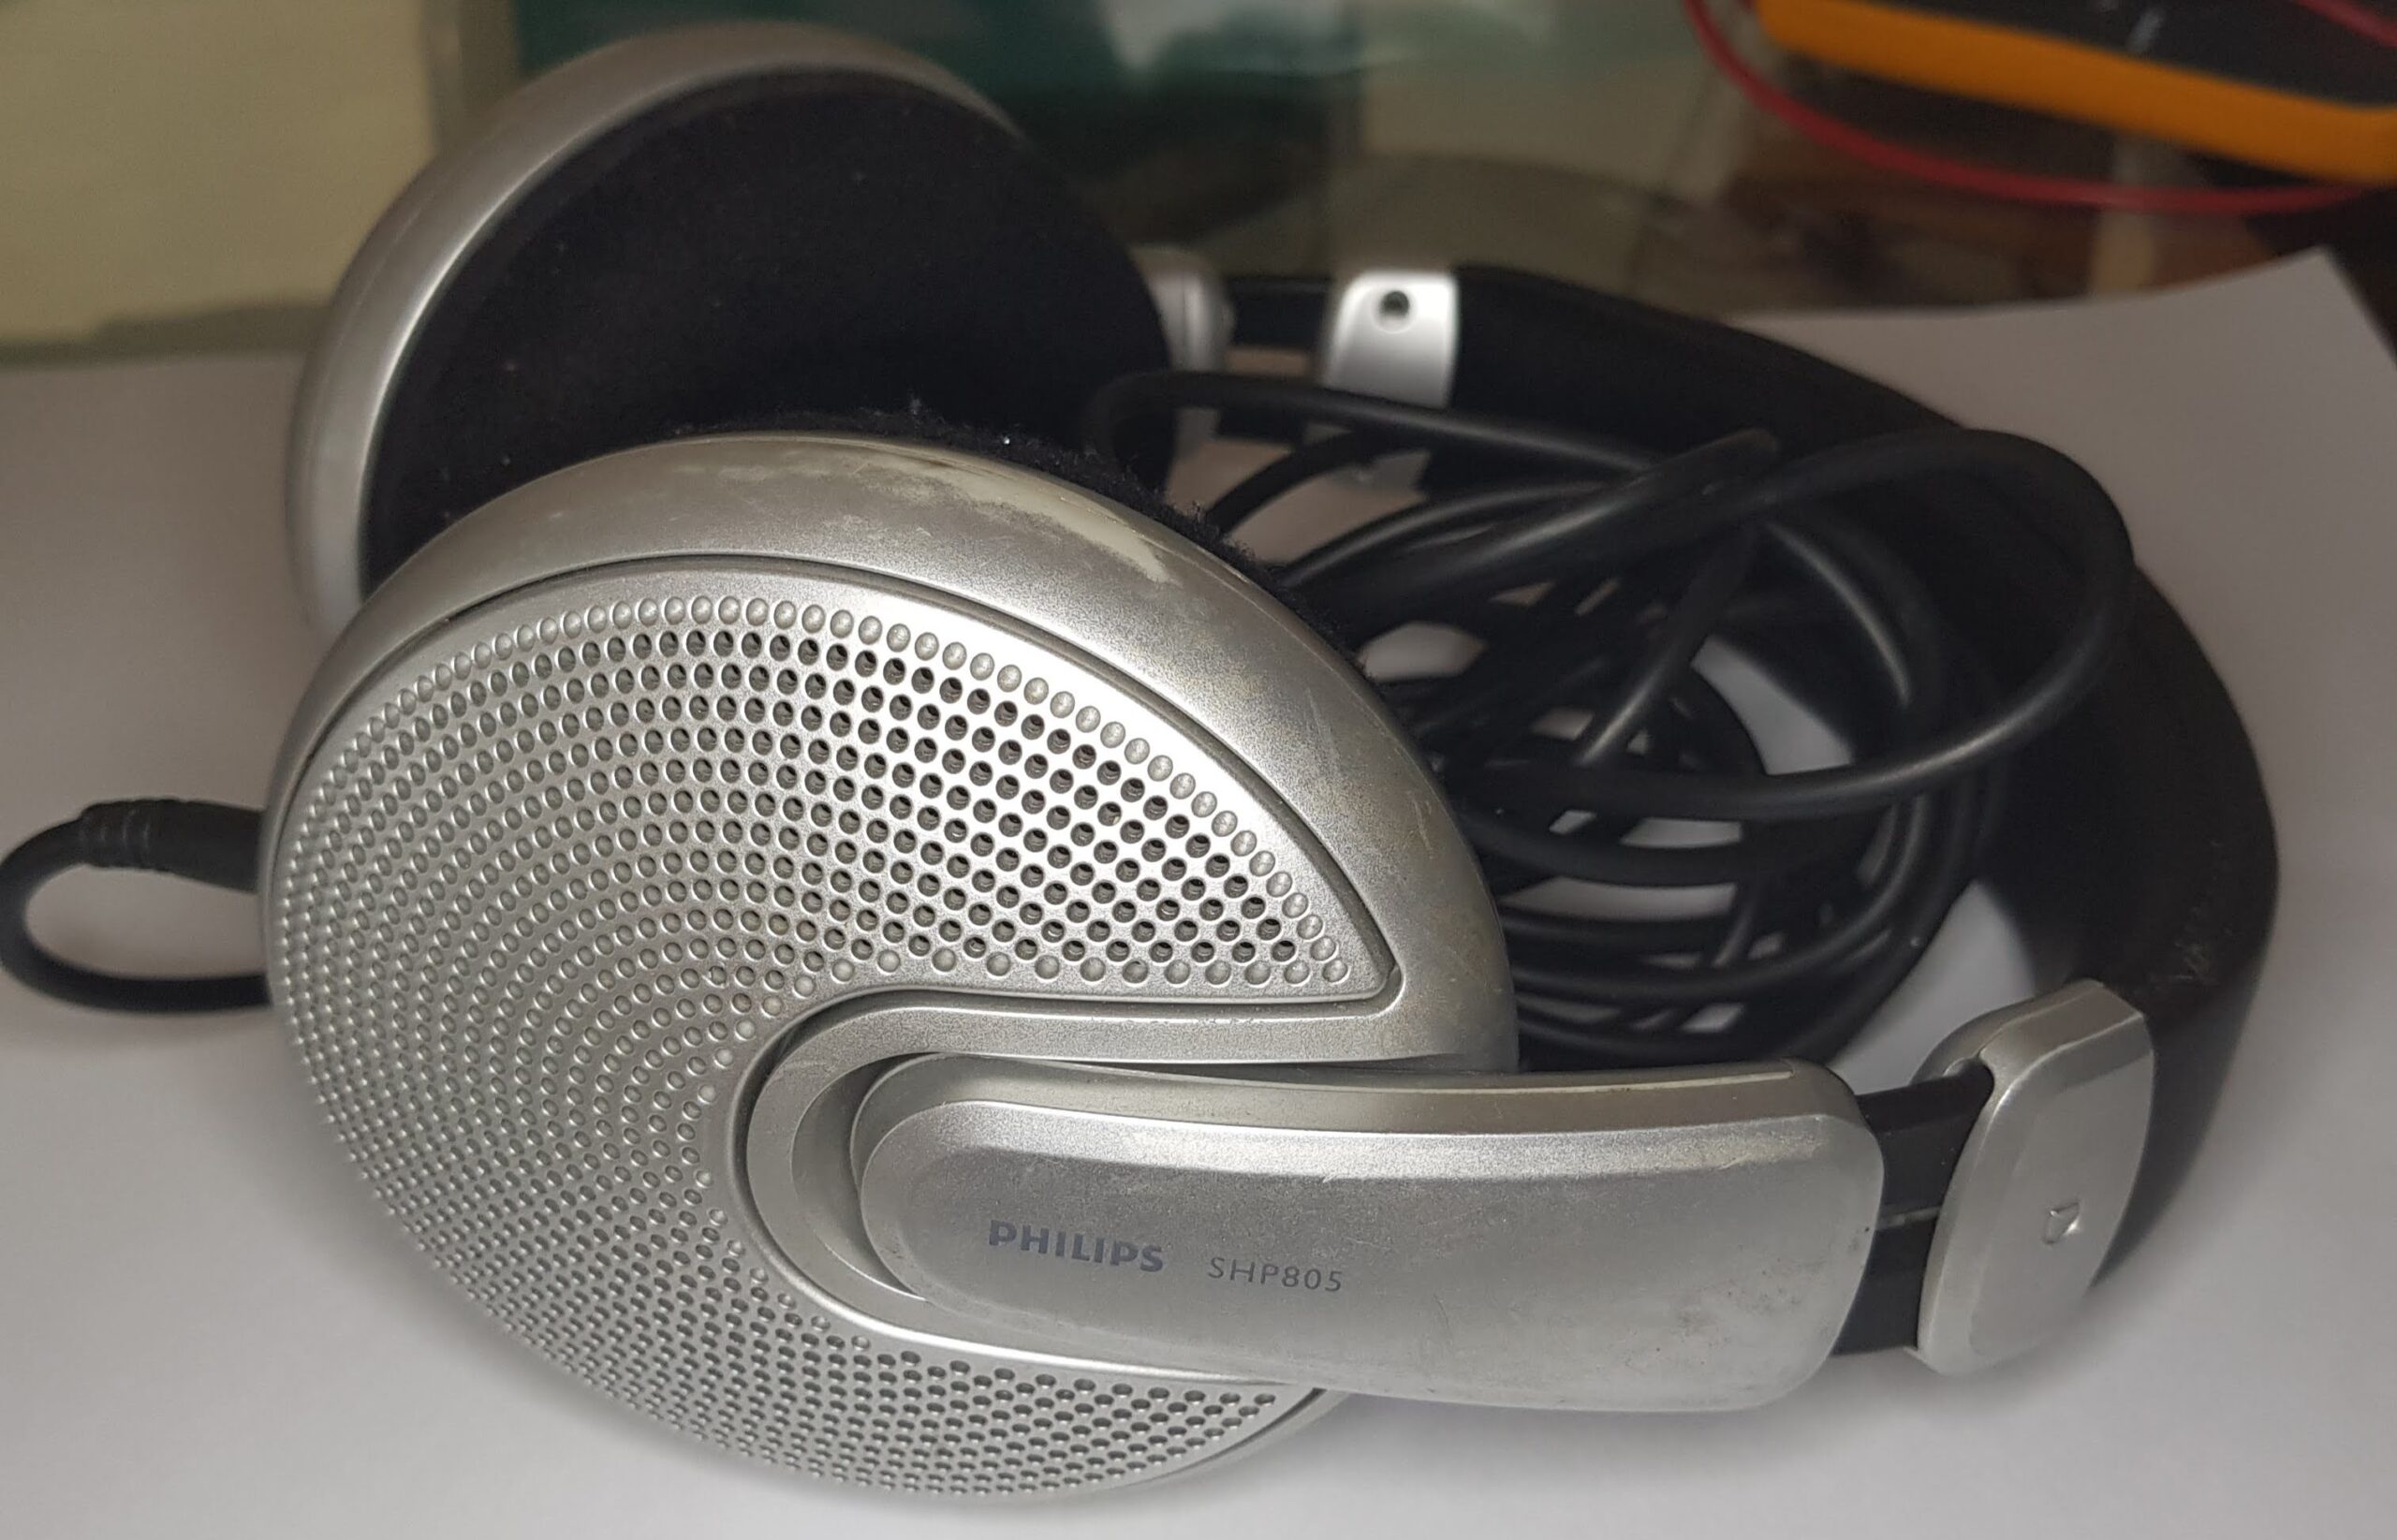
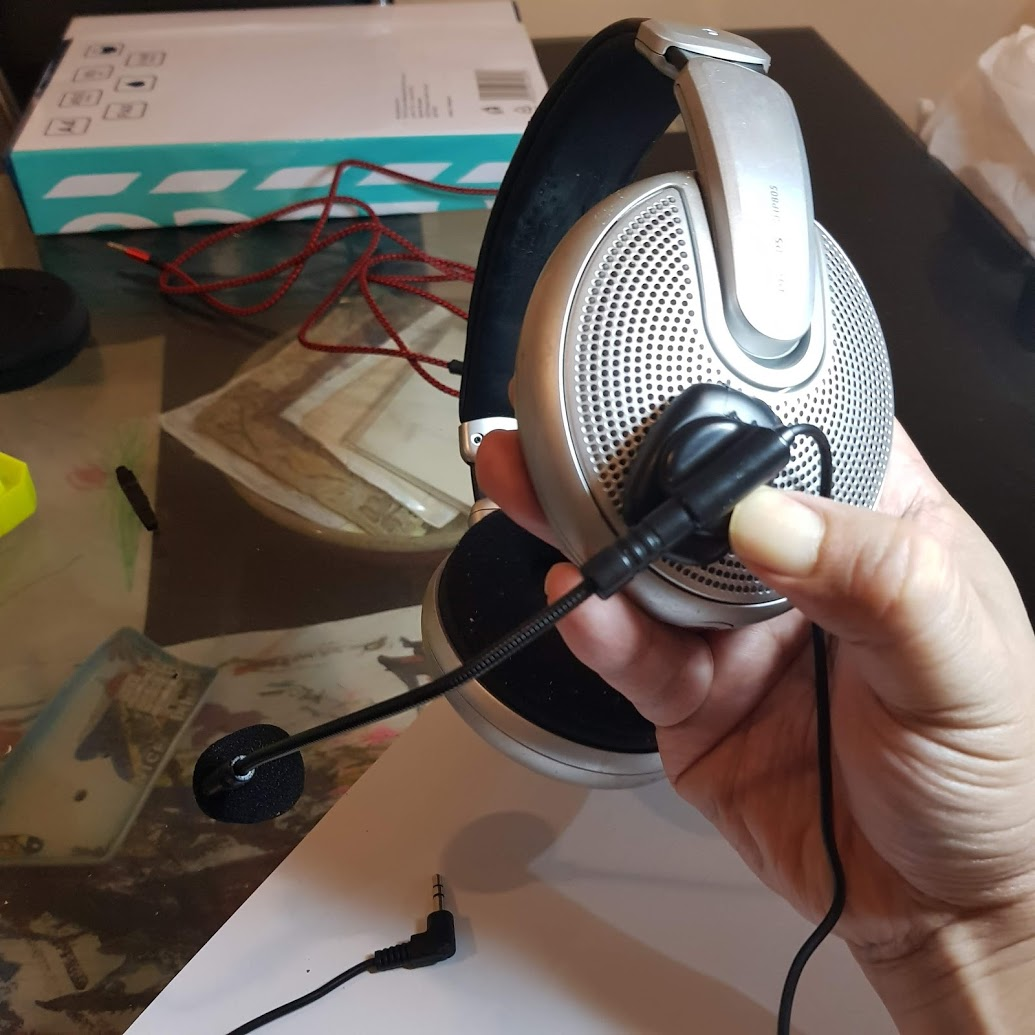
Since I already own more headphones than I have ears, I was reluctant to buy yet another pair (of headphones). Somewhere at the back of my collection of headphones and earbuds is a Philips SHP-805 which I “inherited” a long time ago but hardly ever use. Although it has big “cans” that fit over the ear, it’s an open-backed design, and the drivers are quite sensitive. The only thing making it unsuitable for use with the PS4 is the lack of a microphone.
So why not add a microphone to it?
I would need a cheap microphone and some way to make a flexible arm that could contain the wiring for the mic. Maybe some thick metal wire and flexible tubing? Attach this to one side of the headset and problem solved, technically. It would not look pretty, but I’m gaming on my own, nobody can see my equipment anyway.
While looking for a cheap microphone to modify, I came across this https://shopee.com.my/product/80019057/5213737168:
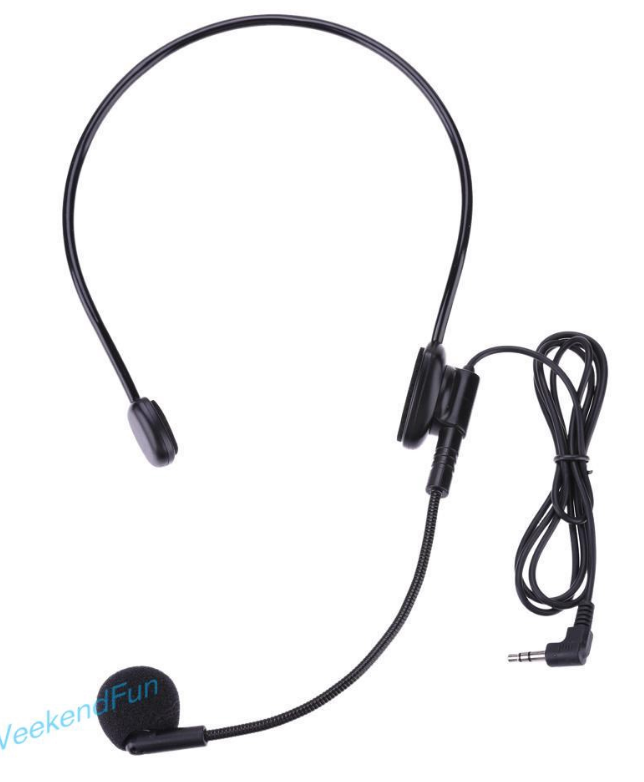
It’s a microphone-only headset, used by speakers and mall promoters who need to have their voice amplified, but don’t need to listen to anything. It has a ready-built flexi-arm and wiring all done neatly. I could just chop the headband part off, attach it to my headphones, and problem solved. The best part is the price … MYR4.13 (USD 1.00). I bought two (plus some other stuff to qualify for free shipping).
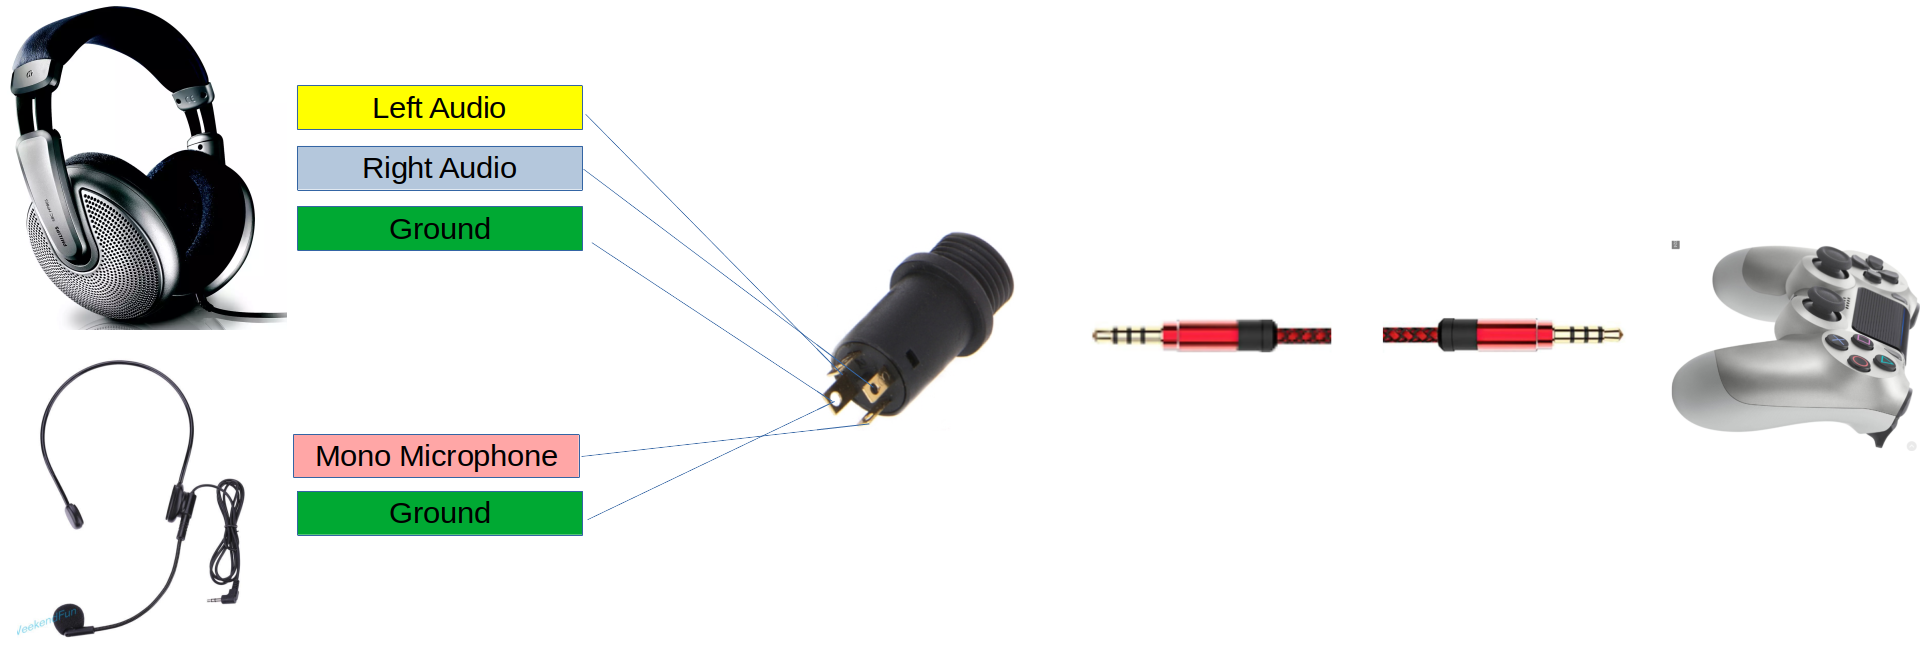
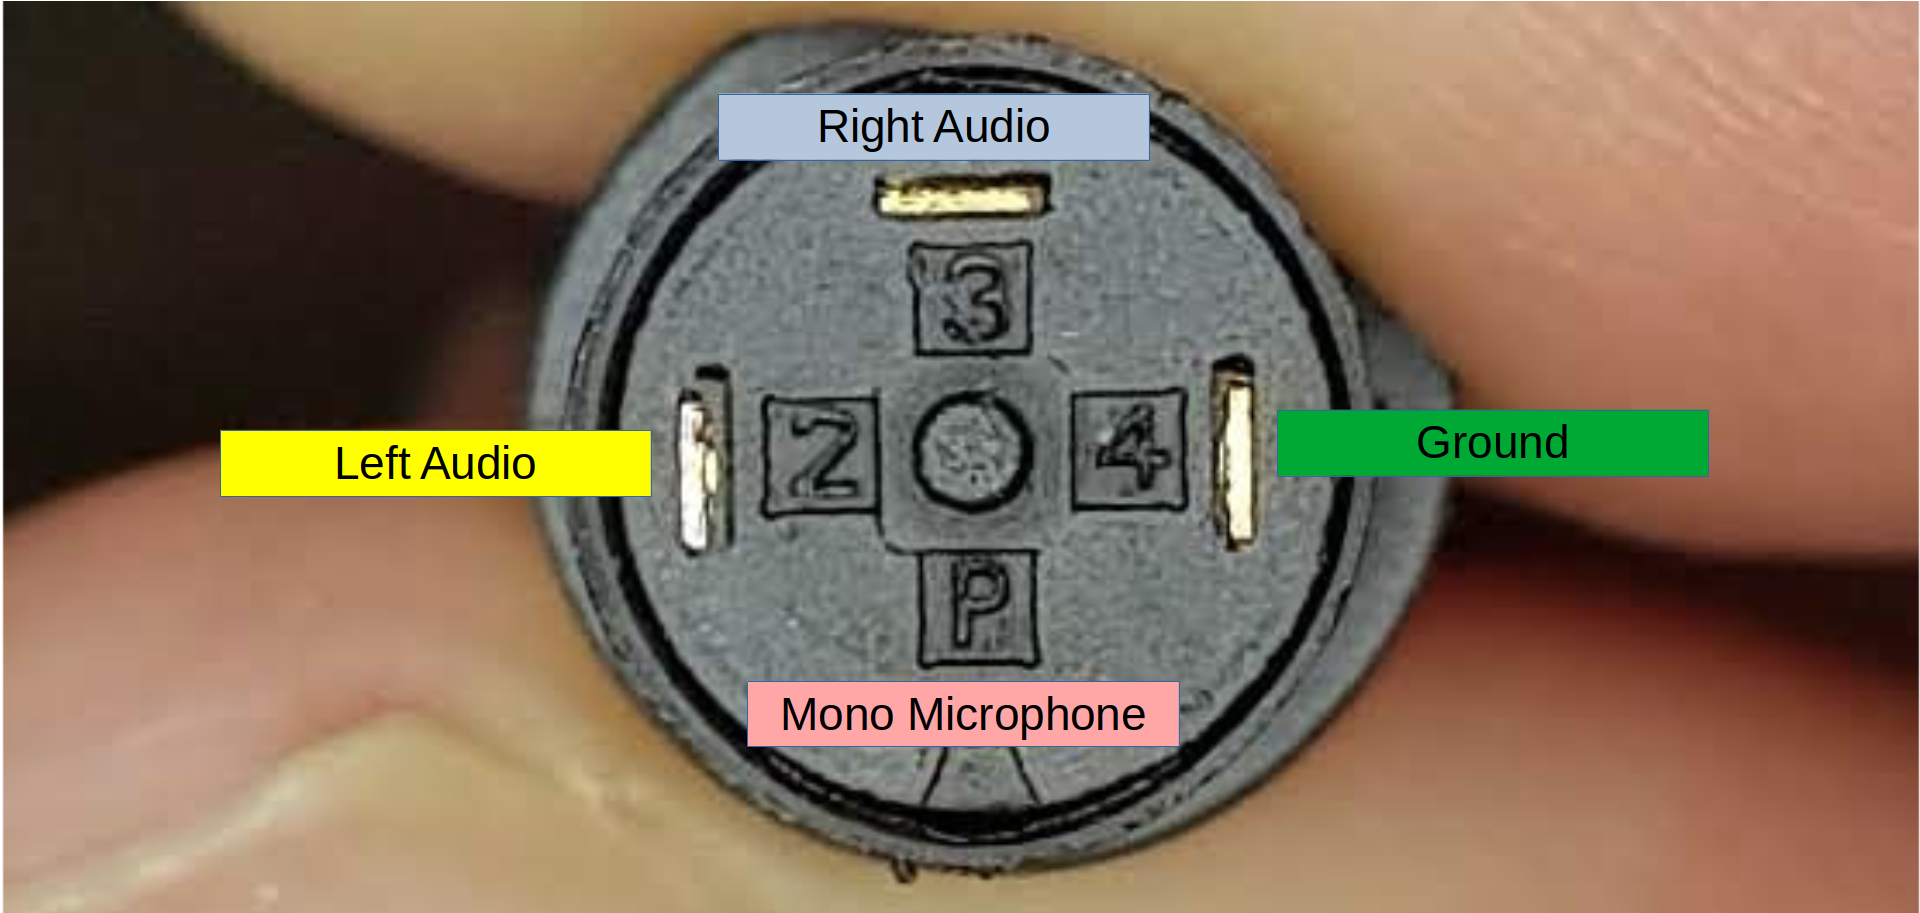
Now this microphone has a plug of its own, and is designed to work with equipment (such as PCs) that has a separate socket for the microphones and headphones, with each device having its own cable.
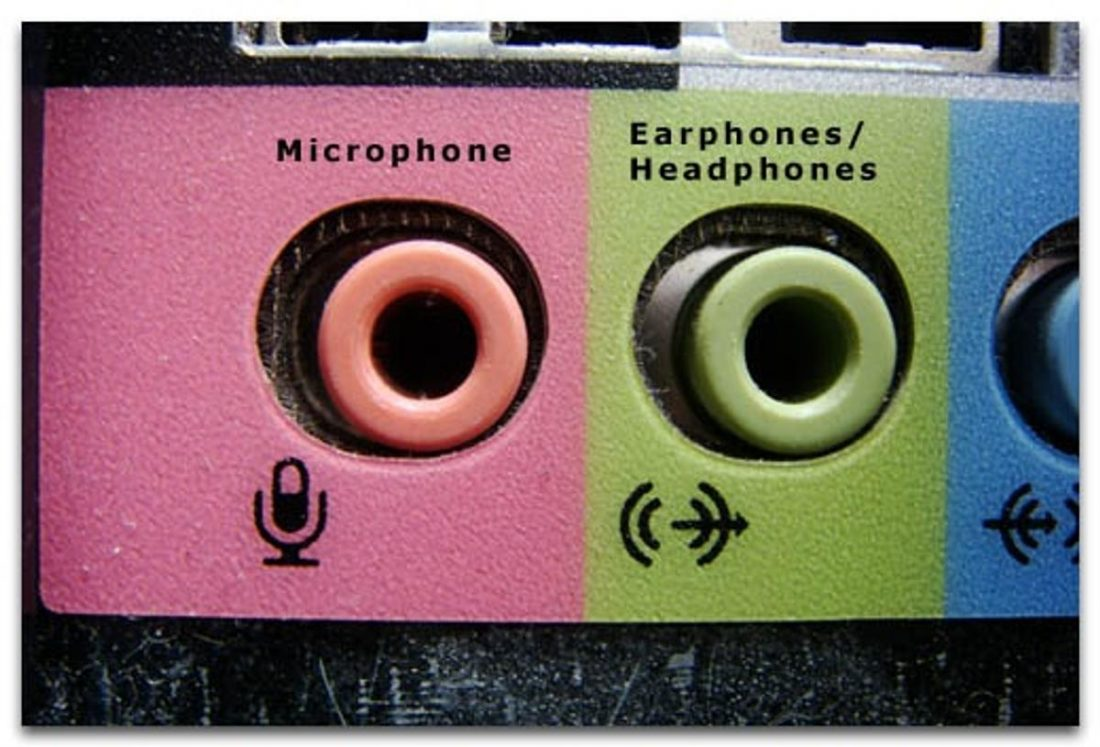
The PS4 (and most mobile phones that still feature headset ports) however use a single plug for both the microphone and the headphones. The connector looks similar but has slight differences:
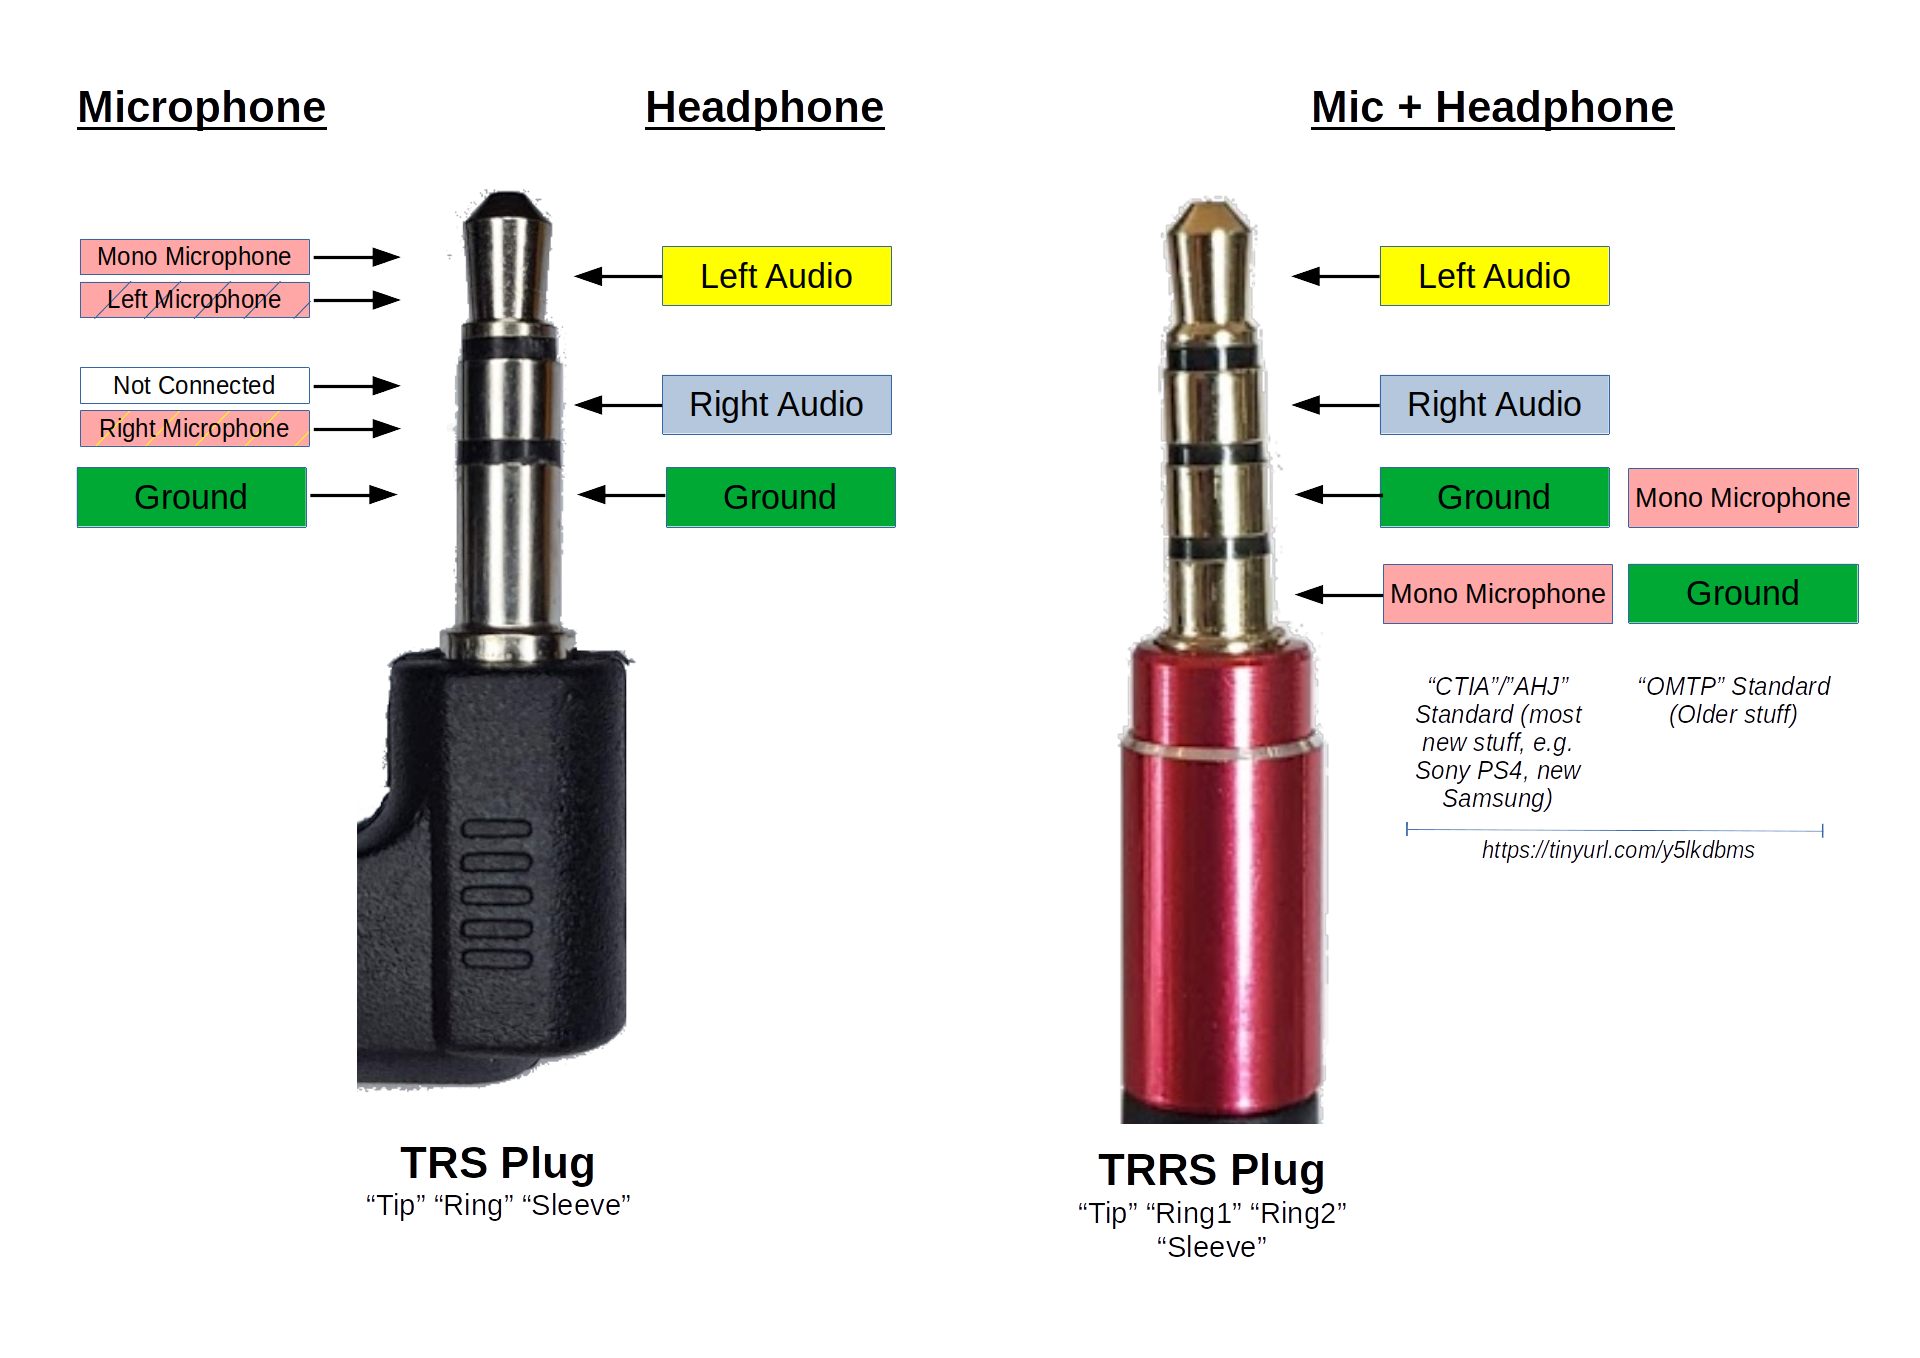
If I want to use my microphone + headphones on the PS4, I will need to get a “TRRS to TRS(headphone) + TRS(microphone) adapter that uses the CTIA standard“, like this that I found on Shopee for RM1.53 (USD0.37): https://shopee.com.my/product/80019057/5214637839.
However, having two different cables from my headset all the way to the controller is awkard. Especially when they are off different lengths, there is excess running cable all over the place. So this is not a “perfect” solution. Having invested MYR4.13 already, I was committed to finding a better solution.
I decided the way forward is to replace the cable between the headphone and PS4 controller, to a single cable that has 4 wires inside. Then rather than using an adapter at the PS4 controller end, I could do all the necessary wiring at the headphone end instead.
I took a look at my Philips SHP-805 headset. Given that the model came out in 2005 (yes, it’s probably over 15 years old!), it is rather well made, compared to the crap you get today. Whereas today’s stuff is mostly made of plastic that snaps together, which requires a pry tool to open and running a high risk of scratching or even cracking the plastic the older it is, the Philips SHP-805 is put together using screws ! You can very easily open it up and put it back together again!
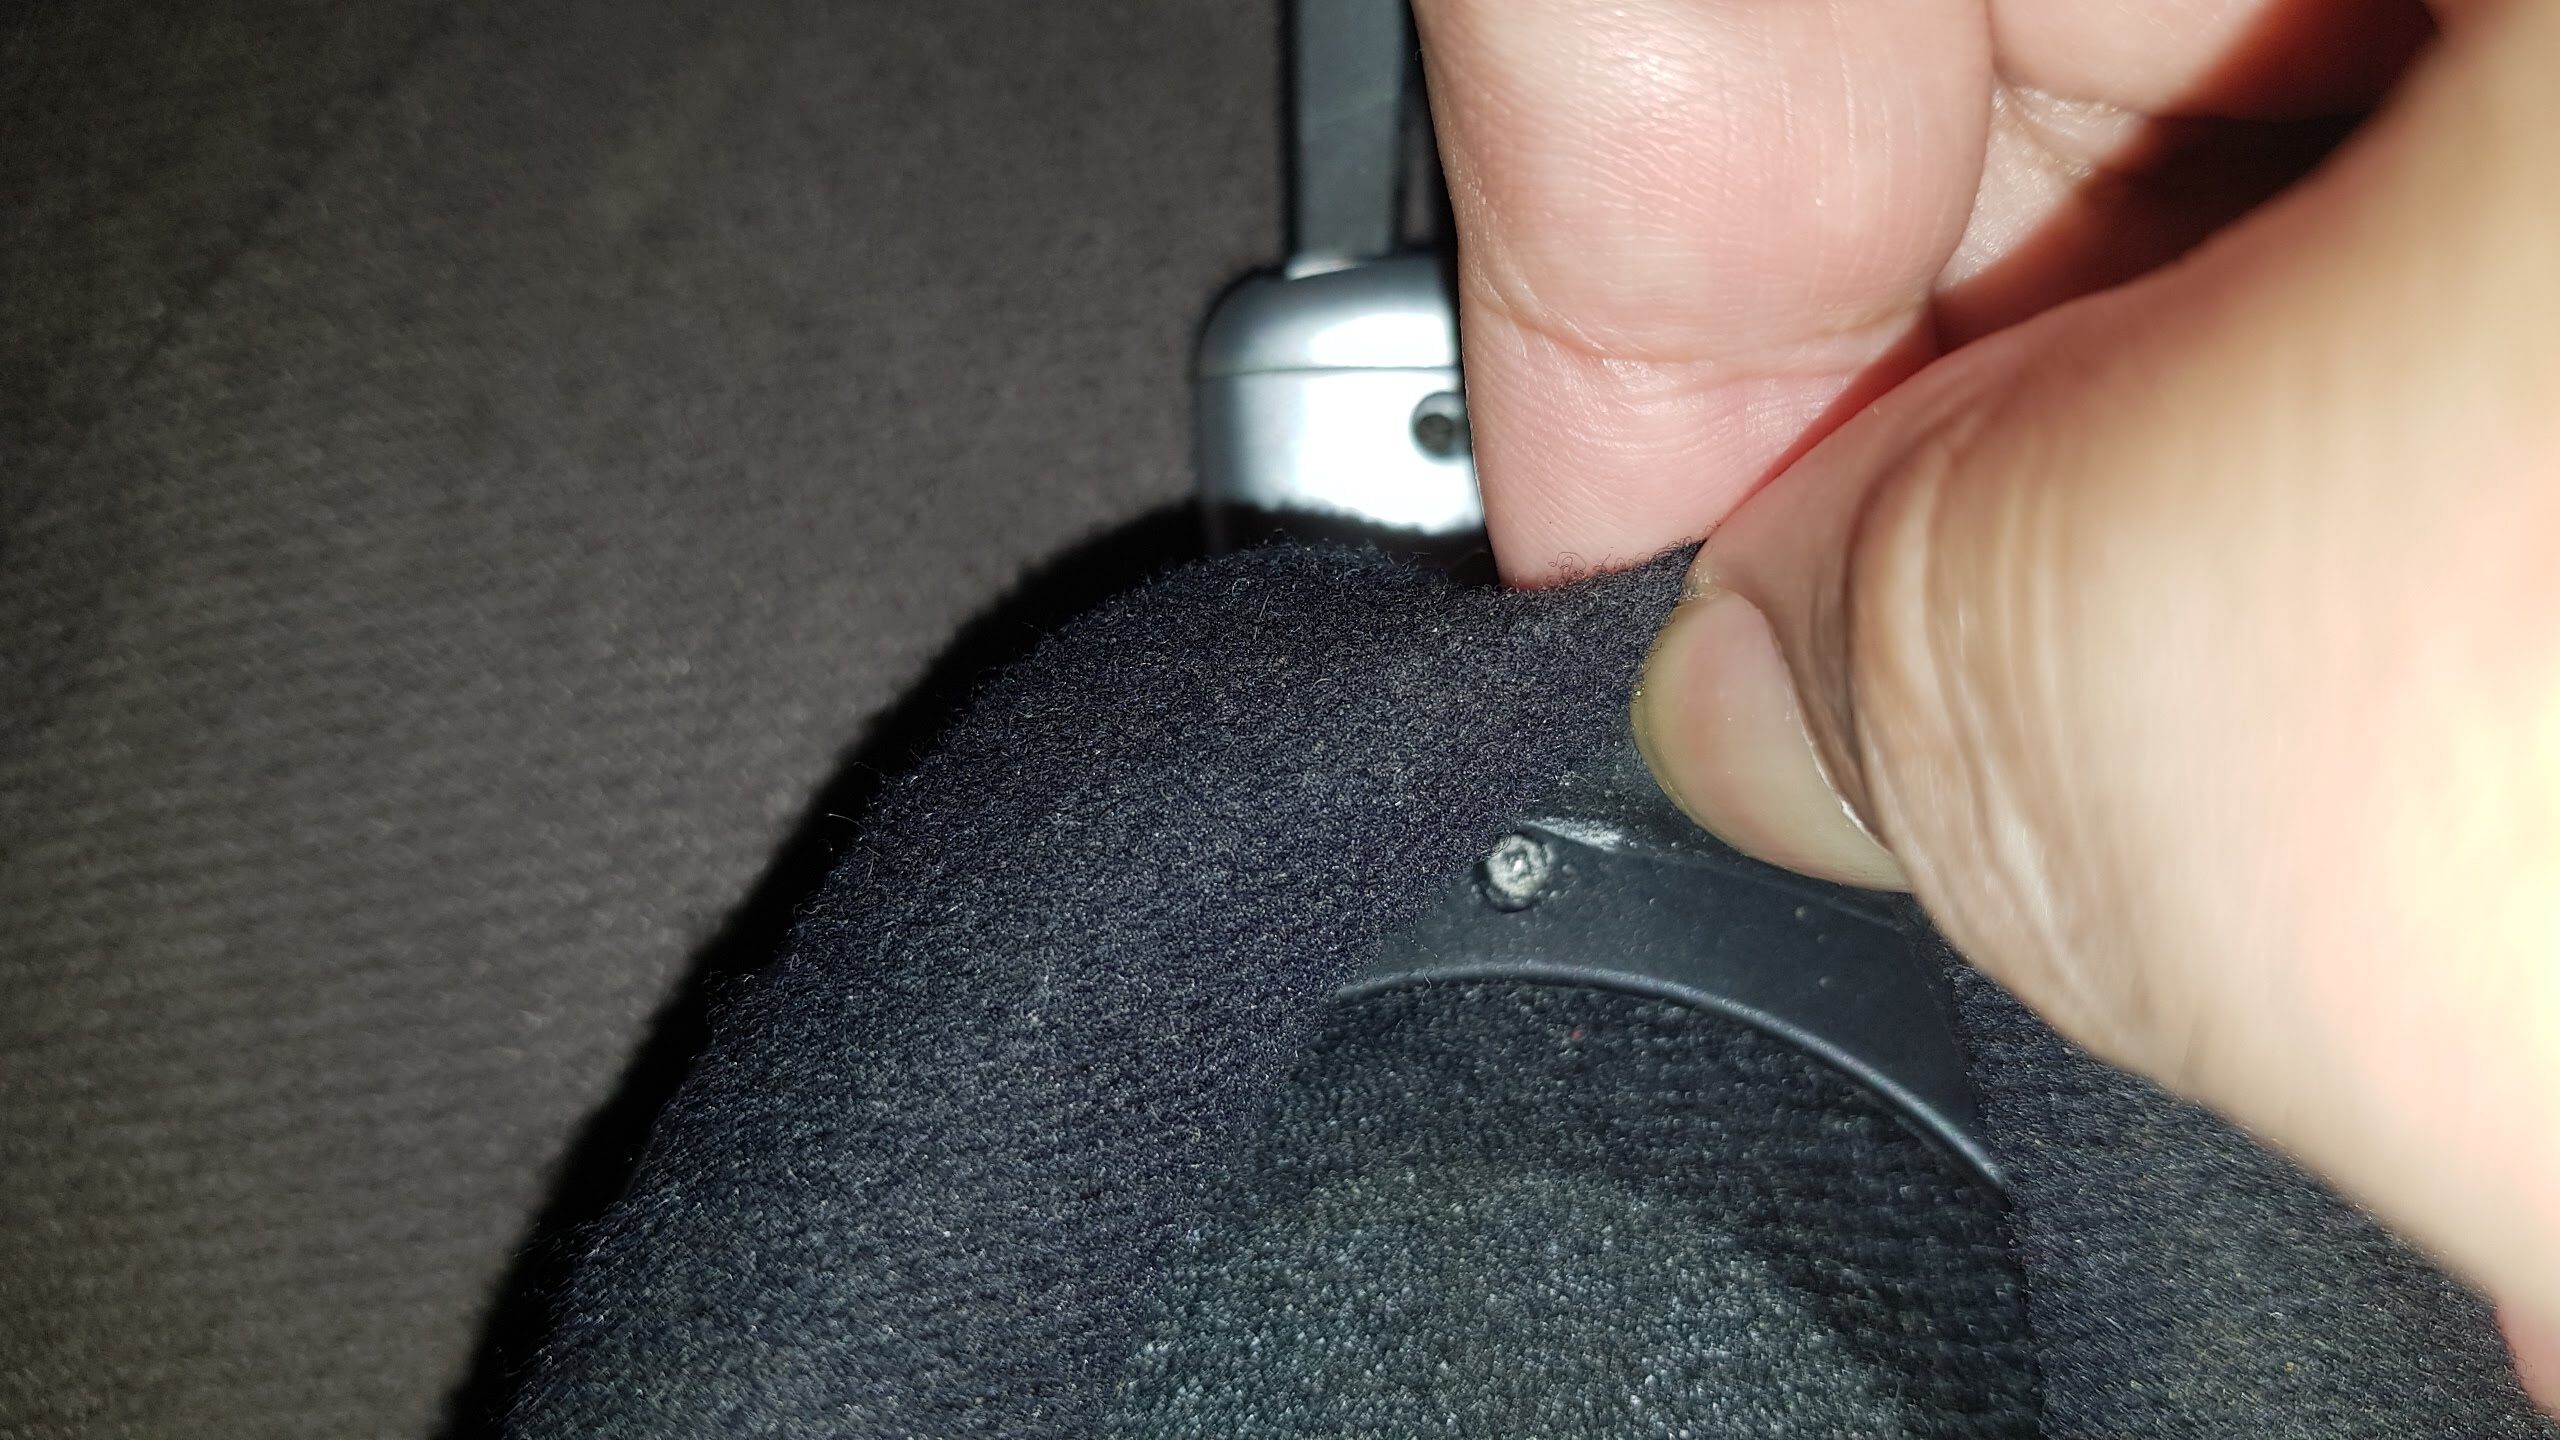
There are three micro screws under the foam padding, undoing those allows you to remove the padding.
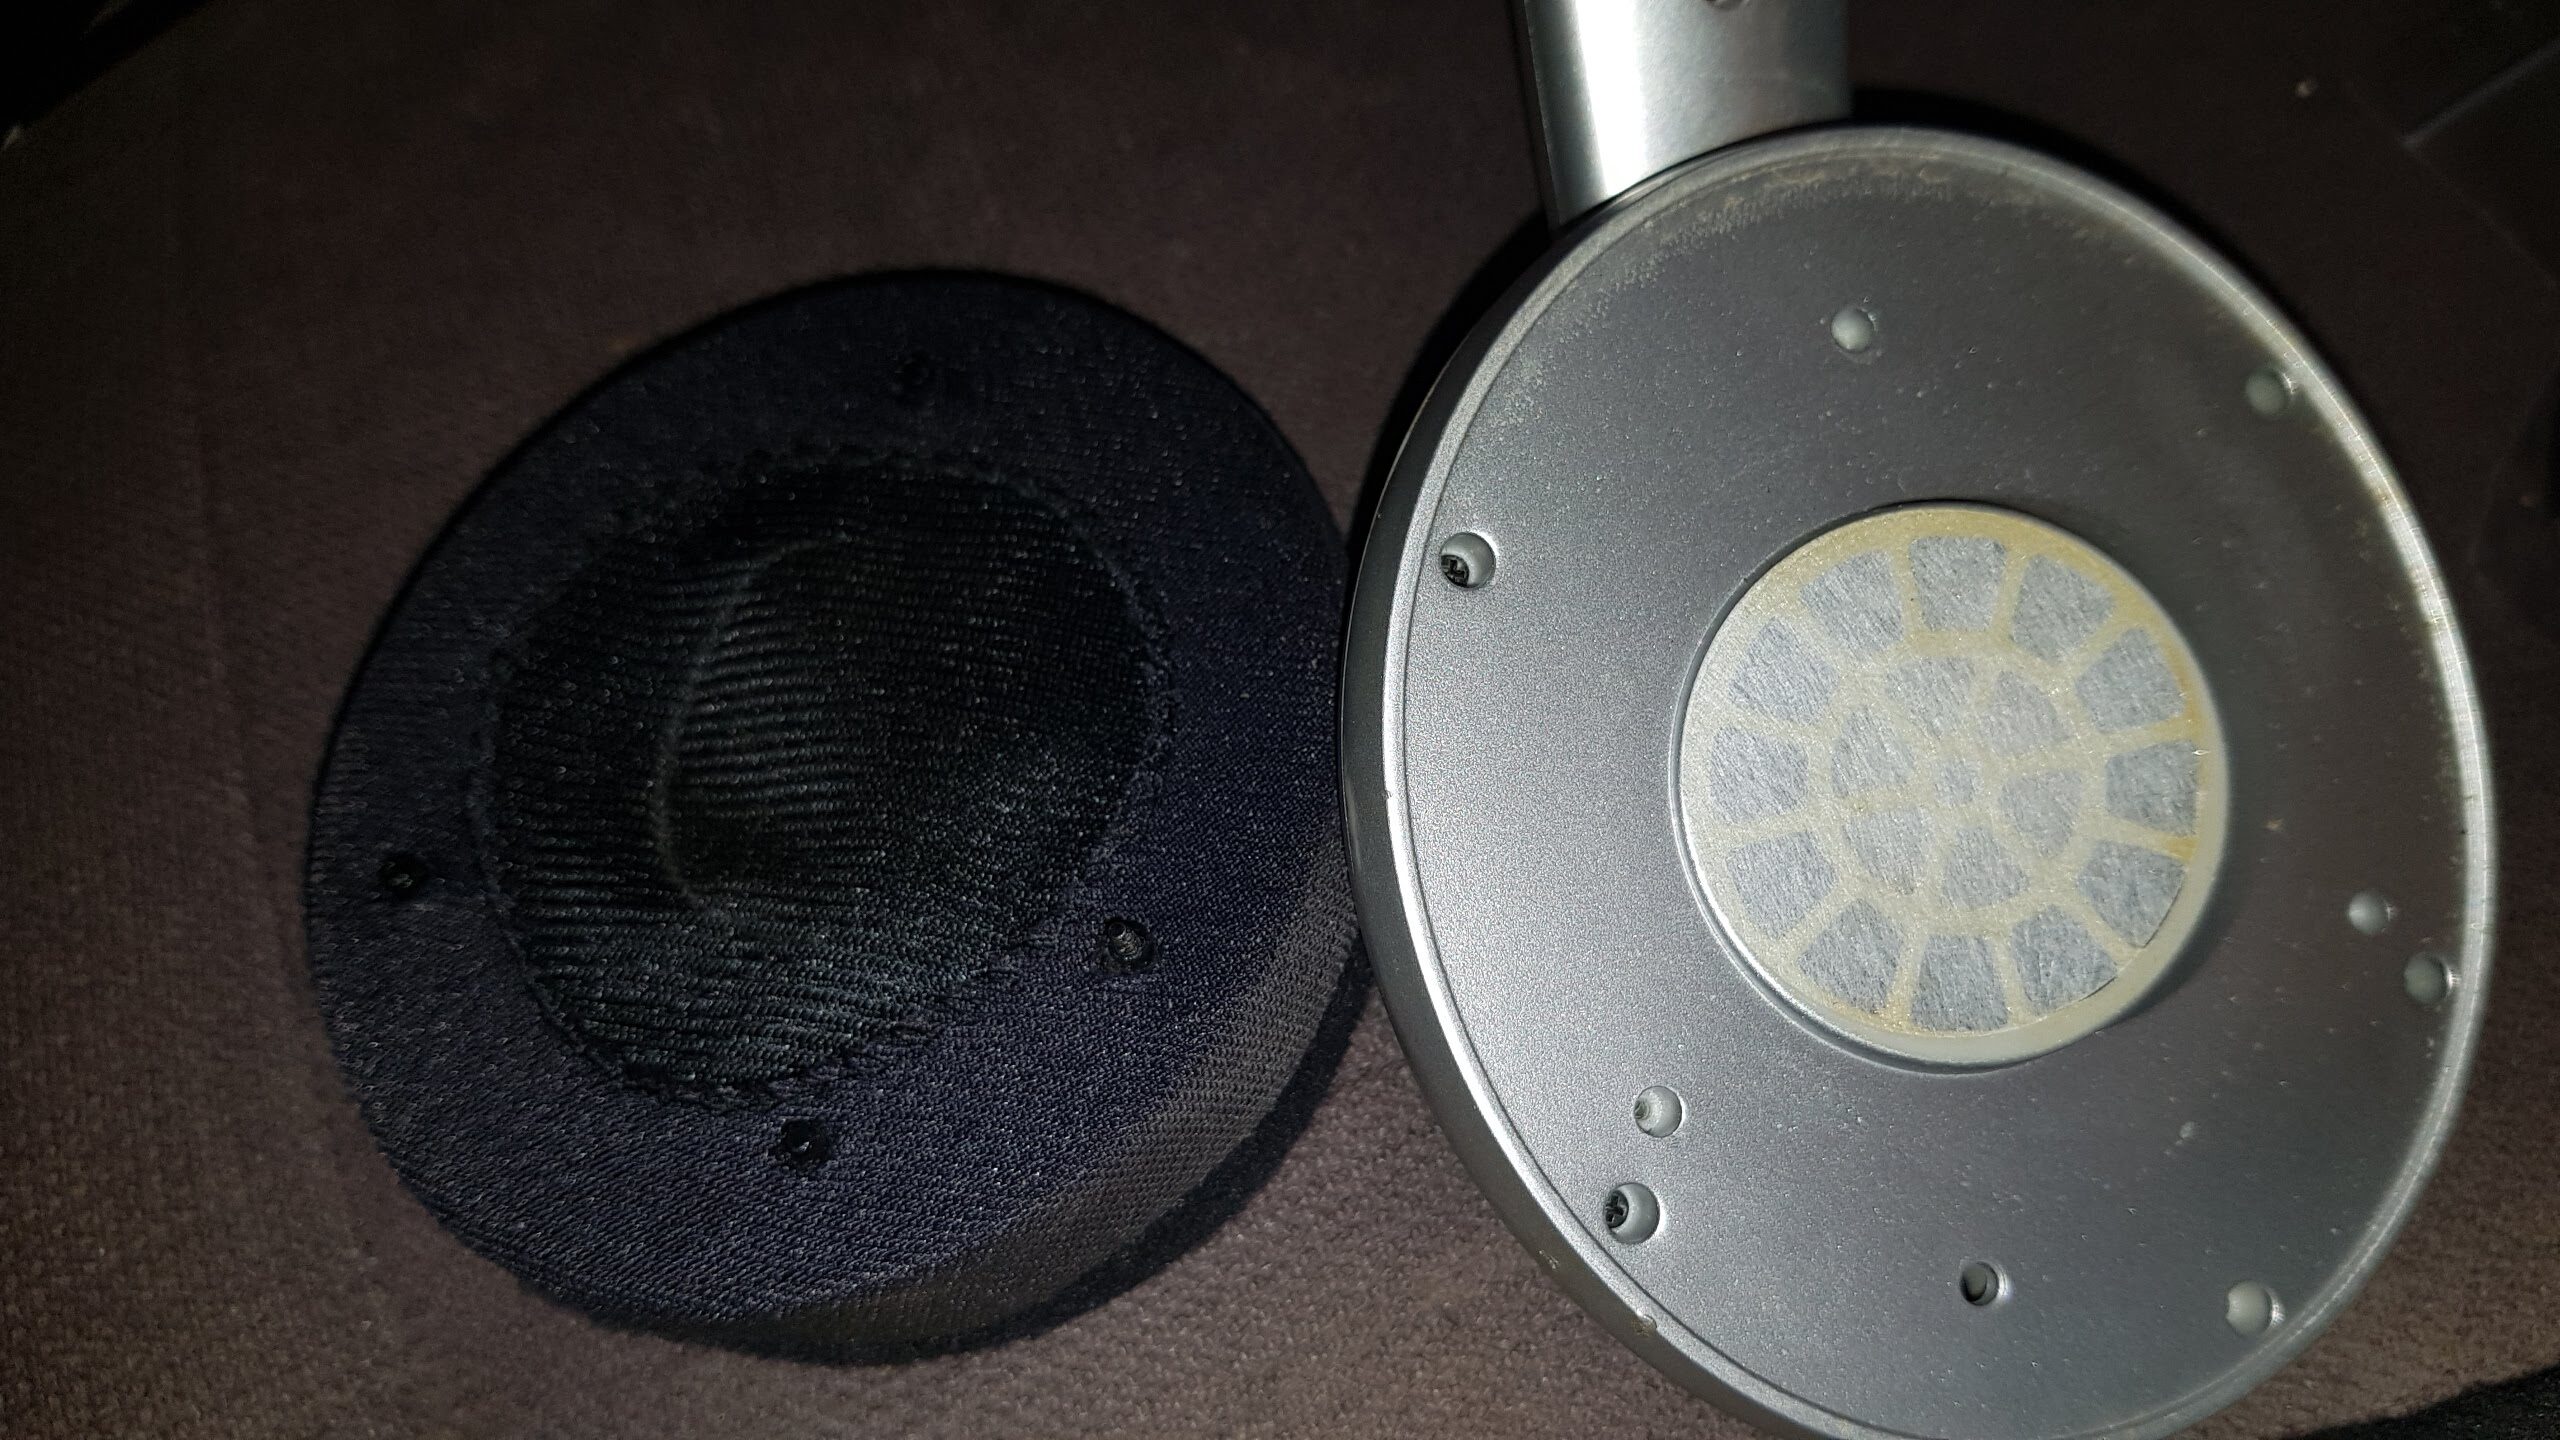
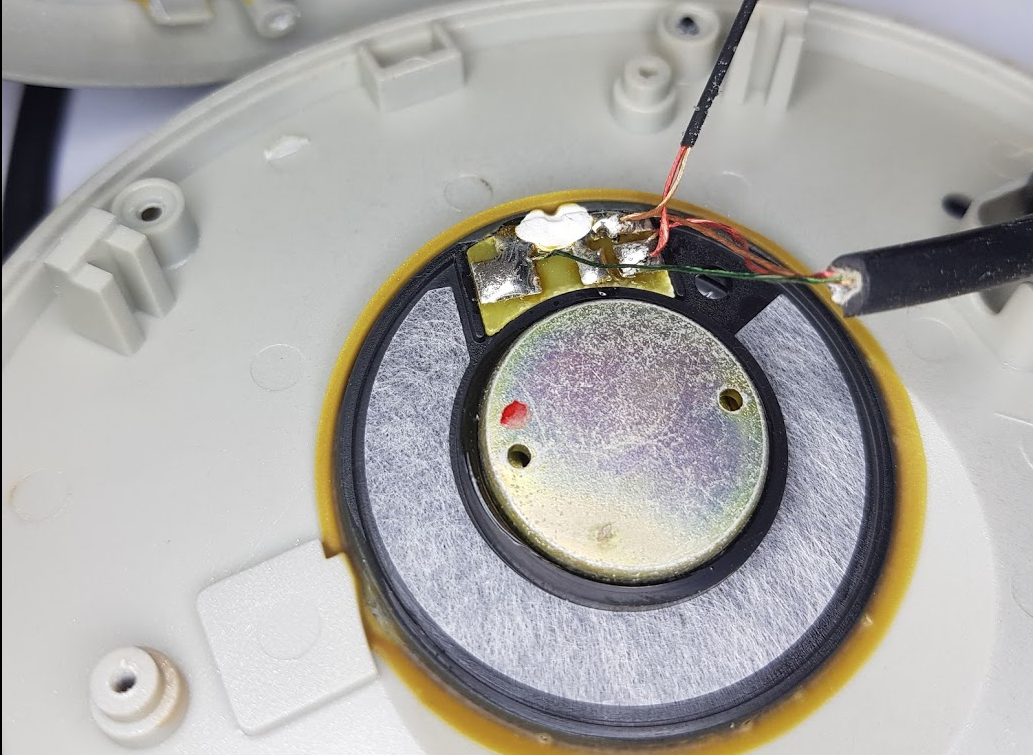
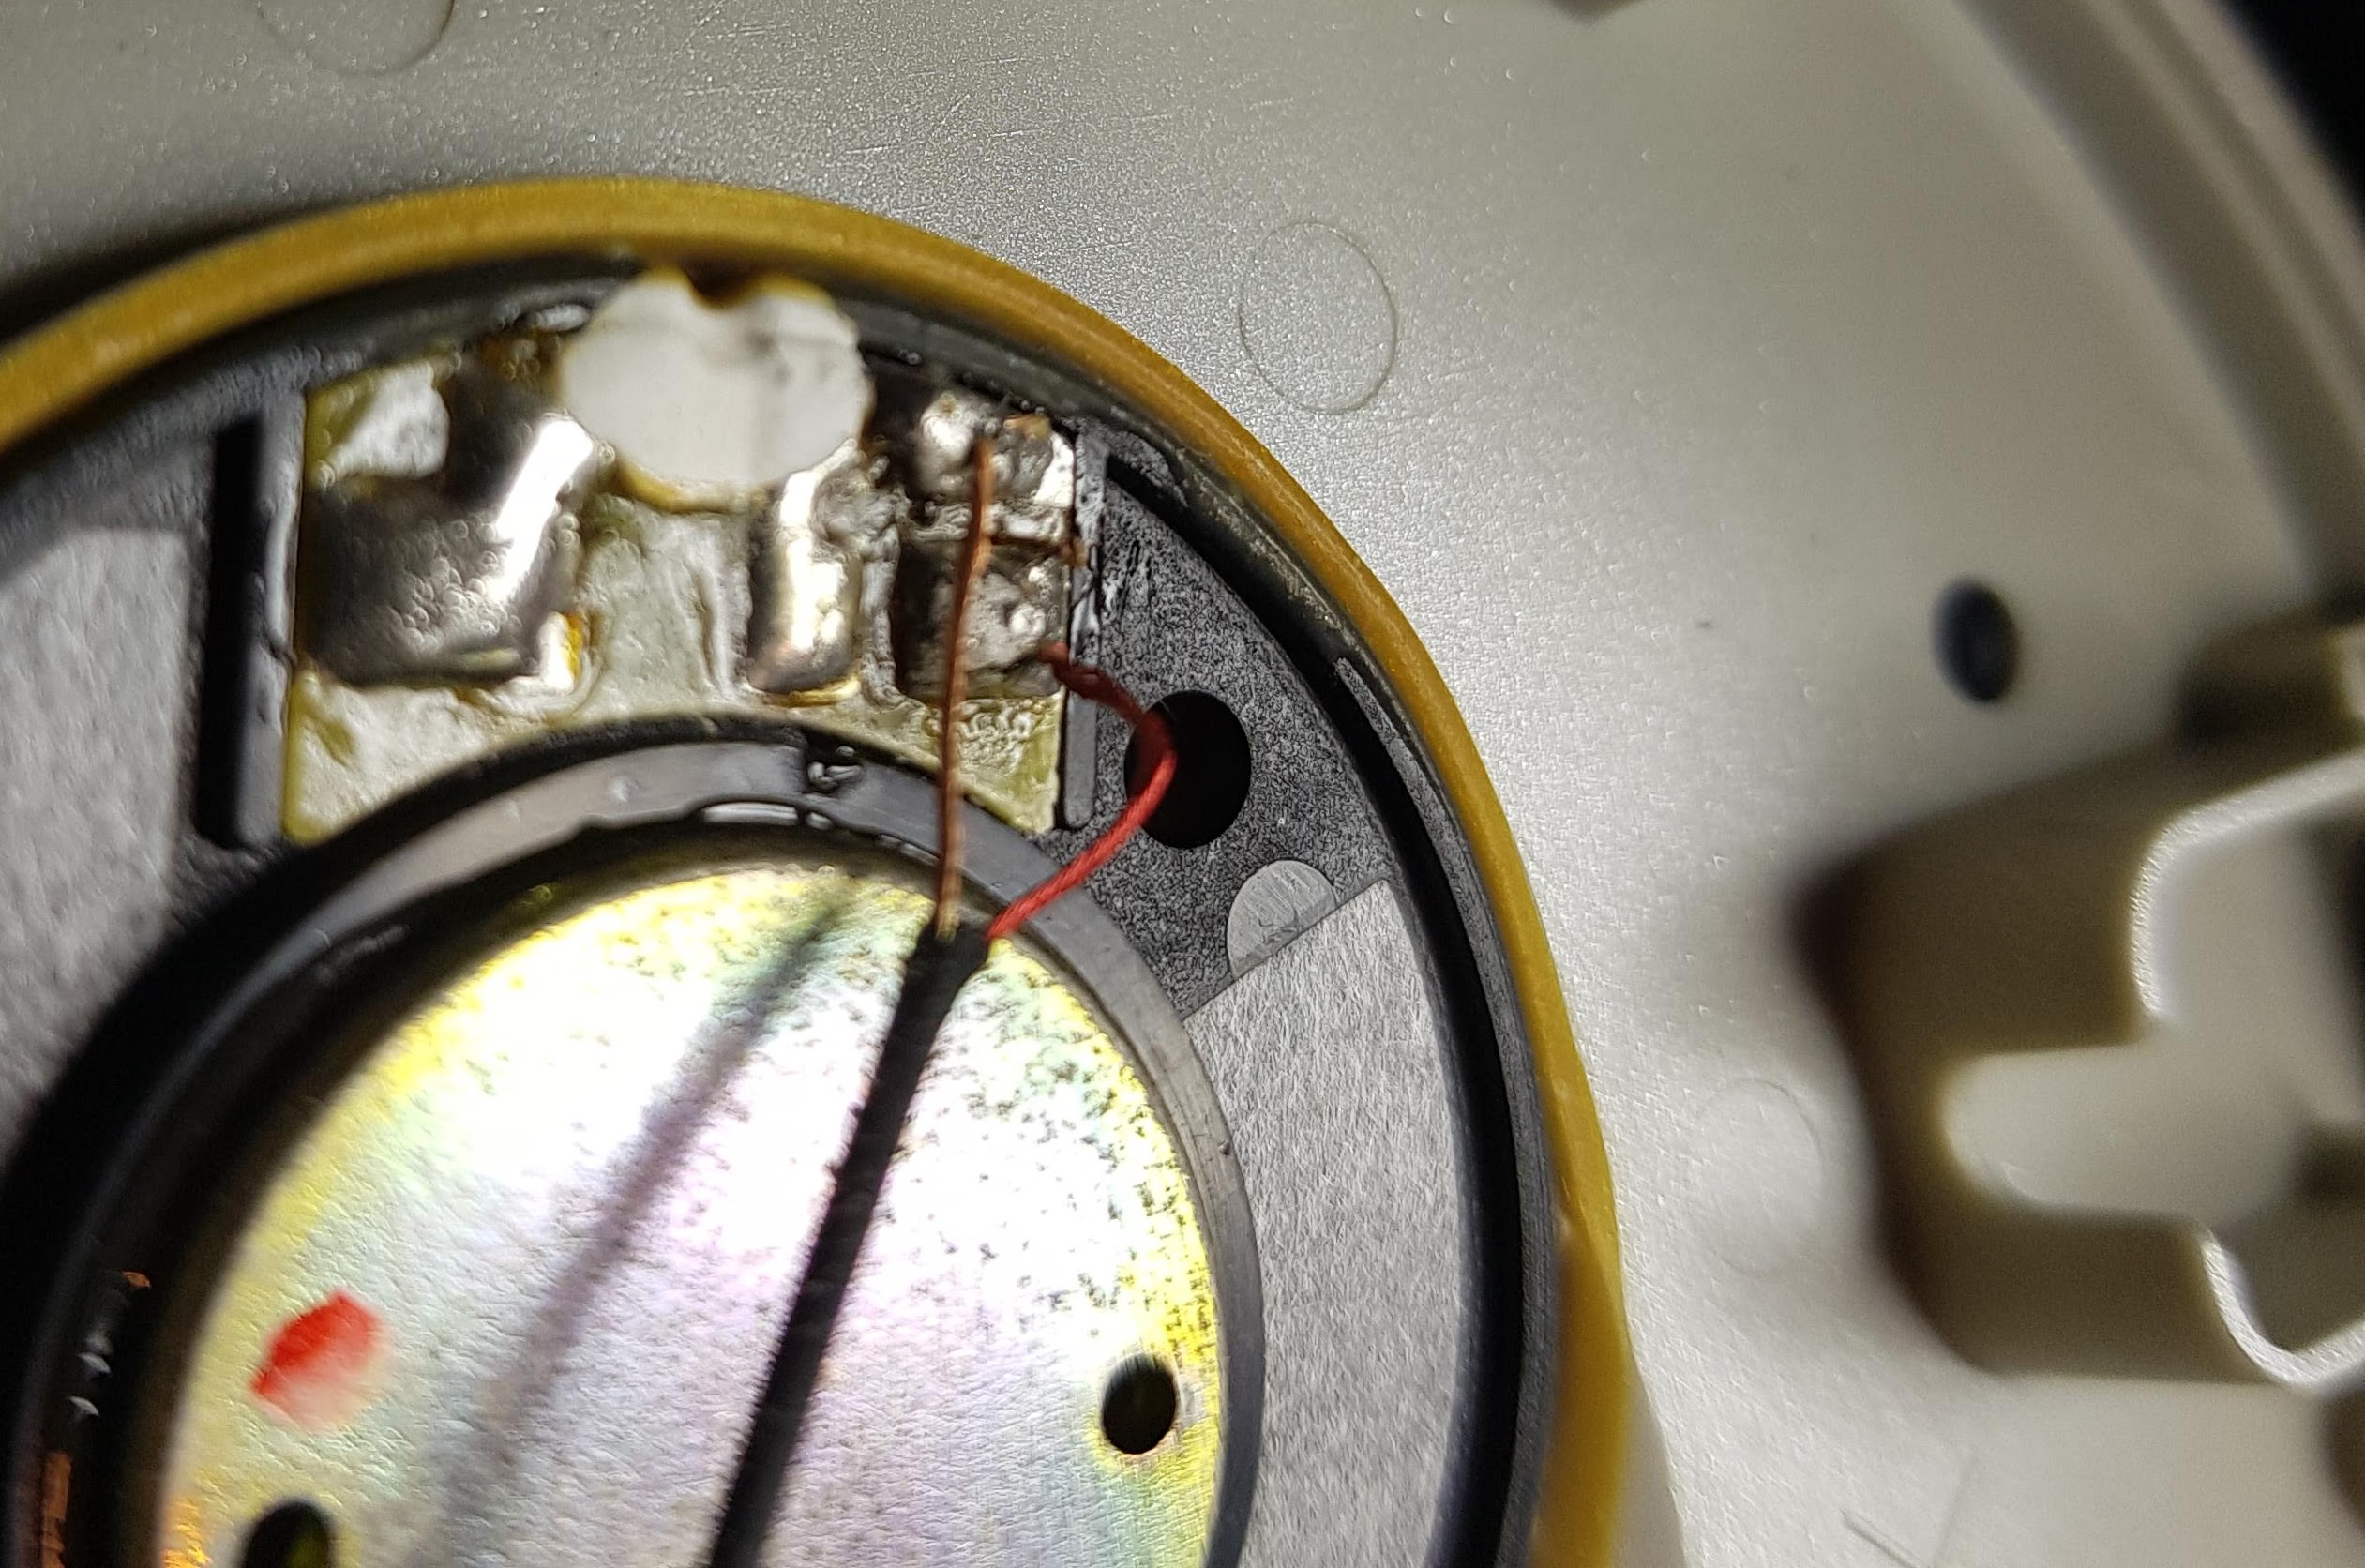
Removing another 4-screws then reveals the back of the driver and the wiring.

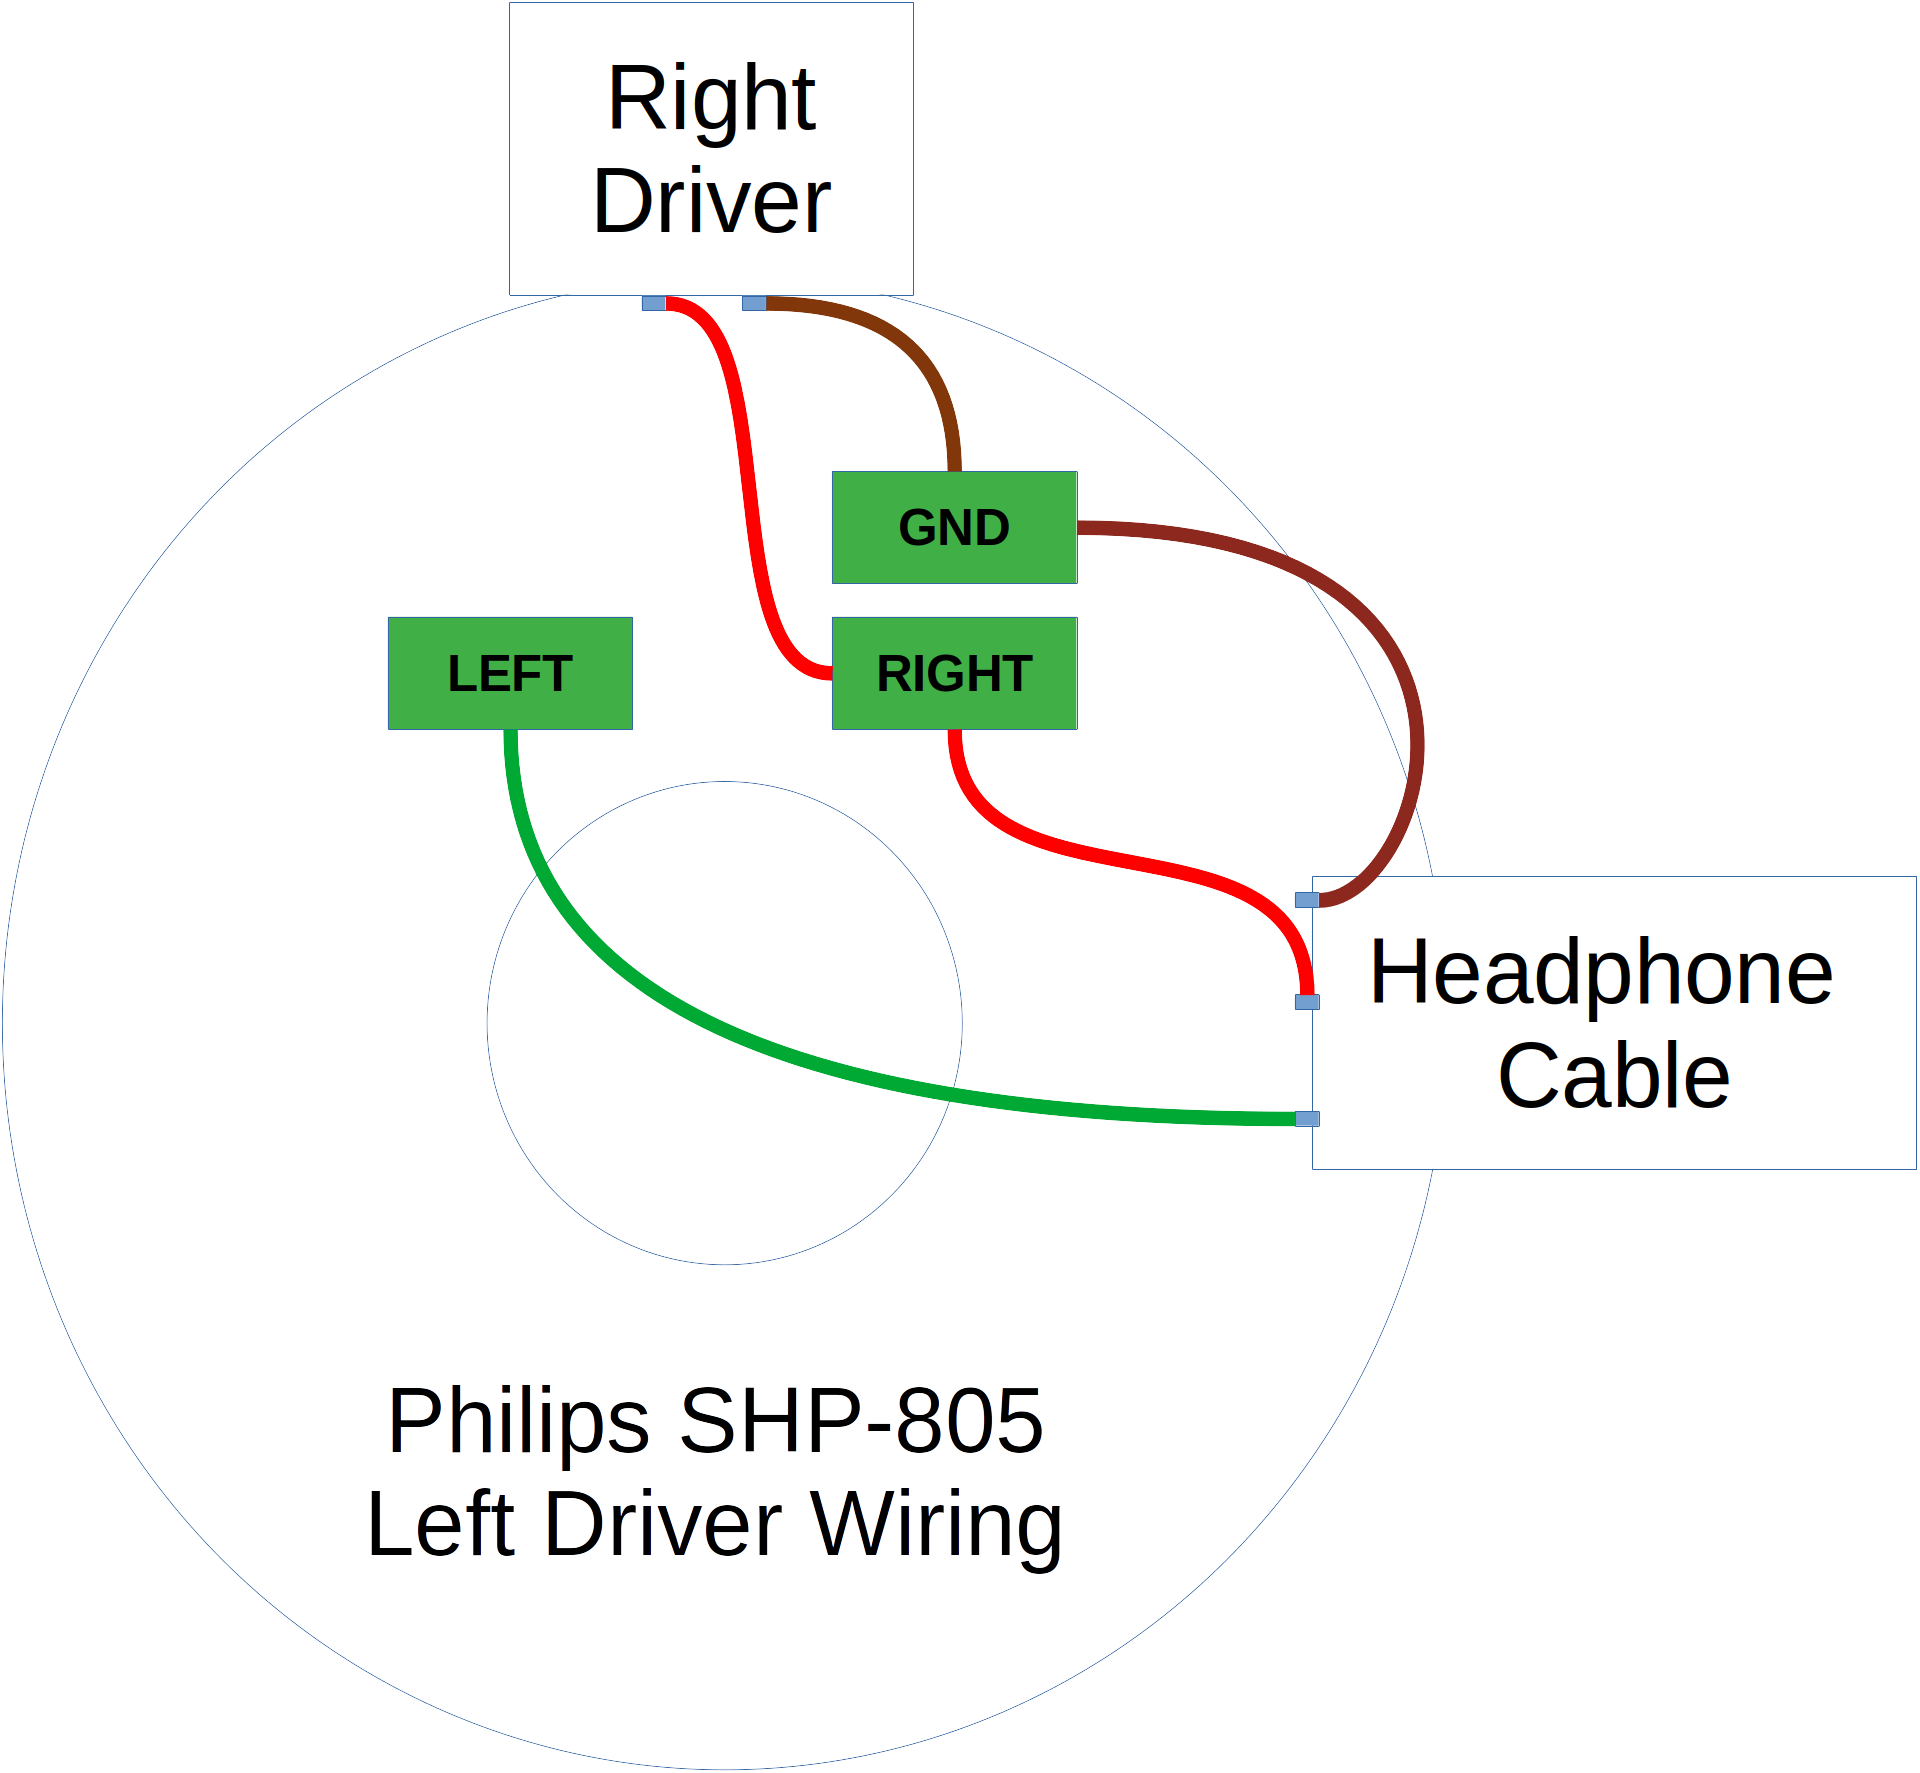
There are huge solder pads where the headphone cable attaches to, and also the wires that lead to the other (right side) driver. These headphones are just asking to be DIY’ed !
So all I need is to get is a 4-core cable, solder a TRRS plug on one end, solder the Audio Left and Right and Ground wires to the existing points in the Philips SHP-805 headphones, and then solder the wires from my microphone to Ground and Microphone wires.
I was looking for a good cheap headphone replacement cable, when I realized I could improve the design a lot by getting these two items instead:
-
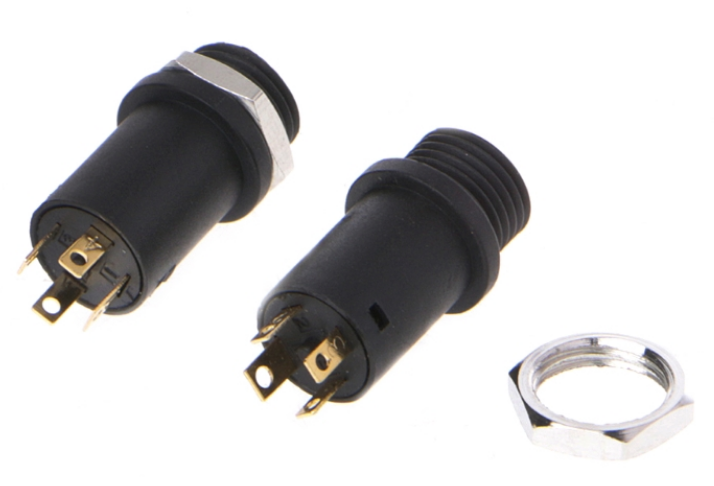
A TRRS socket for MYR5.85 (USD1.42) from https://shopee.com.my/product/135044635/2497339846. I get 10 pieces for this price.
-
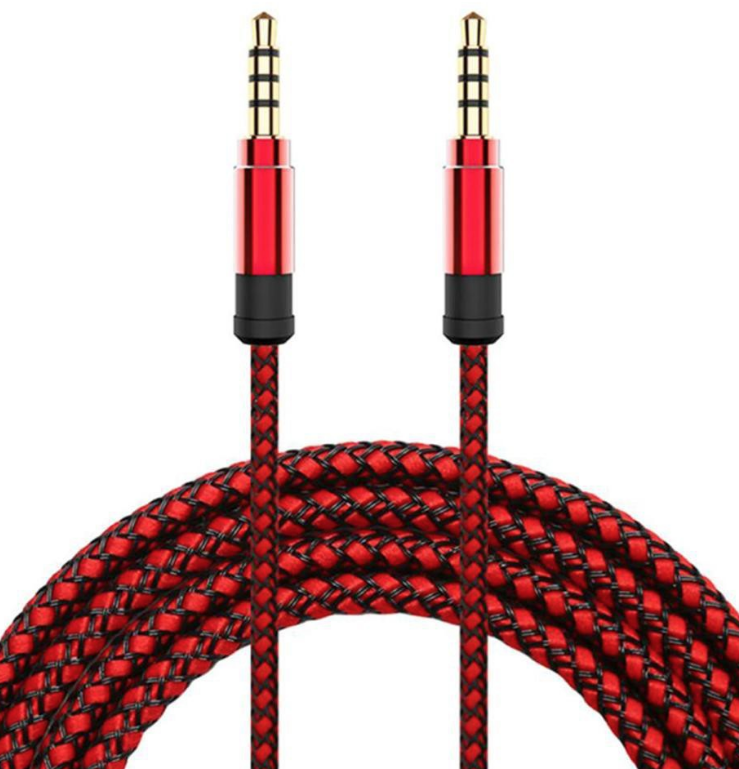
A 1.5m TRRS cable MYR5.64 (USD1.37) from https://shopee.com.my/product/238610935/7647757273.
Here’s my final design:
And so work begins …
I measured the resistances between different points (Speaker and microphone drivers essentially let current through, so there is little point in measuring with continuity). Here’s what I measured for my equipment:
- GND-LEFTAUDIO = 37Ω
- GND-RIGHTAUDIO=37Ω
- GND-MIC=1.7KΩ
This will help me verify the connections later.
I also documented the pads in the headphones:
The first step, is to cut off the wires to the headphone cable and remove the cable from the headphones. The cable to the Right Driver should be left as it is.
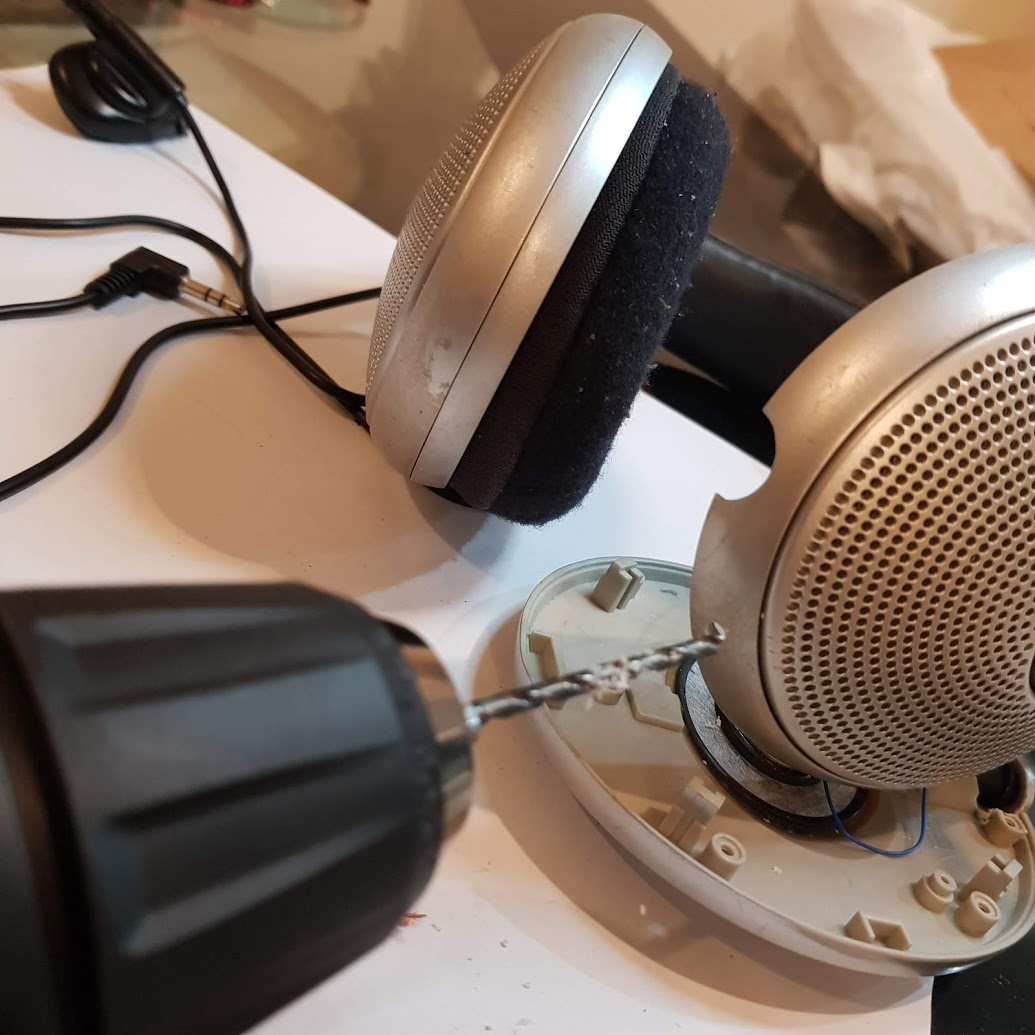
The TRRS socket needs to be fitted into the hole where the cable entered the headphones:
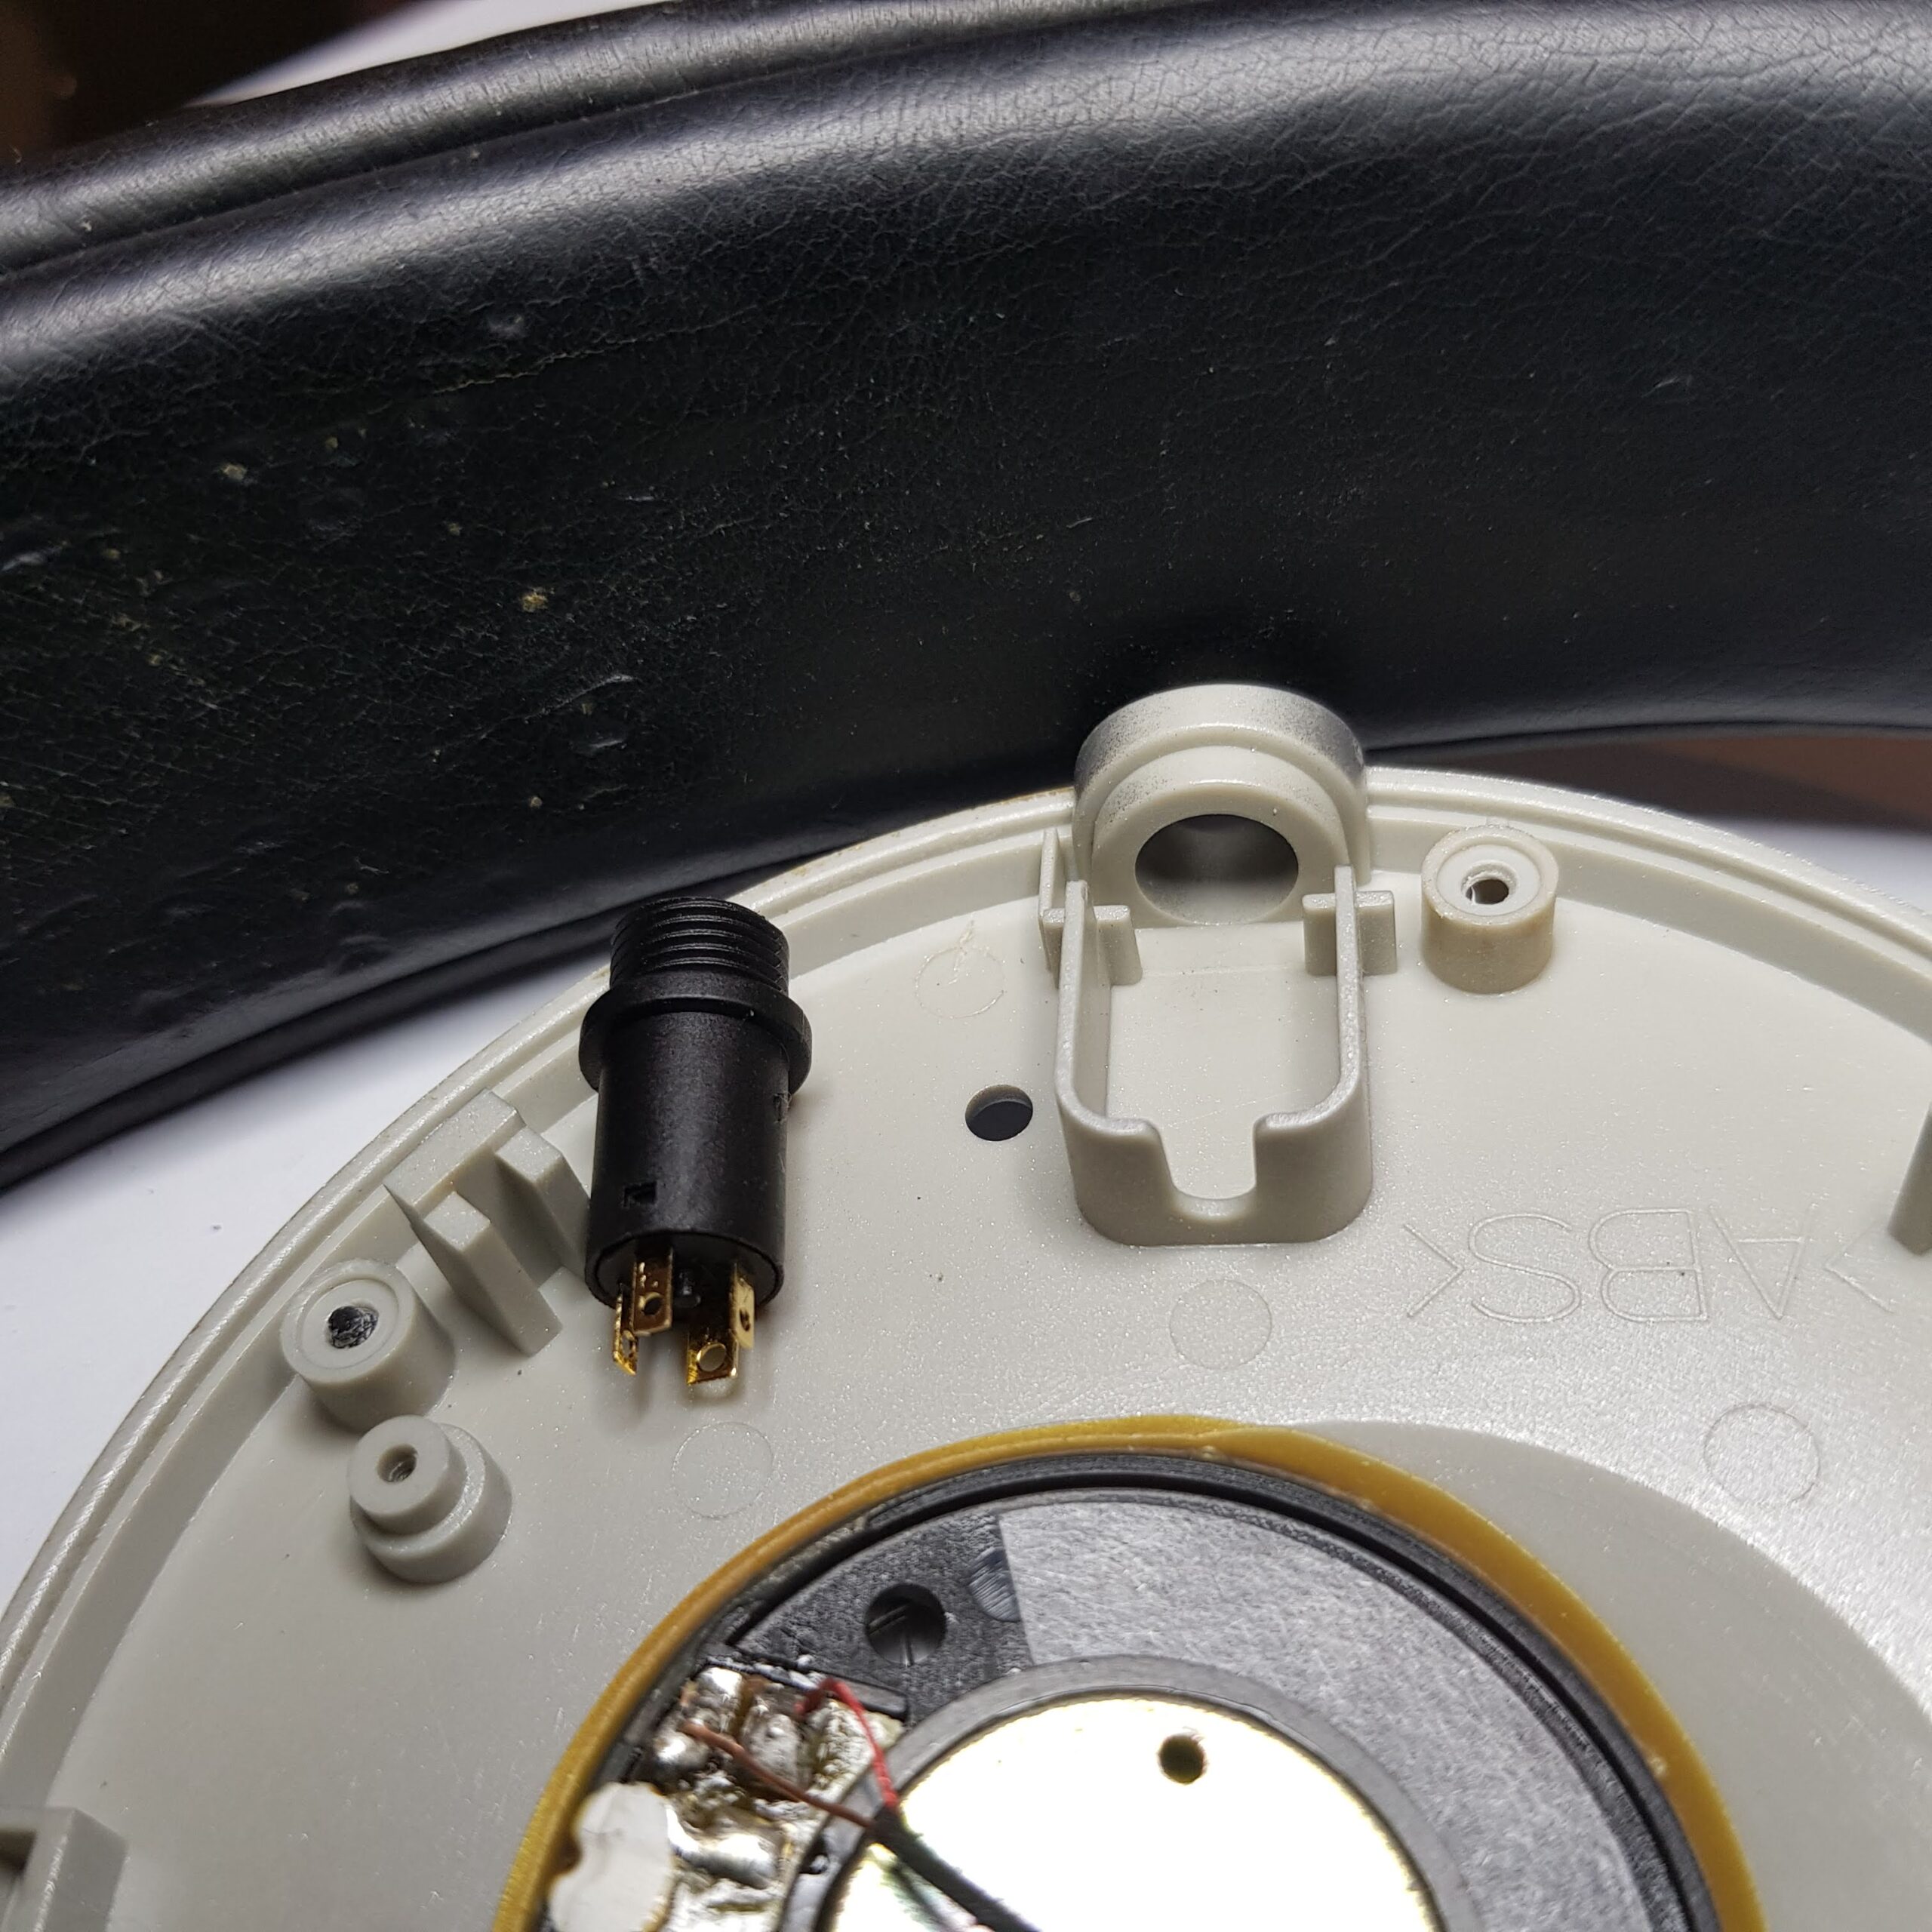
The existing hole needs to be made slightly wider, the rim needs to be made tinner, and the extra plastic trim needs to be removed. I dug my Rotary Tool out of storage, and fitted a grinding stone:
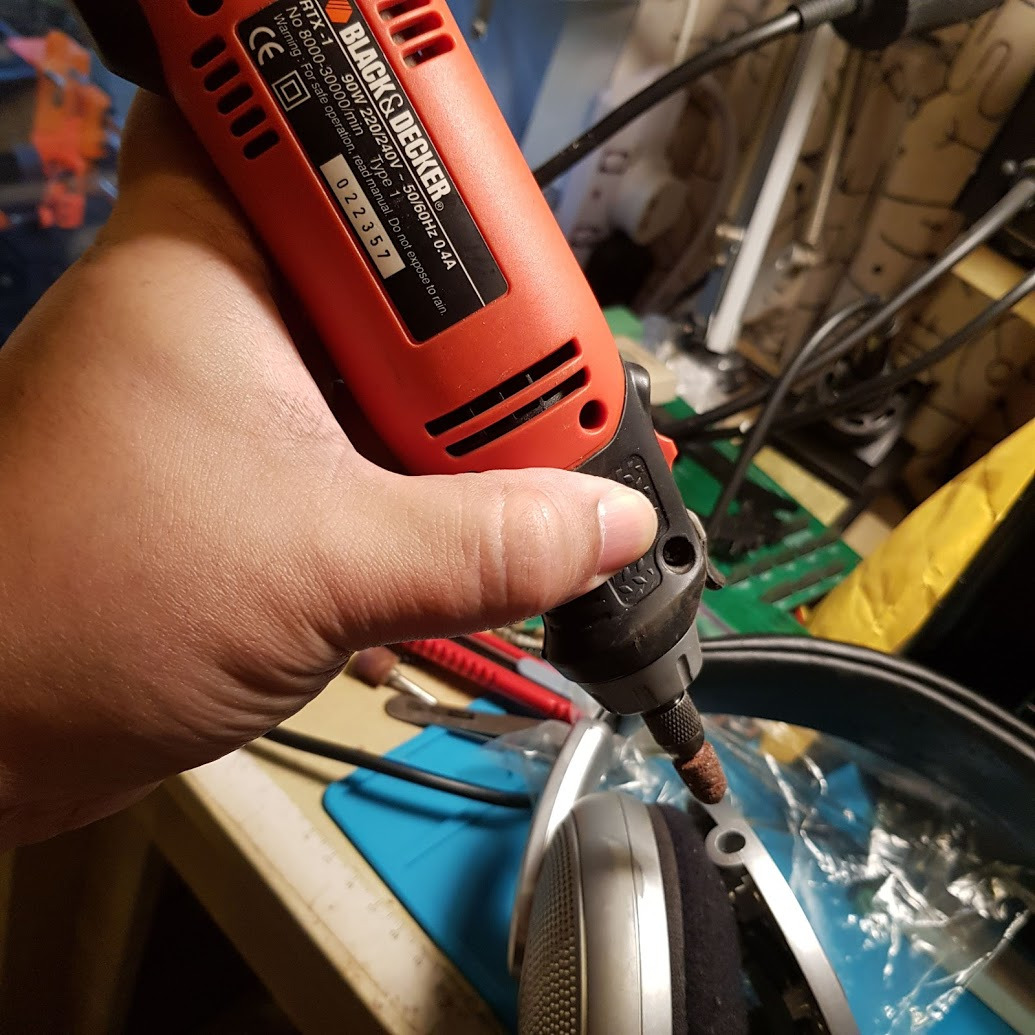
The ABS material on the Philips SHP-805 is of really good quality … I was scared it would be brittle and crack easily, but that did not happen. For the hole my grinding stone was a bit too big, and so to avoid ruining the outside, I used a semi-circular file instead.
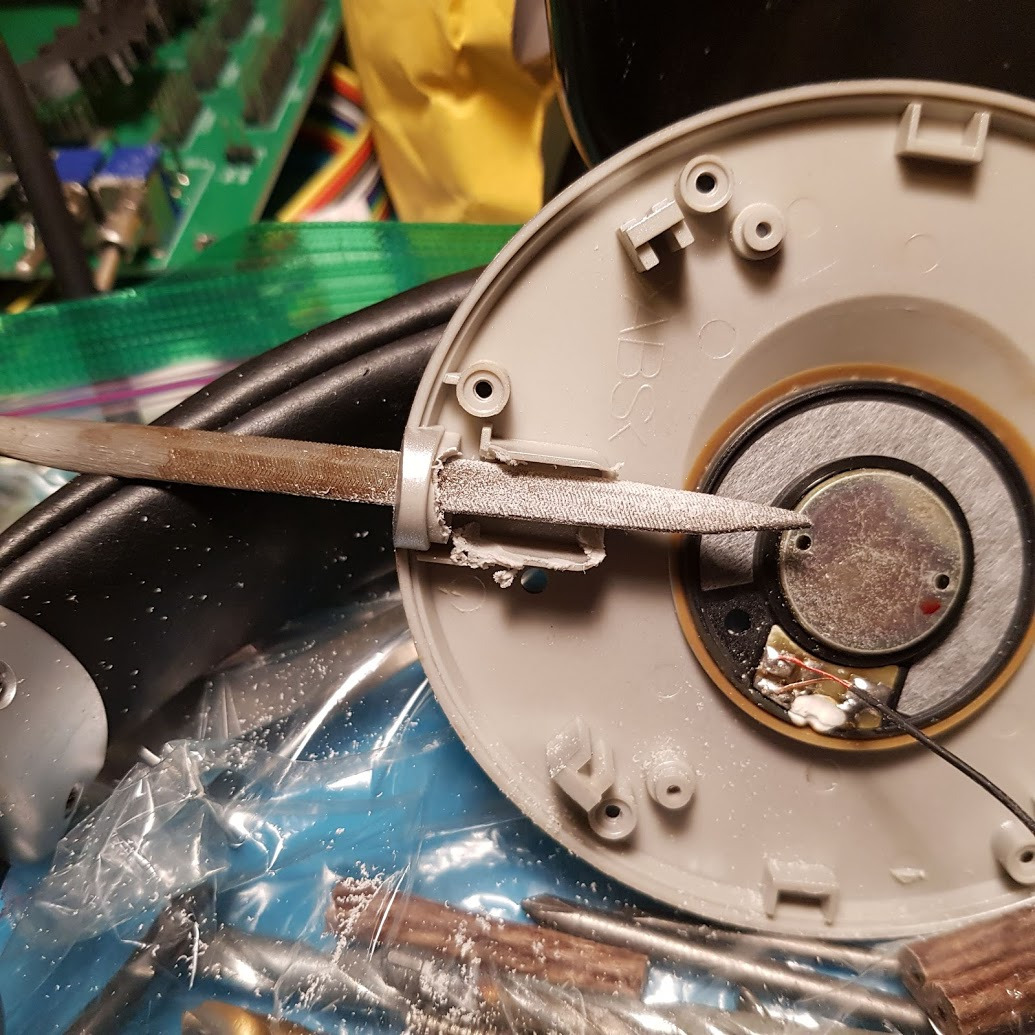
It’s ugly but then this is on the inside.
I could not get enough of the TRRS socket to stick outside the headphones to be able to attach a securing nut. I would have to shave off even more of the circular trim on the headphones making it very thin, and I was scared it would break with the strain of a lot of usage. So instead I decided to just hot-glue the TRRS socket into place later. It looks good from the outside:

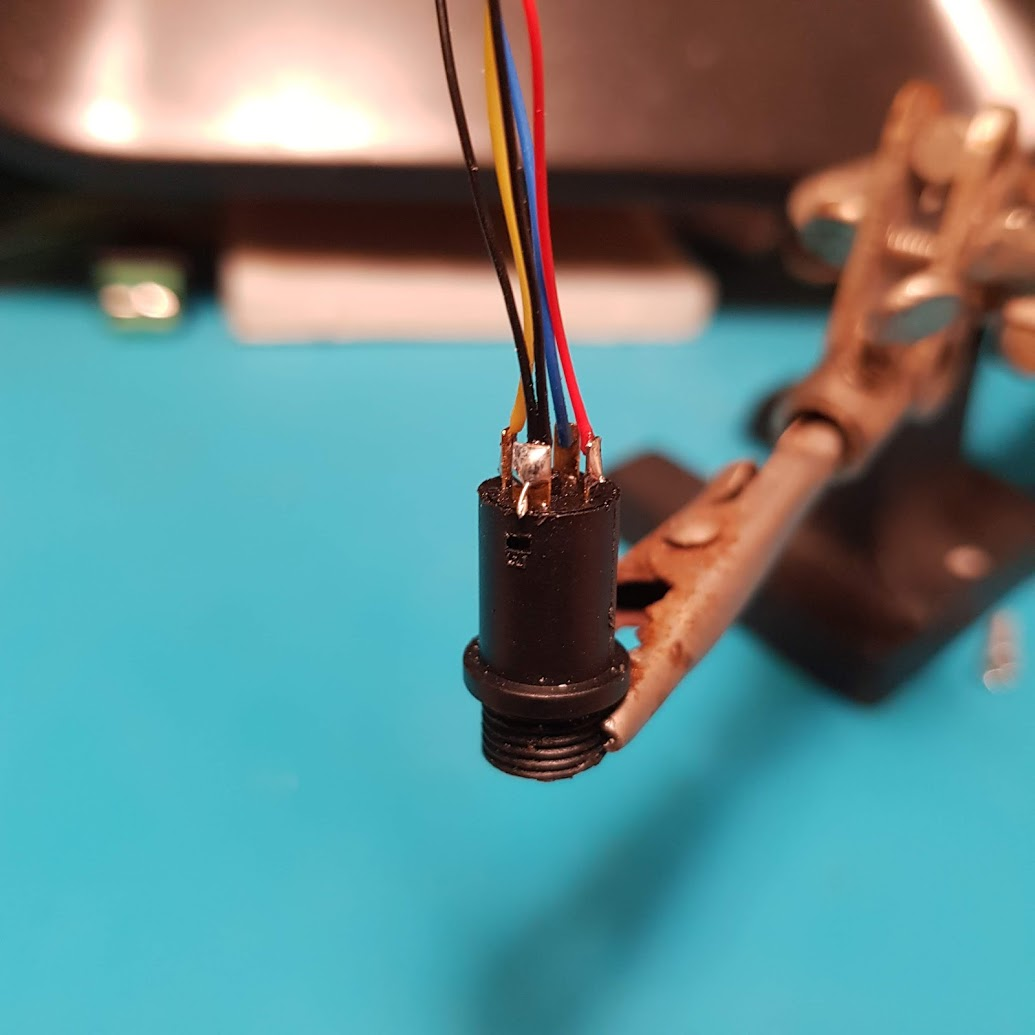
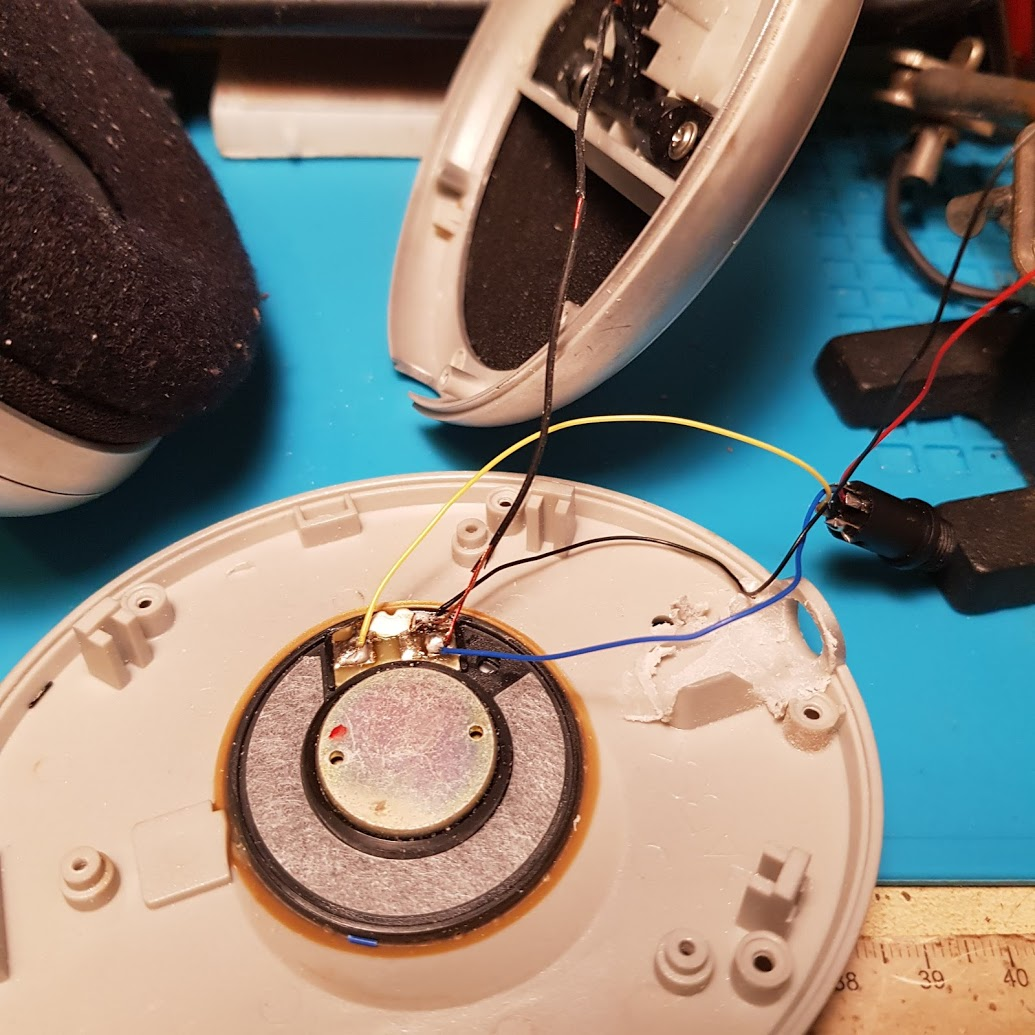
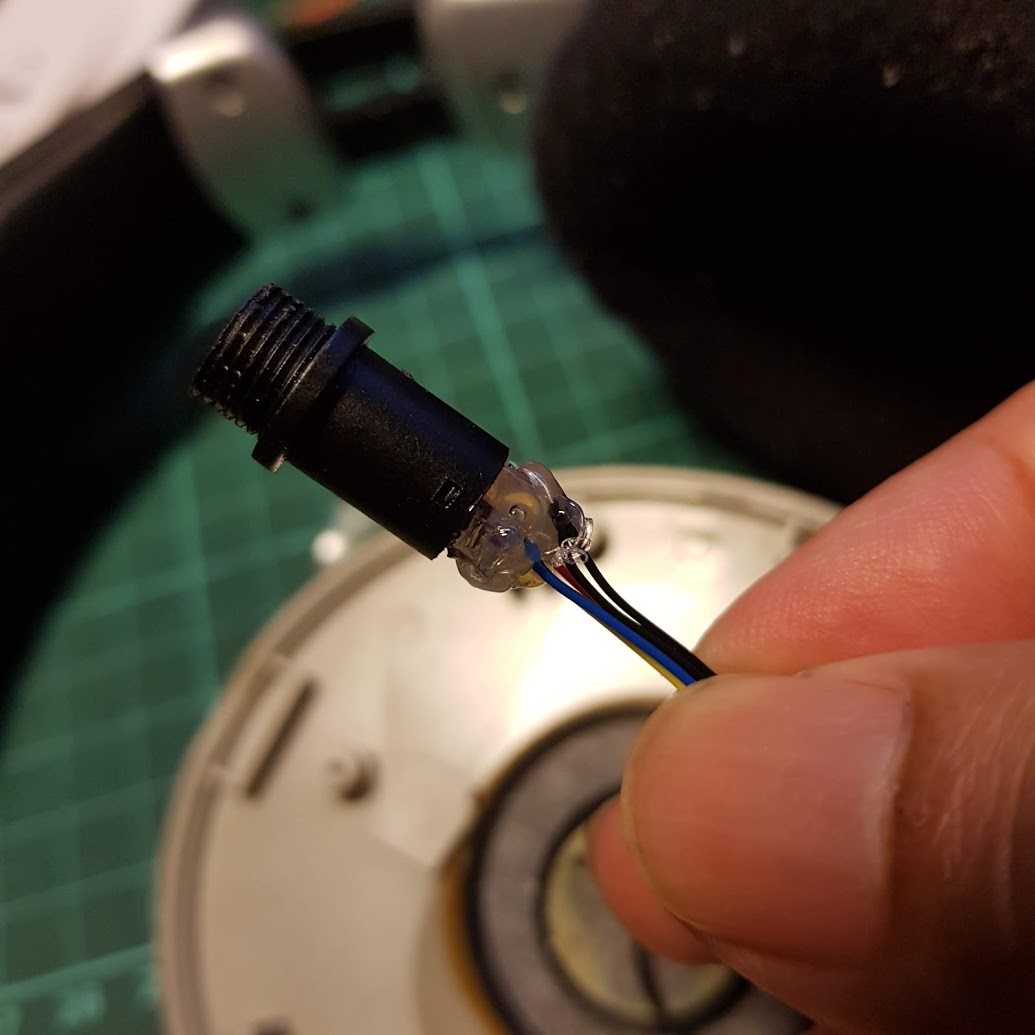
I plugged in the TRRS cable into the socket, and used a multi-meter to determine which terminal connects to which part of the cable:
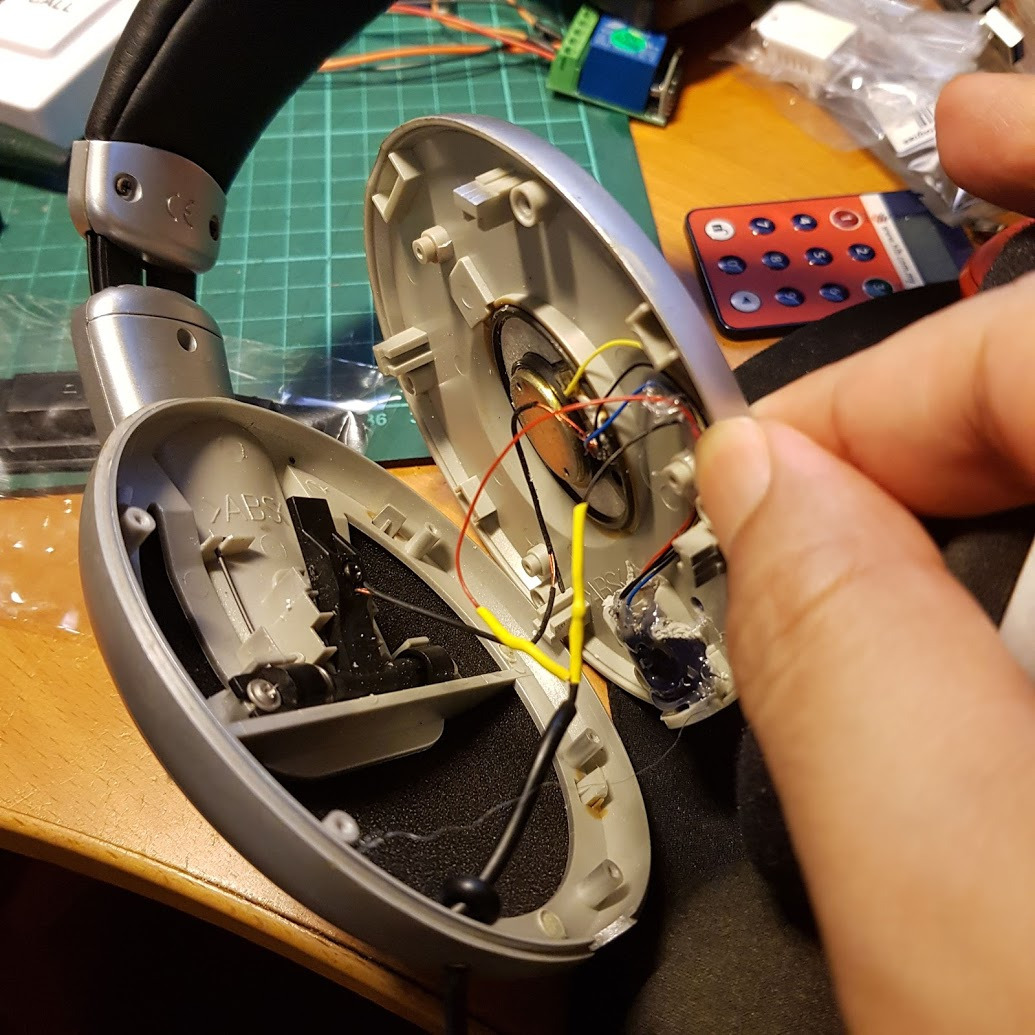
I then soldered wires to each one. I used some 28-30 AWG wire for this. For Ground I soldered two wires, as one needs to go to the headphones and another to the microphone.
(Note: black and red wires were reversed in the photo above, and have since been corrected). The other end of the cables were then soldered to the pads on the driver:
I decided to test if the headphones still work … plugged the cable in to my phone, and started playing some music … WE HAVE SOUND !
Next was the microphone:

I tried cutting the headband off with some wire cutters, but it was too hard. I swapped the grinding stone on the rotary tool for a cutting disc, and had a go.
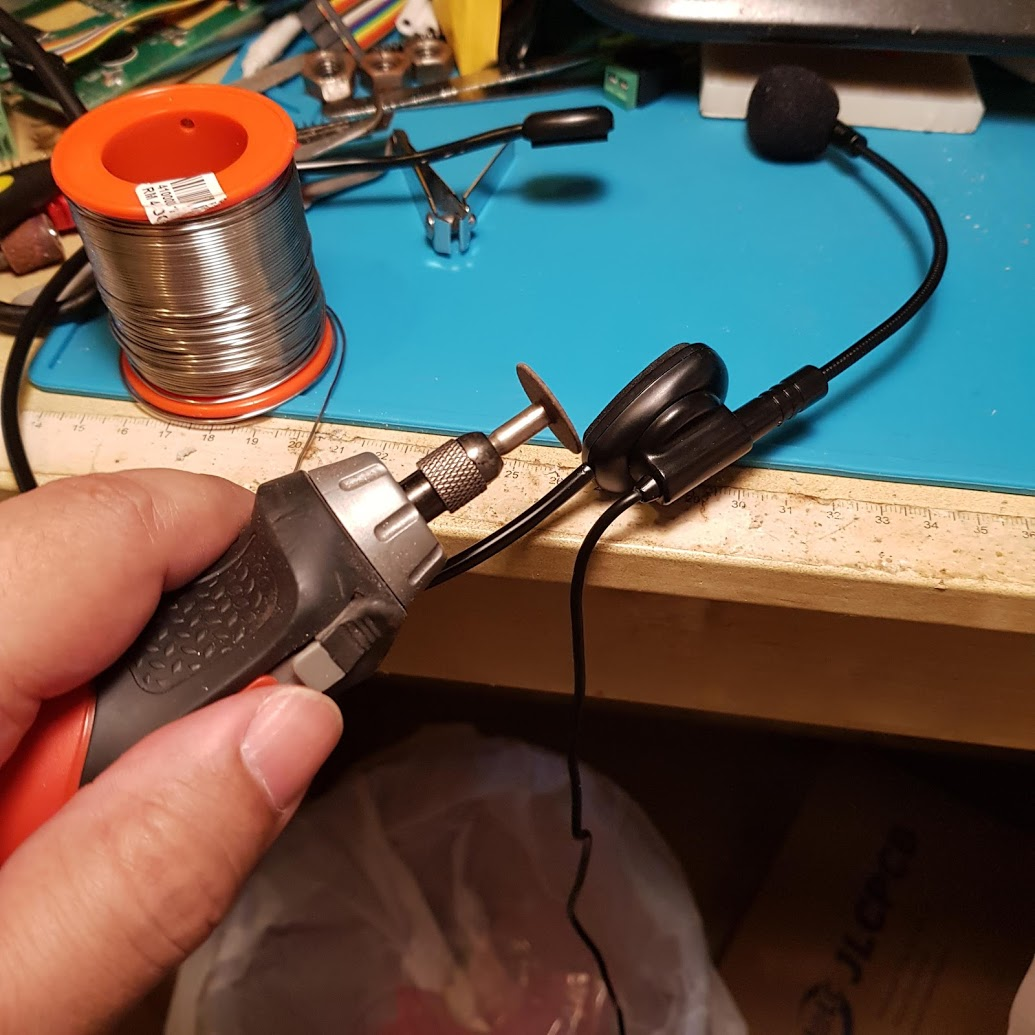
Sparks flew and in the end it came off. A bit ugly, so i covered it with some black electrical tape.
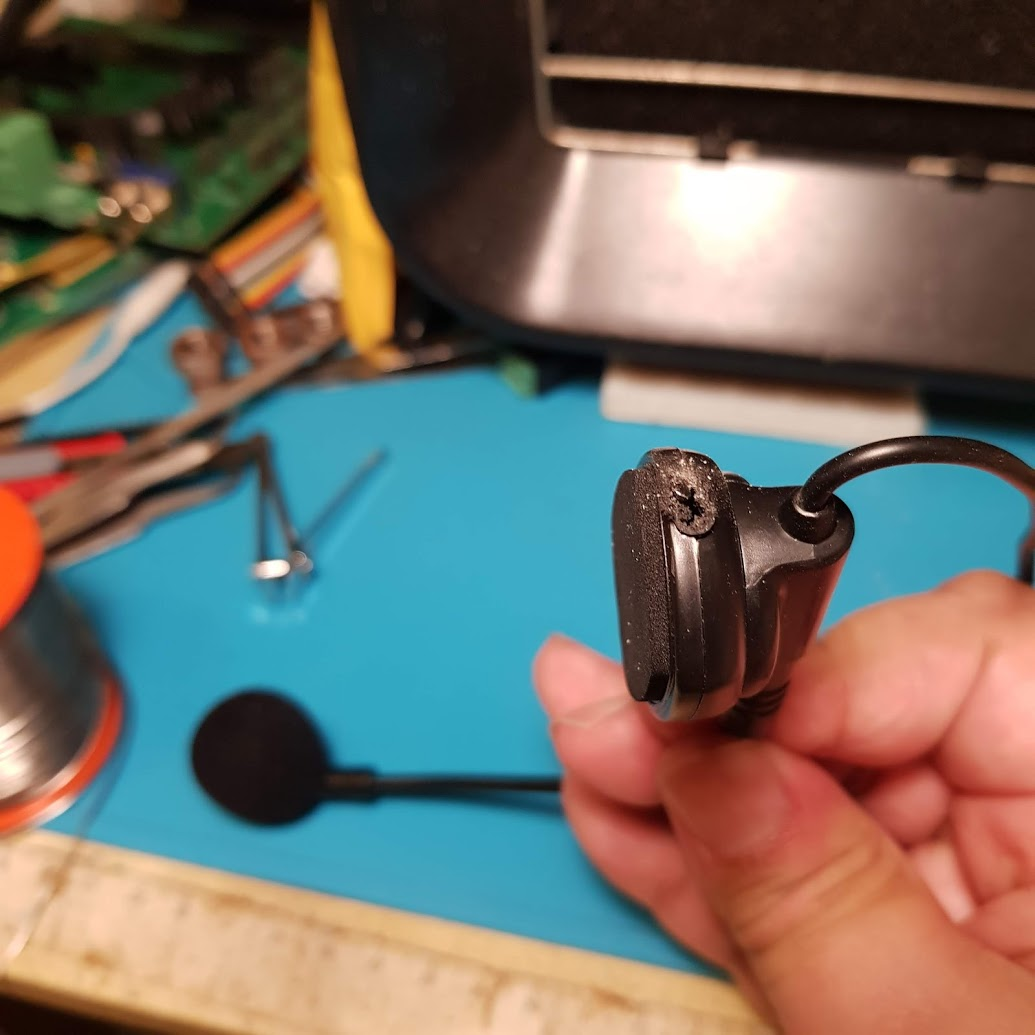
Now I am left with just the flexible microphone arm and its cable.
I did a test fit, and it needs to be attached somewhere here.
I drilled a hole for the microphone wire to go into the headphones:
There needs to be some slack on the wire so that the arm can be moved (the bit it sits on rotates). I measured enough of the wire to enter the headset and comfortably reach the pads, and also to tie a knot inside the headset so that there is some strain relief. The microphone cable was then stripped:
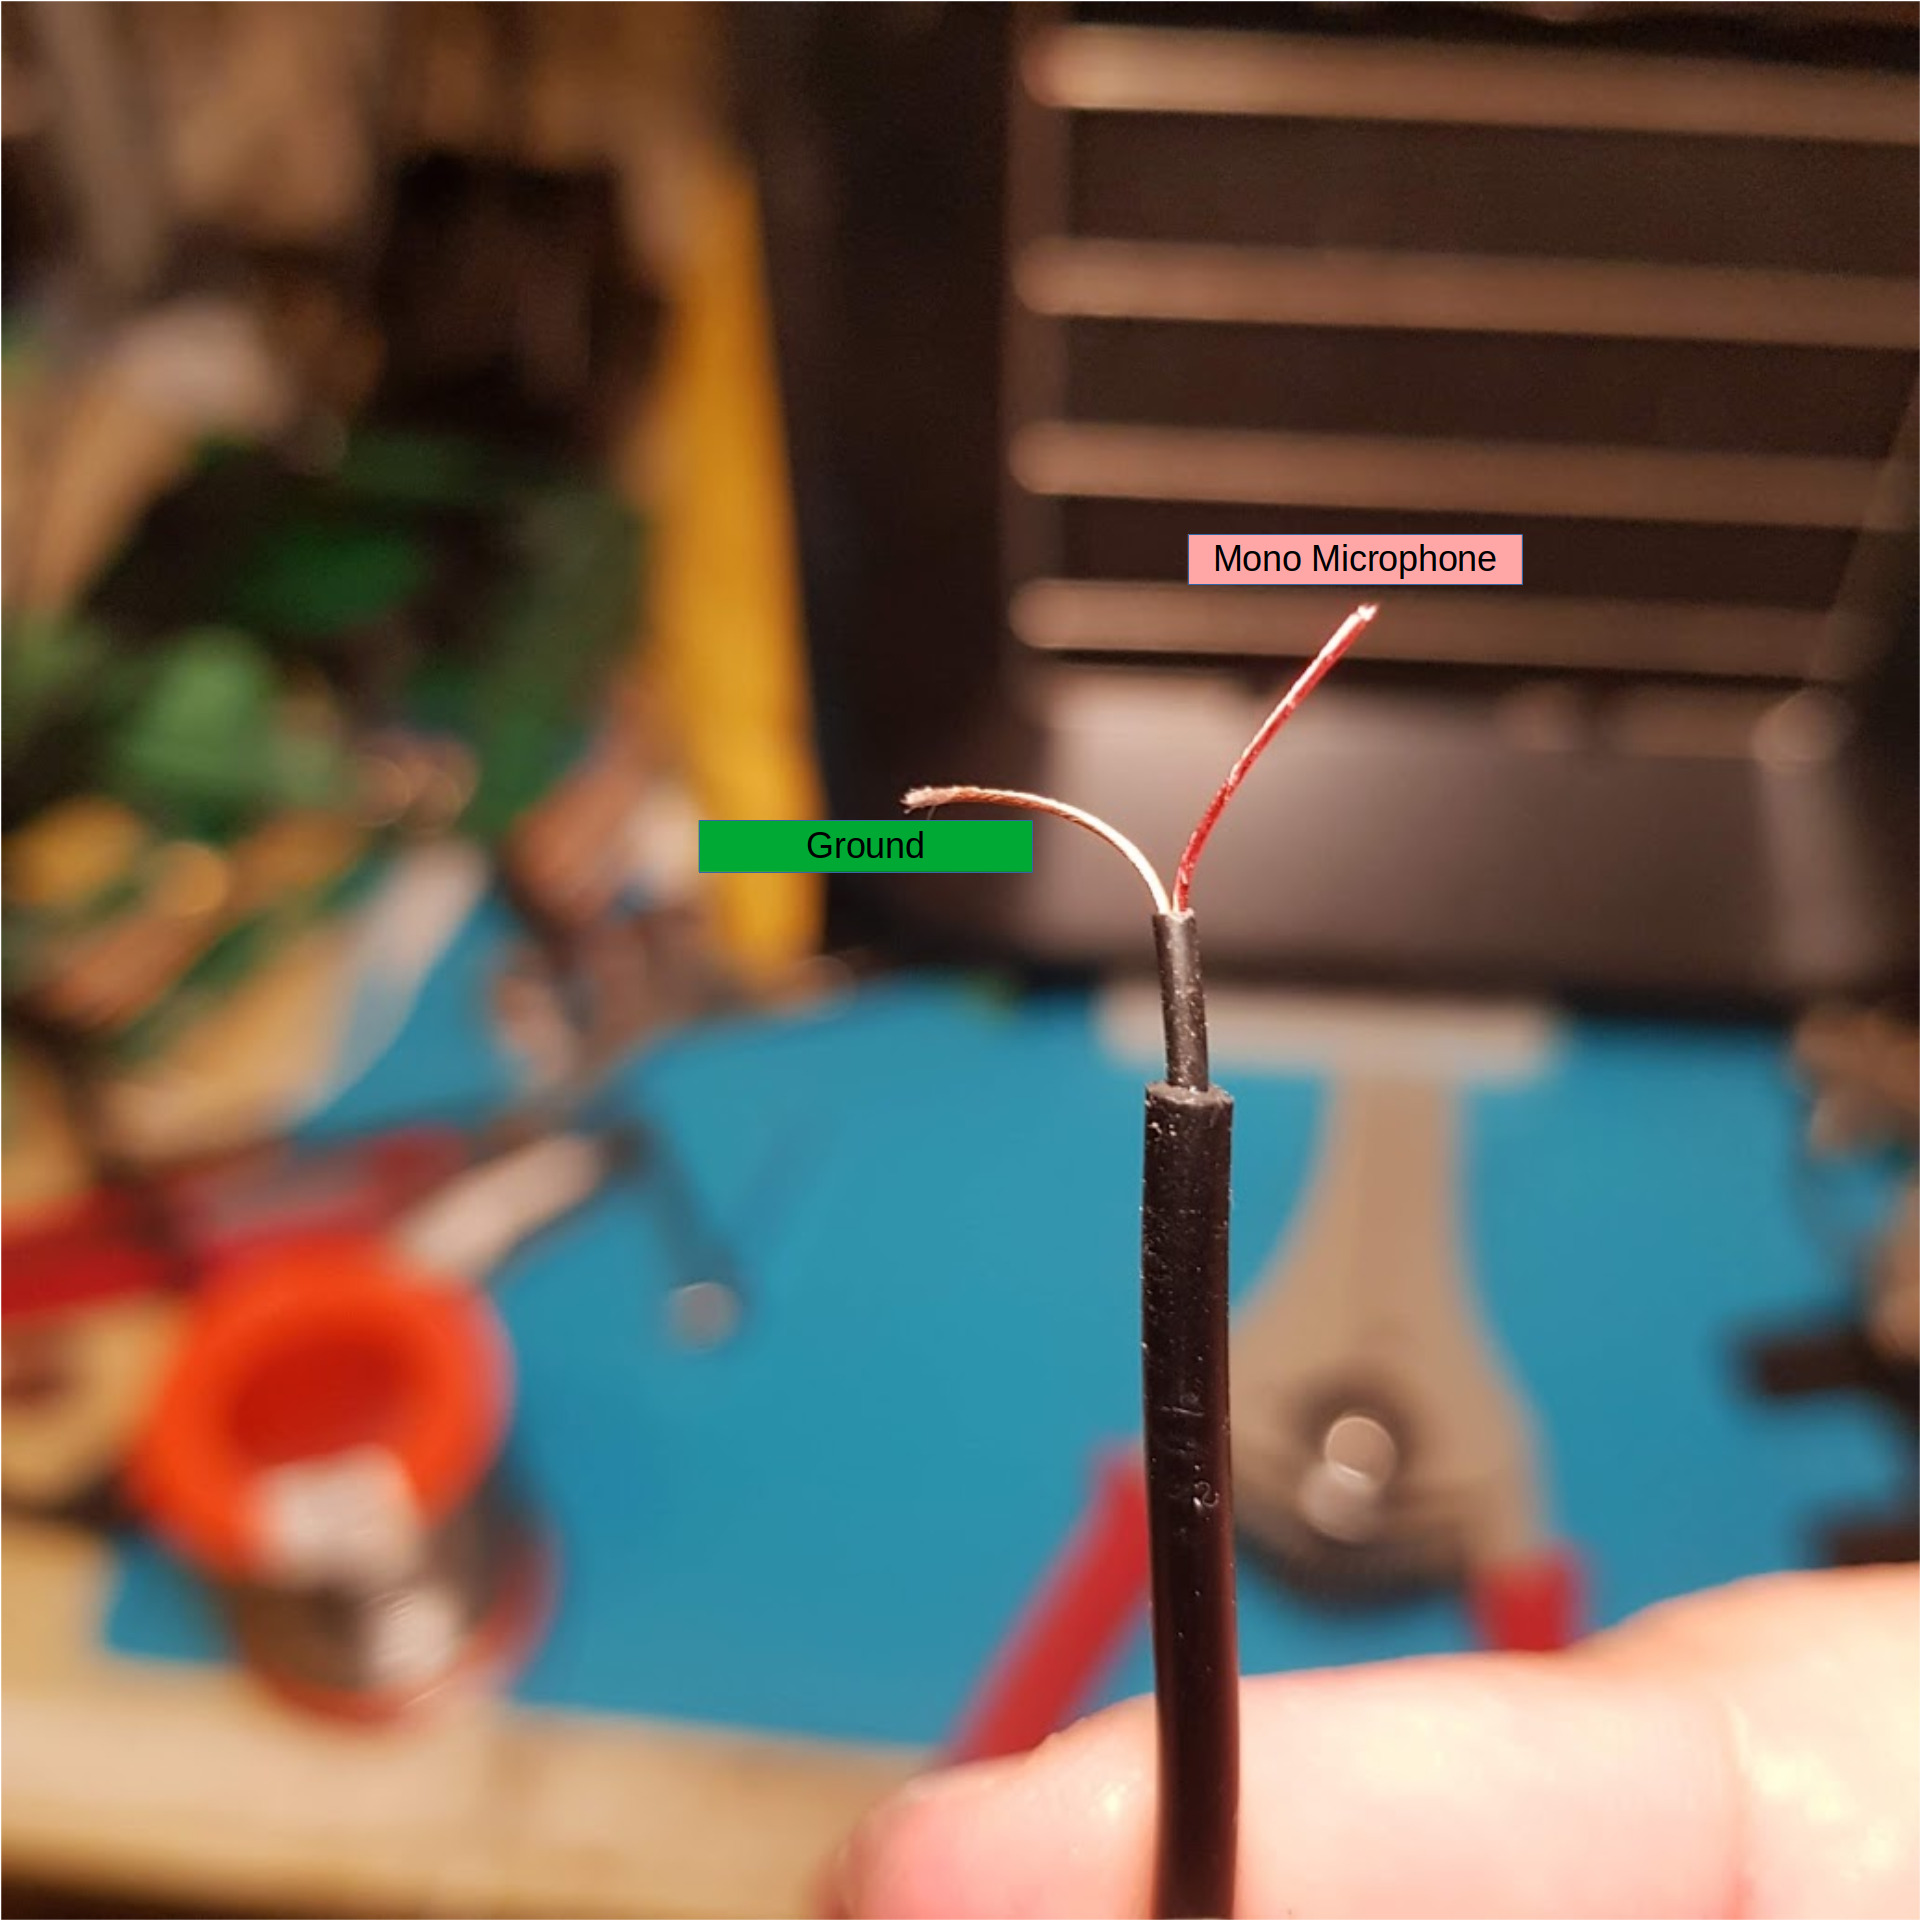
These wires are extremely thin. They are also coated with some sort of lacquer to insulate them. To remove the insulation from the tips, I put them into the flame of a cigarette ligher for a few seconds. Testing with the end of the cable that had the connector on it, I was able to identify which was Ground and which was the Microphone signal. They were then soldered to the wires from the TRRS socket and the joints covered with heat-shrink.
I then made quick test by plugging the cable into my PS4 controller … both headphones and microphones are working !
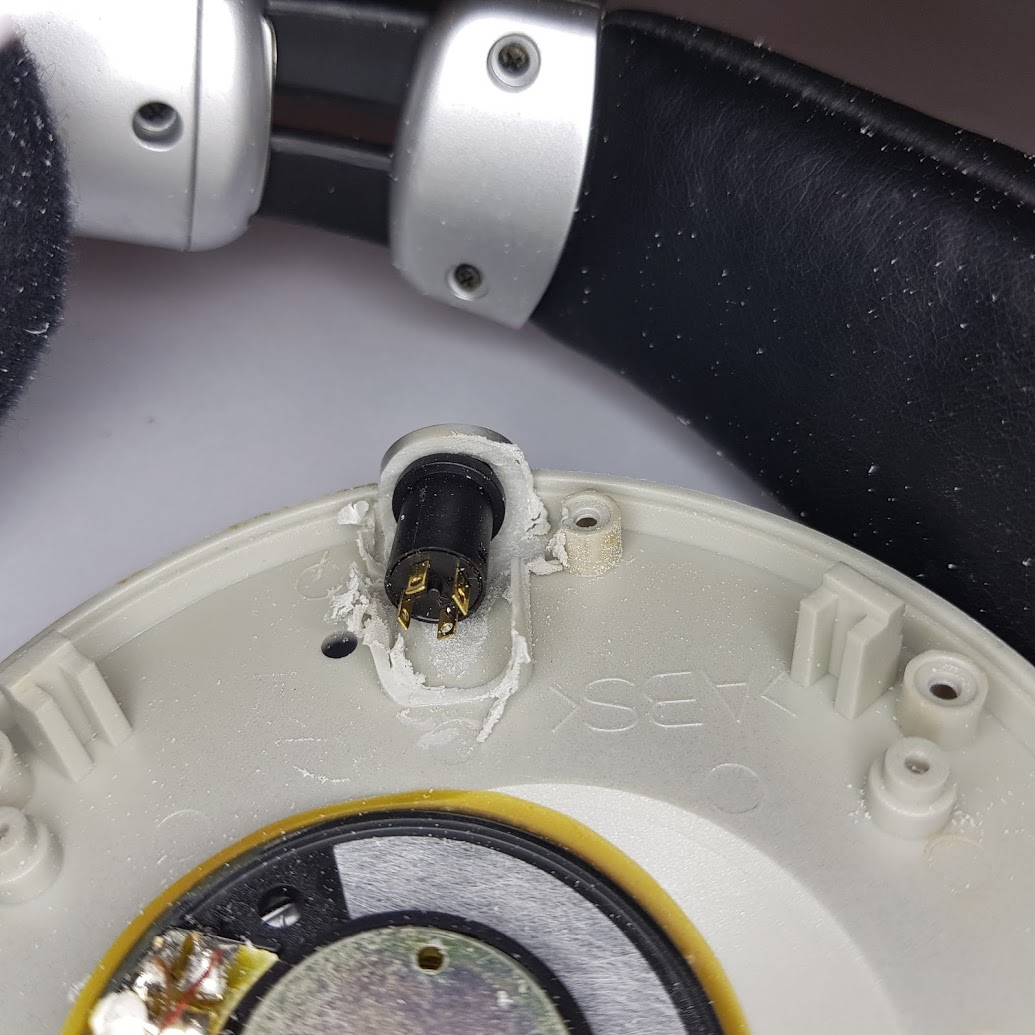
Now it’s time to put everything back together. I covered the soldered terminals on the TRRS socket with some hot-glue:
And then set the entire TRRS socket into the space with hot-glue. I also hot glued the wires down at a few points, to avoid them rattling inside the headphones:
I screwed the driver back to the headphones, and then screwed the padding back into the driver. Lastly, the microphone base was hot-glued to the side of the headphones (I’m not sure if hot-glue is strong enough, and was tempted to use super-glue, but decided to give hot-glue a try first).
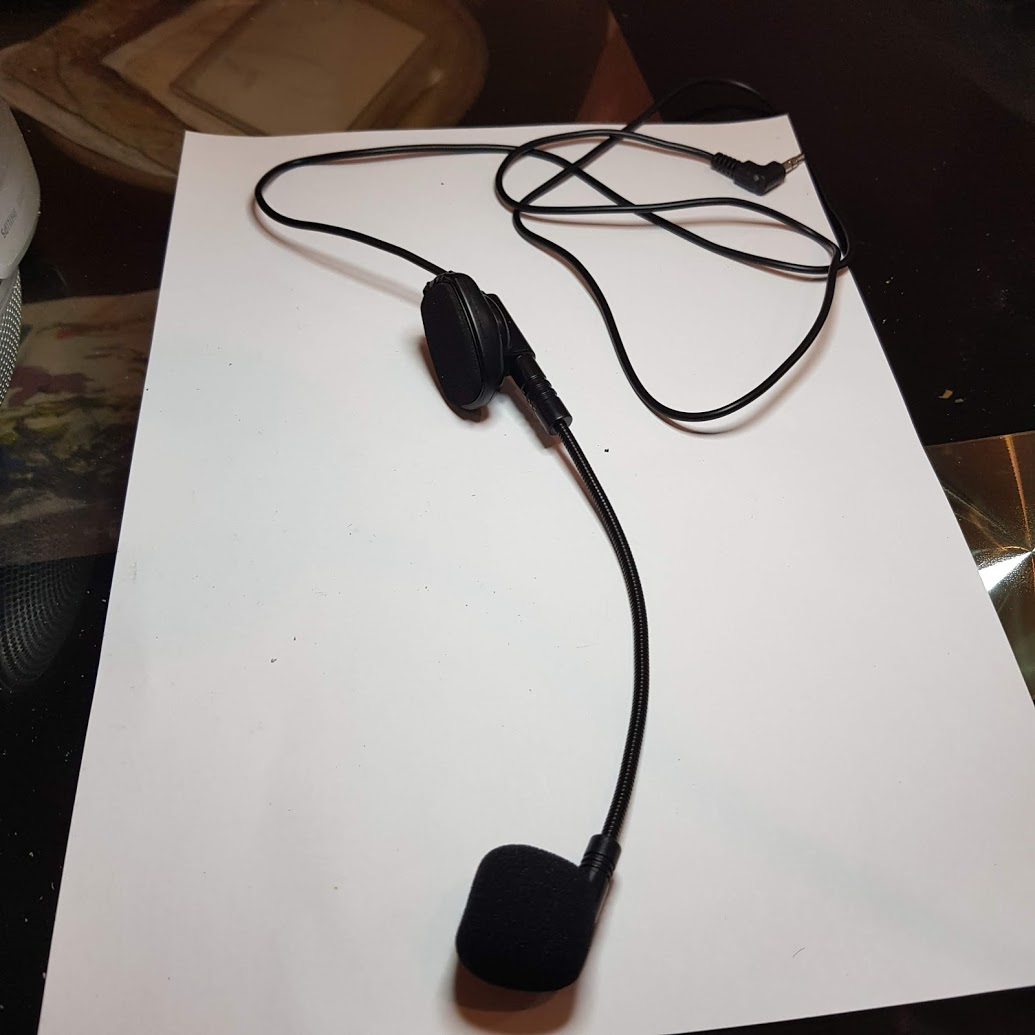
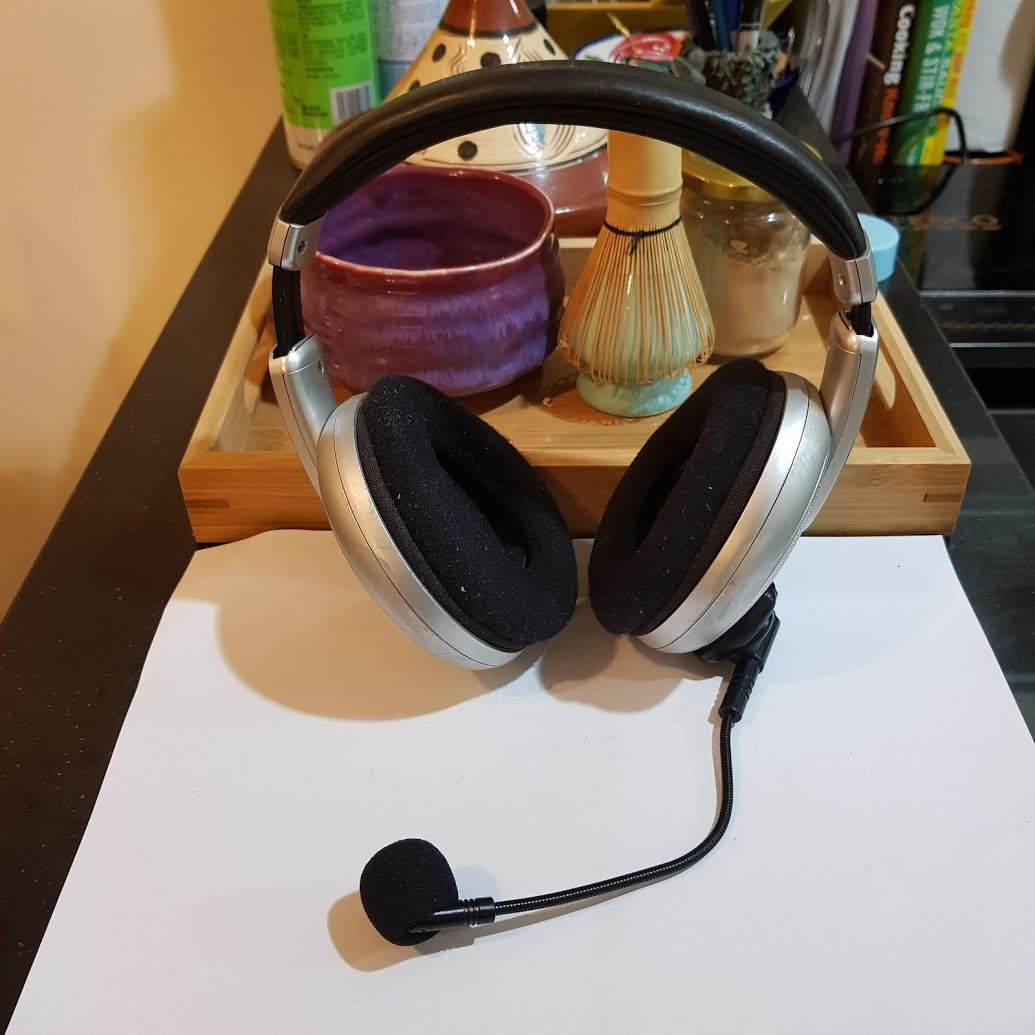
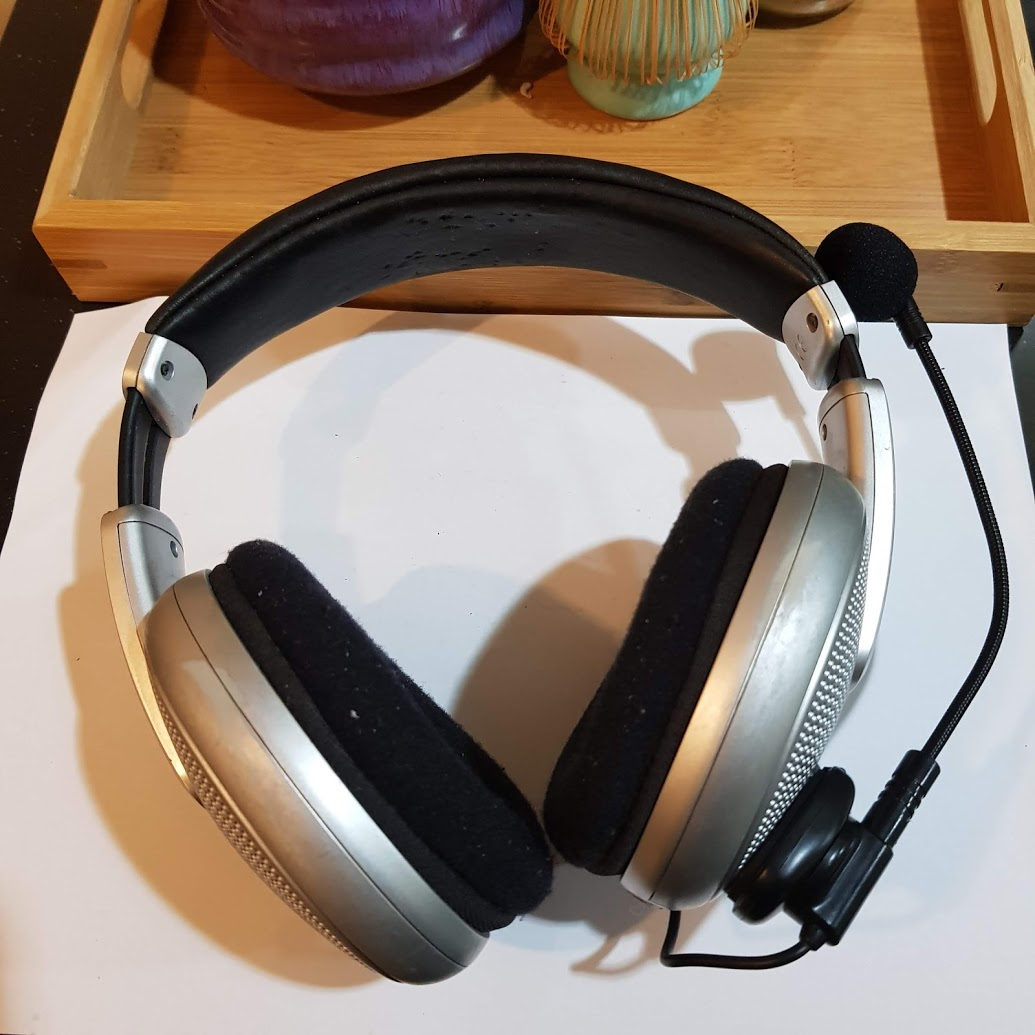
And I’m done !
Here’s the end result:
The flexible arm on the microphone rotates upwards when not in use:
The socket for the cable is quite neat:
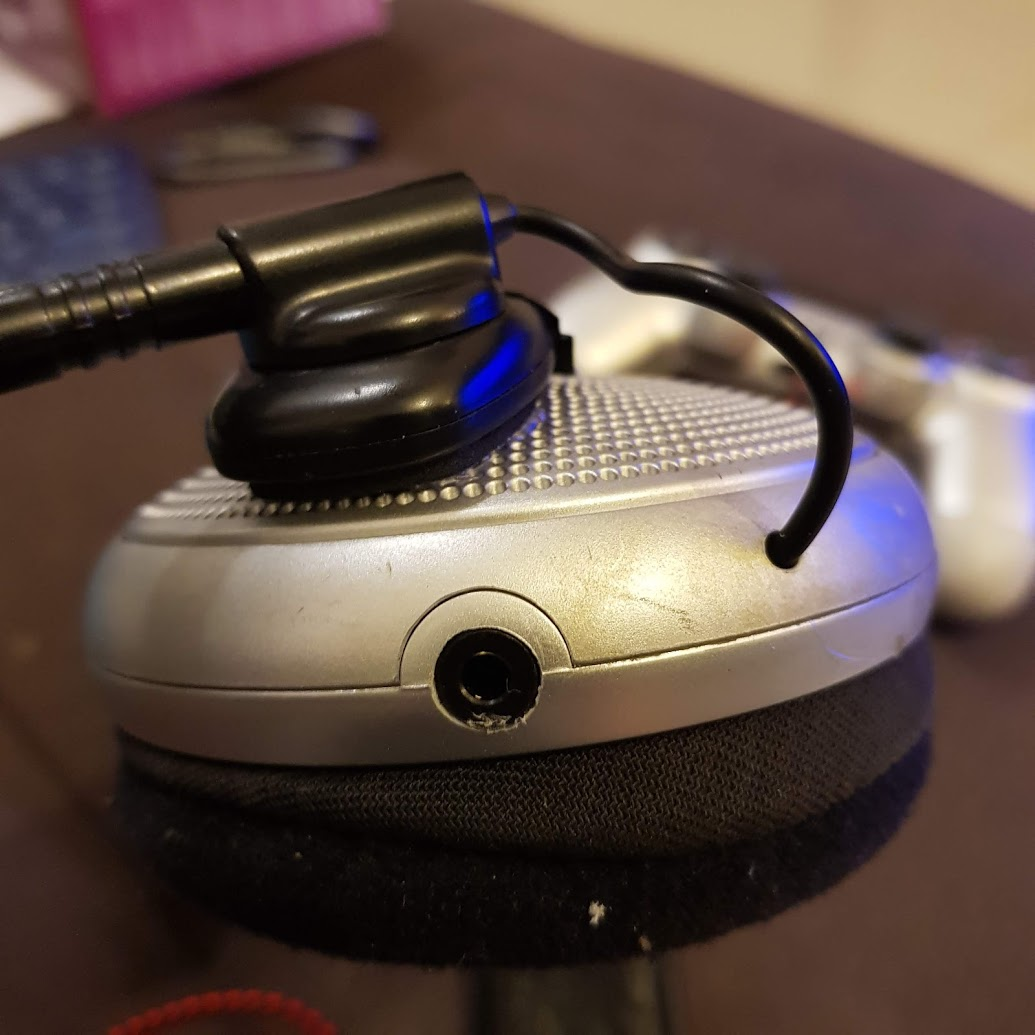
I really love the detachable cable design. The ready-made cable design means a good secure connection, as compared to DIY soldering, where it counts the most. And if it gets damaged, or I happen to need a cable with sepate Microphone and Headphone plugs, I can easily replace it.
Here it is connected to the PS4 controller:
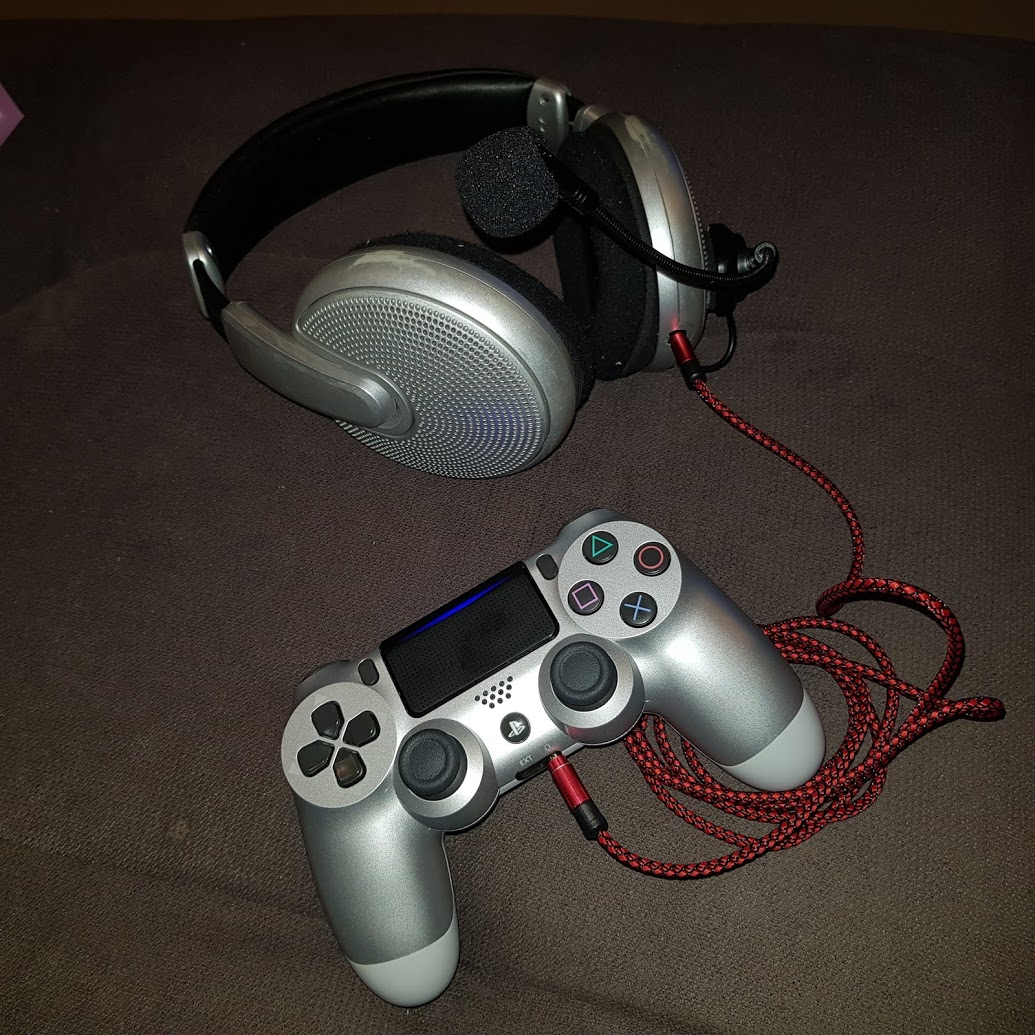
I messaged my friend and we spent a few hours on GTA Online … my DIY Gaming Headset worked perfectly.
So this is what it took …
-
15-year old Philips SHP-805 Headset : Free (Inherited)
- Monetary Investment for the Upgrade : MYR 15.62 (well actually a lot more, as I bought other stuff to qualify for free shipping. But that’s stuff to be costed in another project 😉)
-
Time spent doing research: A few hours spread over a few weeks
-
Time spent on actual DIY: a few more hours
-
Time spent writing all this stuff : another few hours
Worth it?
For the fun factor of this DIY project and re-using stuff I already have, hell yeah…😀
Originally created with EverNote at 20201114T183457Z