Cleaning Blower Roller Fan on Panasonic Air-Conditioner Model CS-XPU10WKH
I replaced my bedroom air-conditioner with a Panasonic CS-XPU10WKH model in August 2020. Some time in March 2021, it’s performance had deteriorated so much that i woke up one morning to a warm room and a flashing red light on the unit. I had it serviced and it was back to normal again. Now it’s Sep 2021 and I’m facing the same issues again, so I decided to see if I can fix it by DIY .
I’ve been cleaning the filters every few weeks and I don’t see much dust on the cooling coils. Also the air coming out of the aircond feels cold, so I don’t think there is an issue with the gas leaking or needing to be topped up (it’s supposed to be a closed system). What I do notice though is that the volume of air being pushed out is much lower than before. Looking through the flaps I can see some dust on the blower’s roller fan.
So I set off on a mission to clean it.
This model does seem easier to maintain than my other older Panasonic models:
-
There are no “hidden” screws in the front to be removed
-
There’s no wiring going along drainage tube from right to left (older ones had the infrared receiver at the opposite end from the electronics)
-
The cover just slides forwards rather than forwards-and-up. Therefore there are no “hooks” at the top rear of the unit. Now we just have sliders (which i really like) to lock the cover in place.
But because of the differences, it took me some time to figure out (now with experience I can get the blower out in 5 minutes!). Probably because it is not so old, there wasn’t much information specifically for this model on YouTube. So here are my notes for my future (and your) reference.
Switch Off Mains
Before doing any maintenance work, switch off the mains power from the air-cond.
Open Top Lid and Remove Filters
This is the easy part, which should be done regularly anyway.
-
There are two catches at the sides where the lid needs to be pulled forwards and swung up
-
And then just slide the filters upwards a bit out of the slots they sit in, and then can then be pulled out forwards.
-
The filters can be washed with a shower hose, and then left standing to dry.
Strictly speaking this step is not necessary (I am able to open the covers without opening the lid or removing the filters) but it’s good to regularly clean the filters.
(Don’t) Remove the flaps
The flaps do not need to be removed to service the Blower Roller Fan. If the flaps are dirty they can be wiped easily from outside without dismantling the unit. But here are the steps if you need to remove them, or you accidentally detached them or want to put them back.
There are two flaps, but they are both driven by the same stepper motor, on the right hand side. There’s a support brace in the center, and the flaps are driven through a motor spindle on the right side. The other side sits freely in a hole.
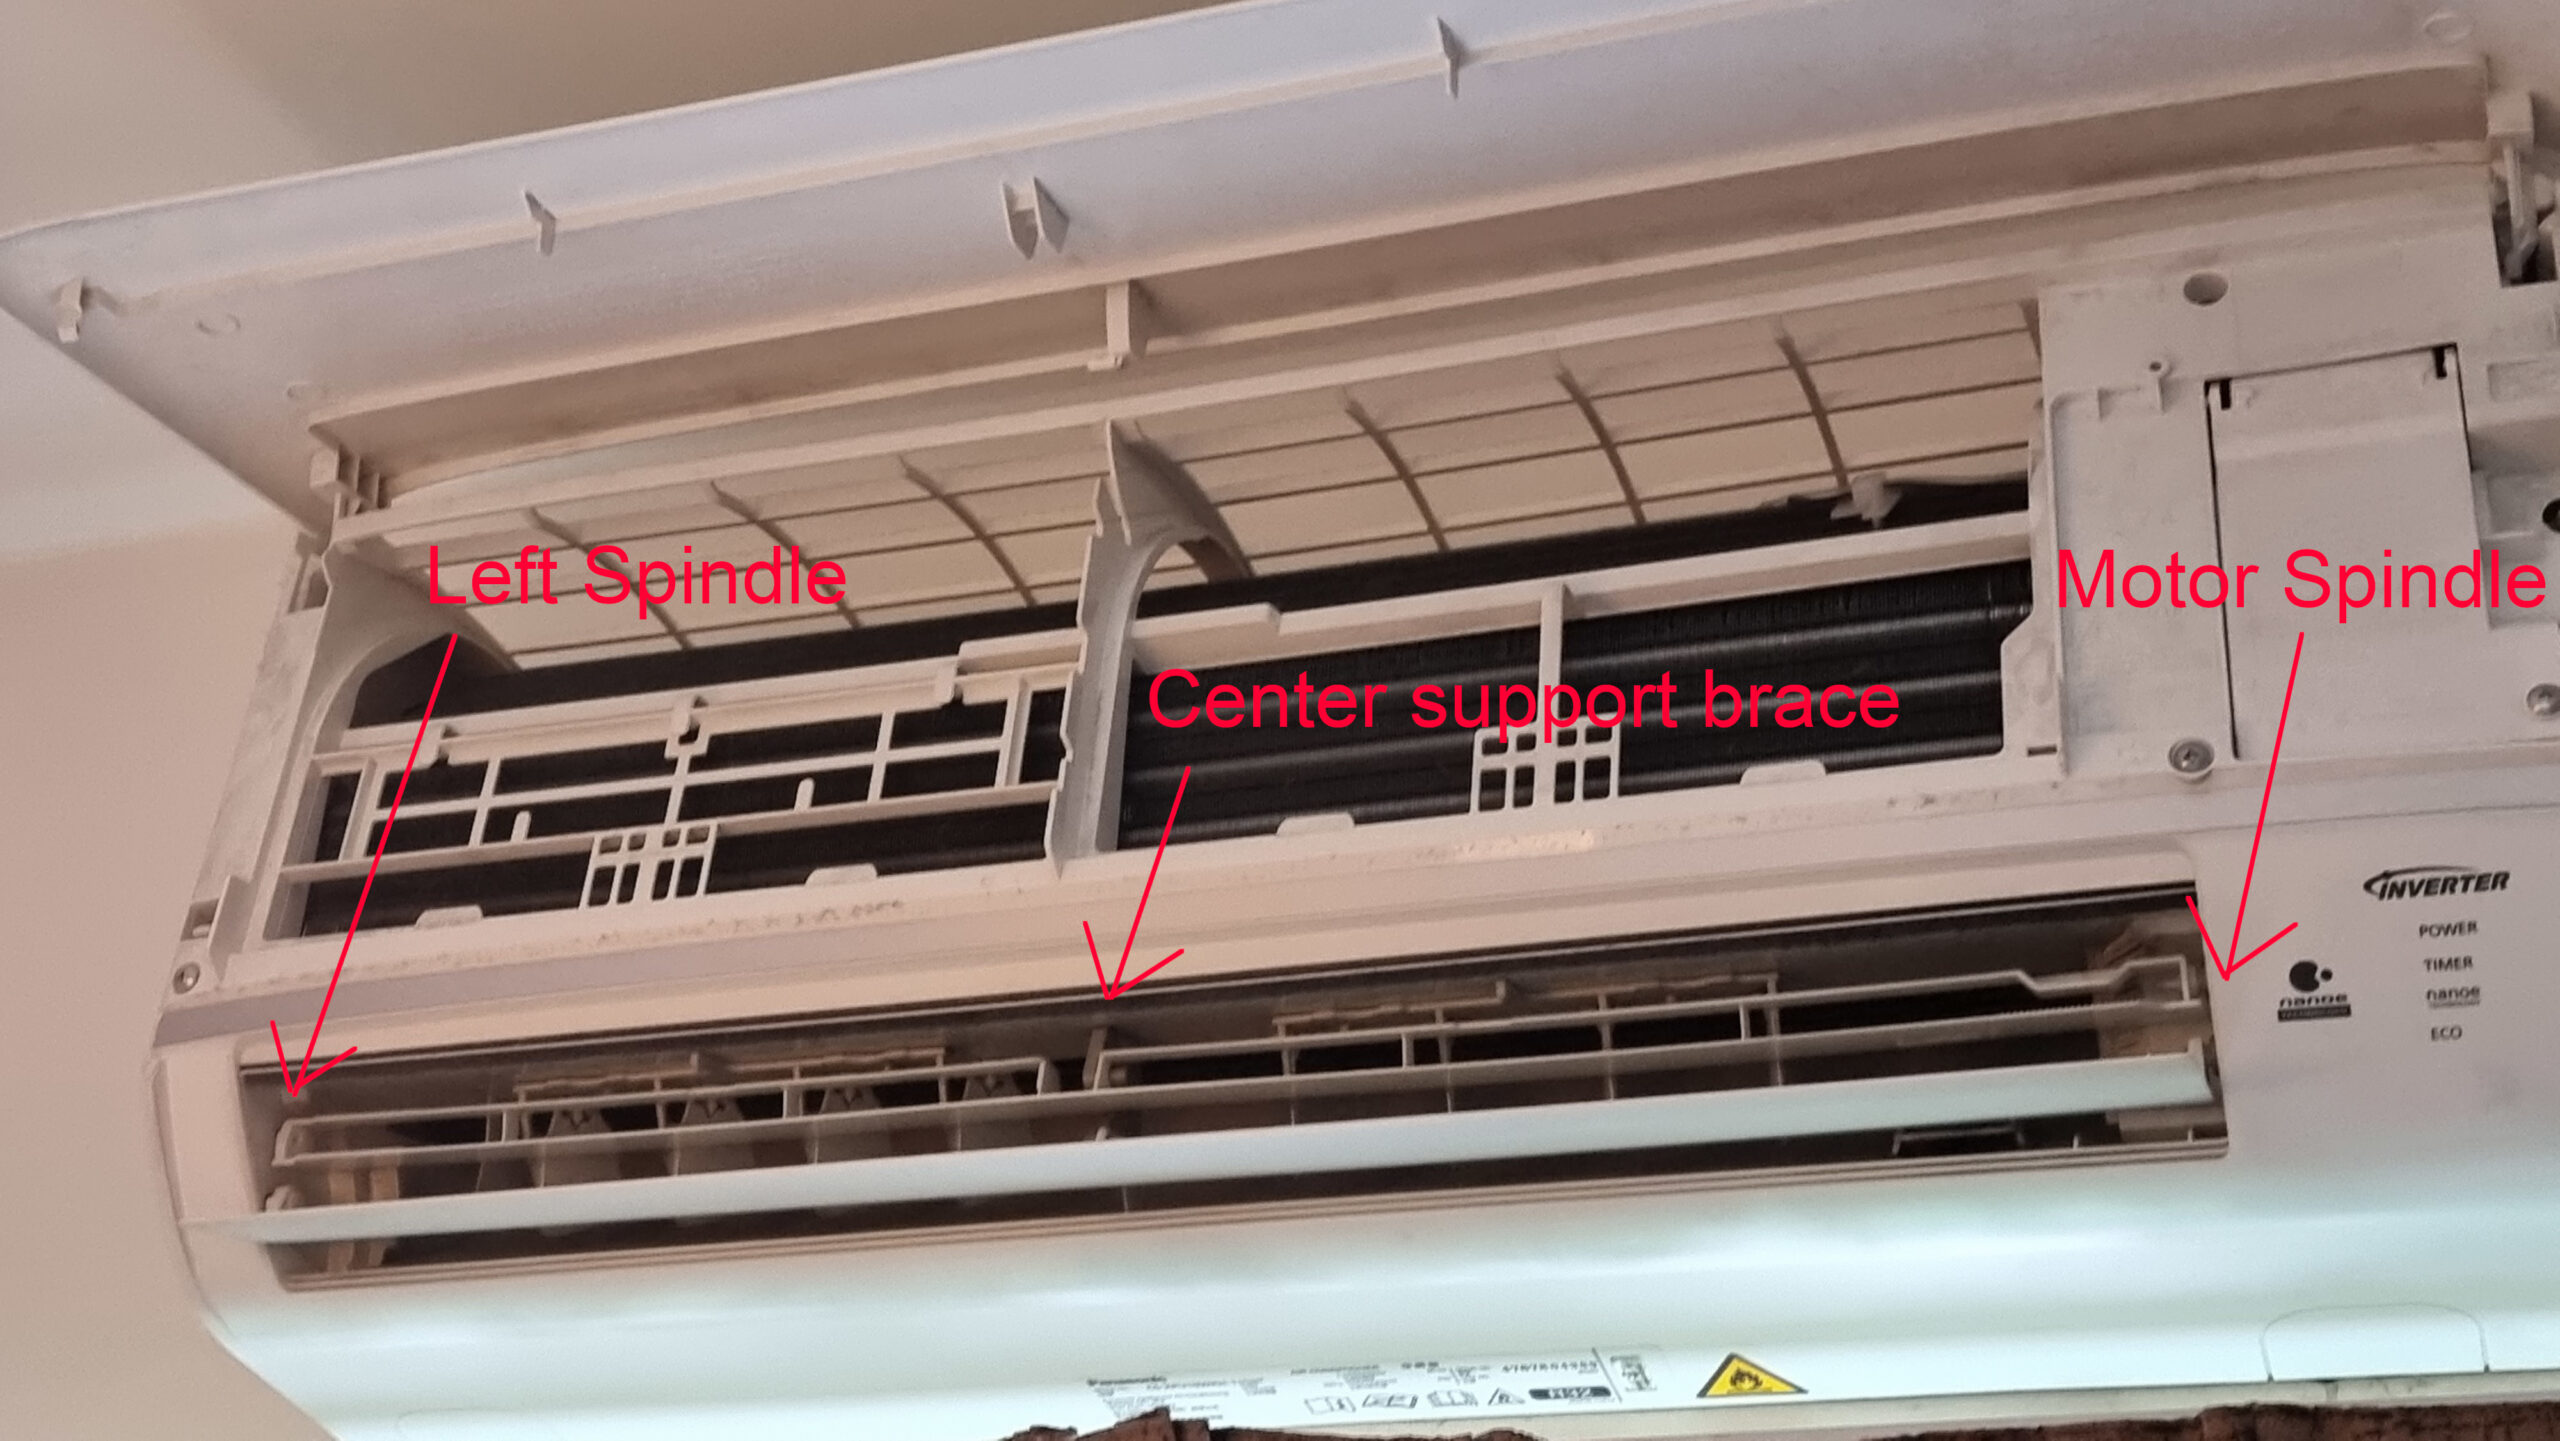
The same process applies to remove the lower and upper flap:
-
First push the center brace to the left so that the flaps comes off it. The plastic for the flap is quite soft and bendy, so you can push it down and then let go of the center brace.
-
If you rotate the flap a bit, at one point the left little tab on the left spindle will align with the tab in the hole, and you can pull that end of the flap out.
-
Once the left and center of the flap are loose, you can rotate the flap again until it aligns with the tab on the motor spindle, and pull it towards the right to remove the entire flap.
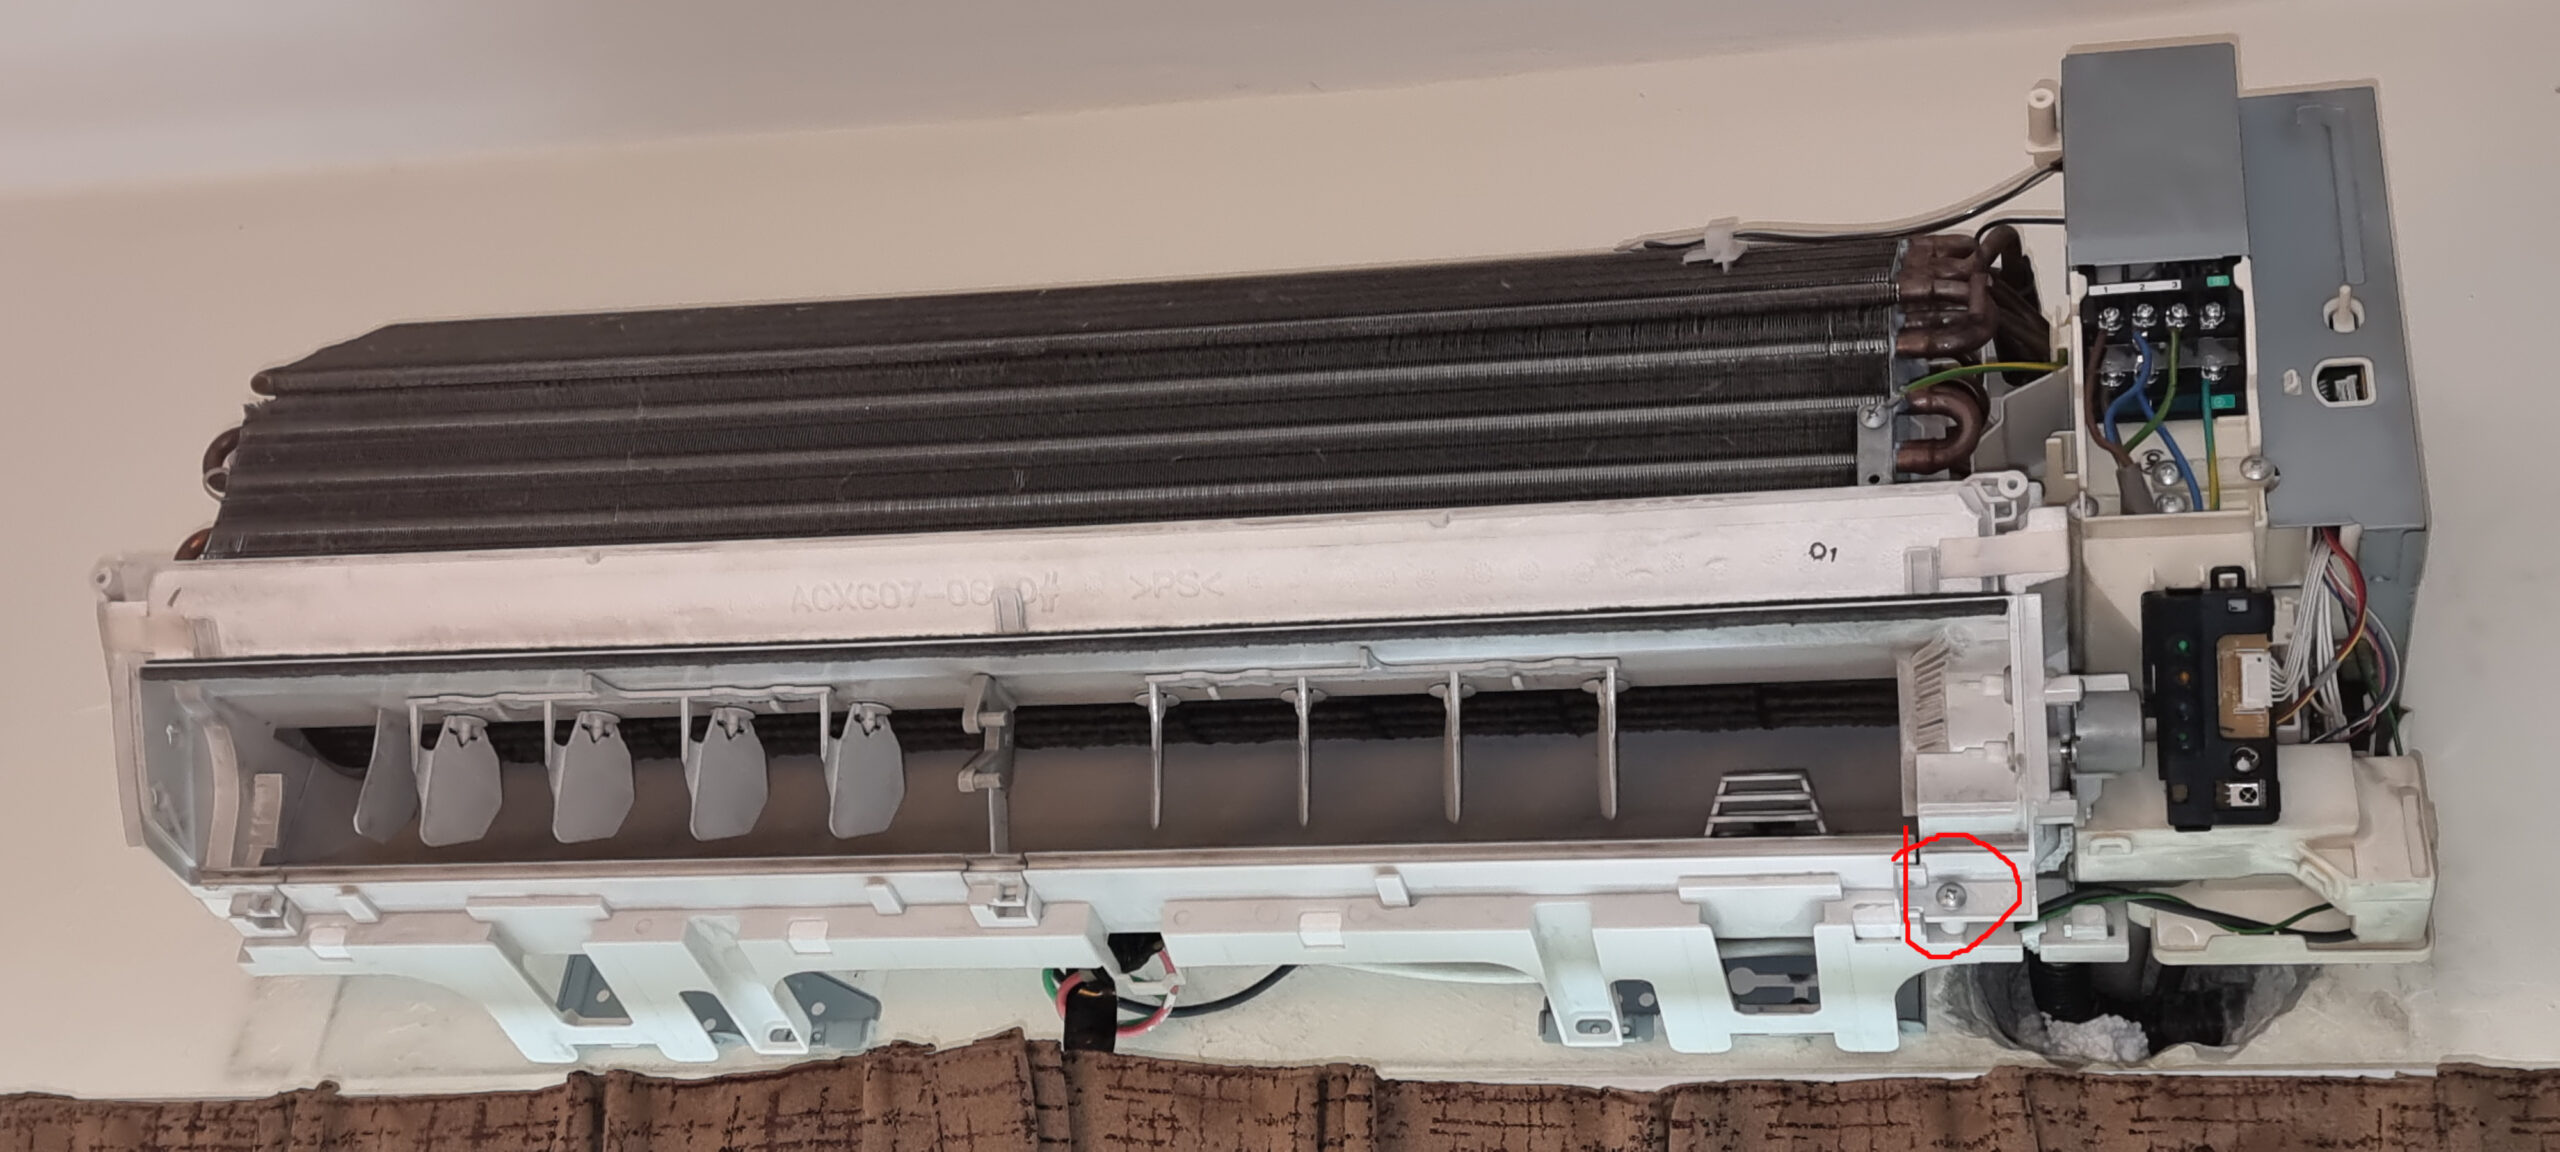
Removing the Front Cover
-
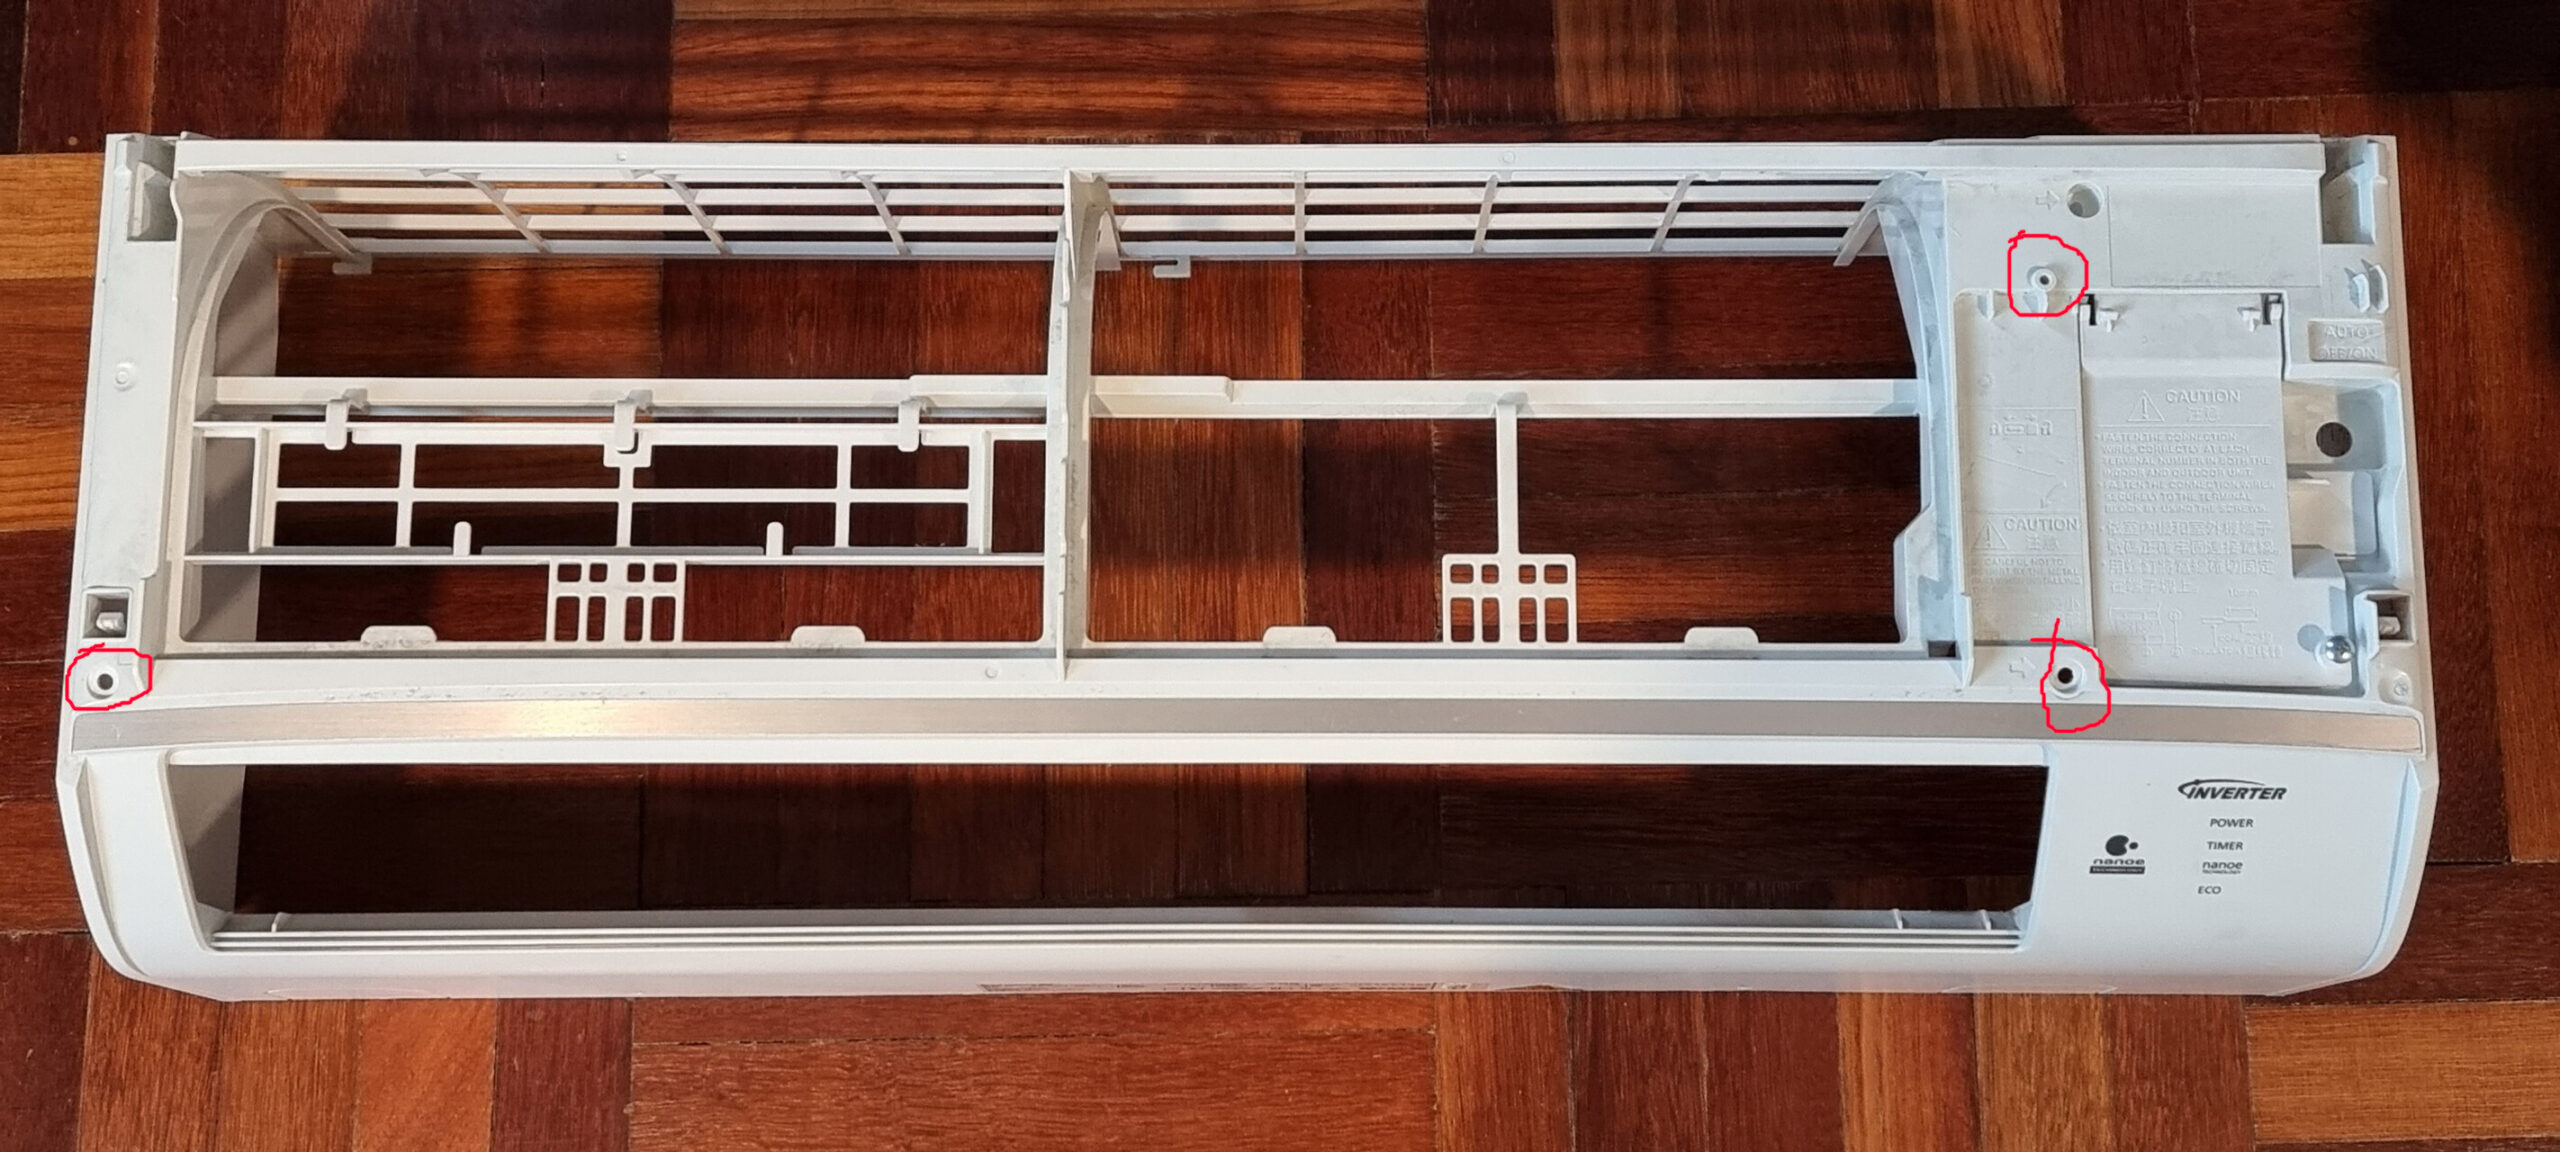
Open the three screws on the front panel
-
At the top-rear, are three sliders located at the sides and center. Reach back and slide these to the right, which is the “unlocked” position:


-
Now pull the entire cover forwards. It should slide all the way out smoothly.
You will be left with this on the wall:

Removing The Drainage Tray
The Blower Roller Fan is behind the Drainage Tray, and so to get to it the Drainage Tray needs to be removed.
-
Undo this screw:
-
And this screw:
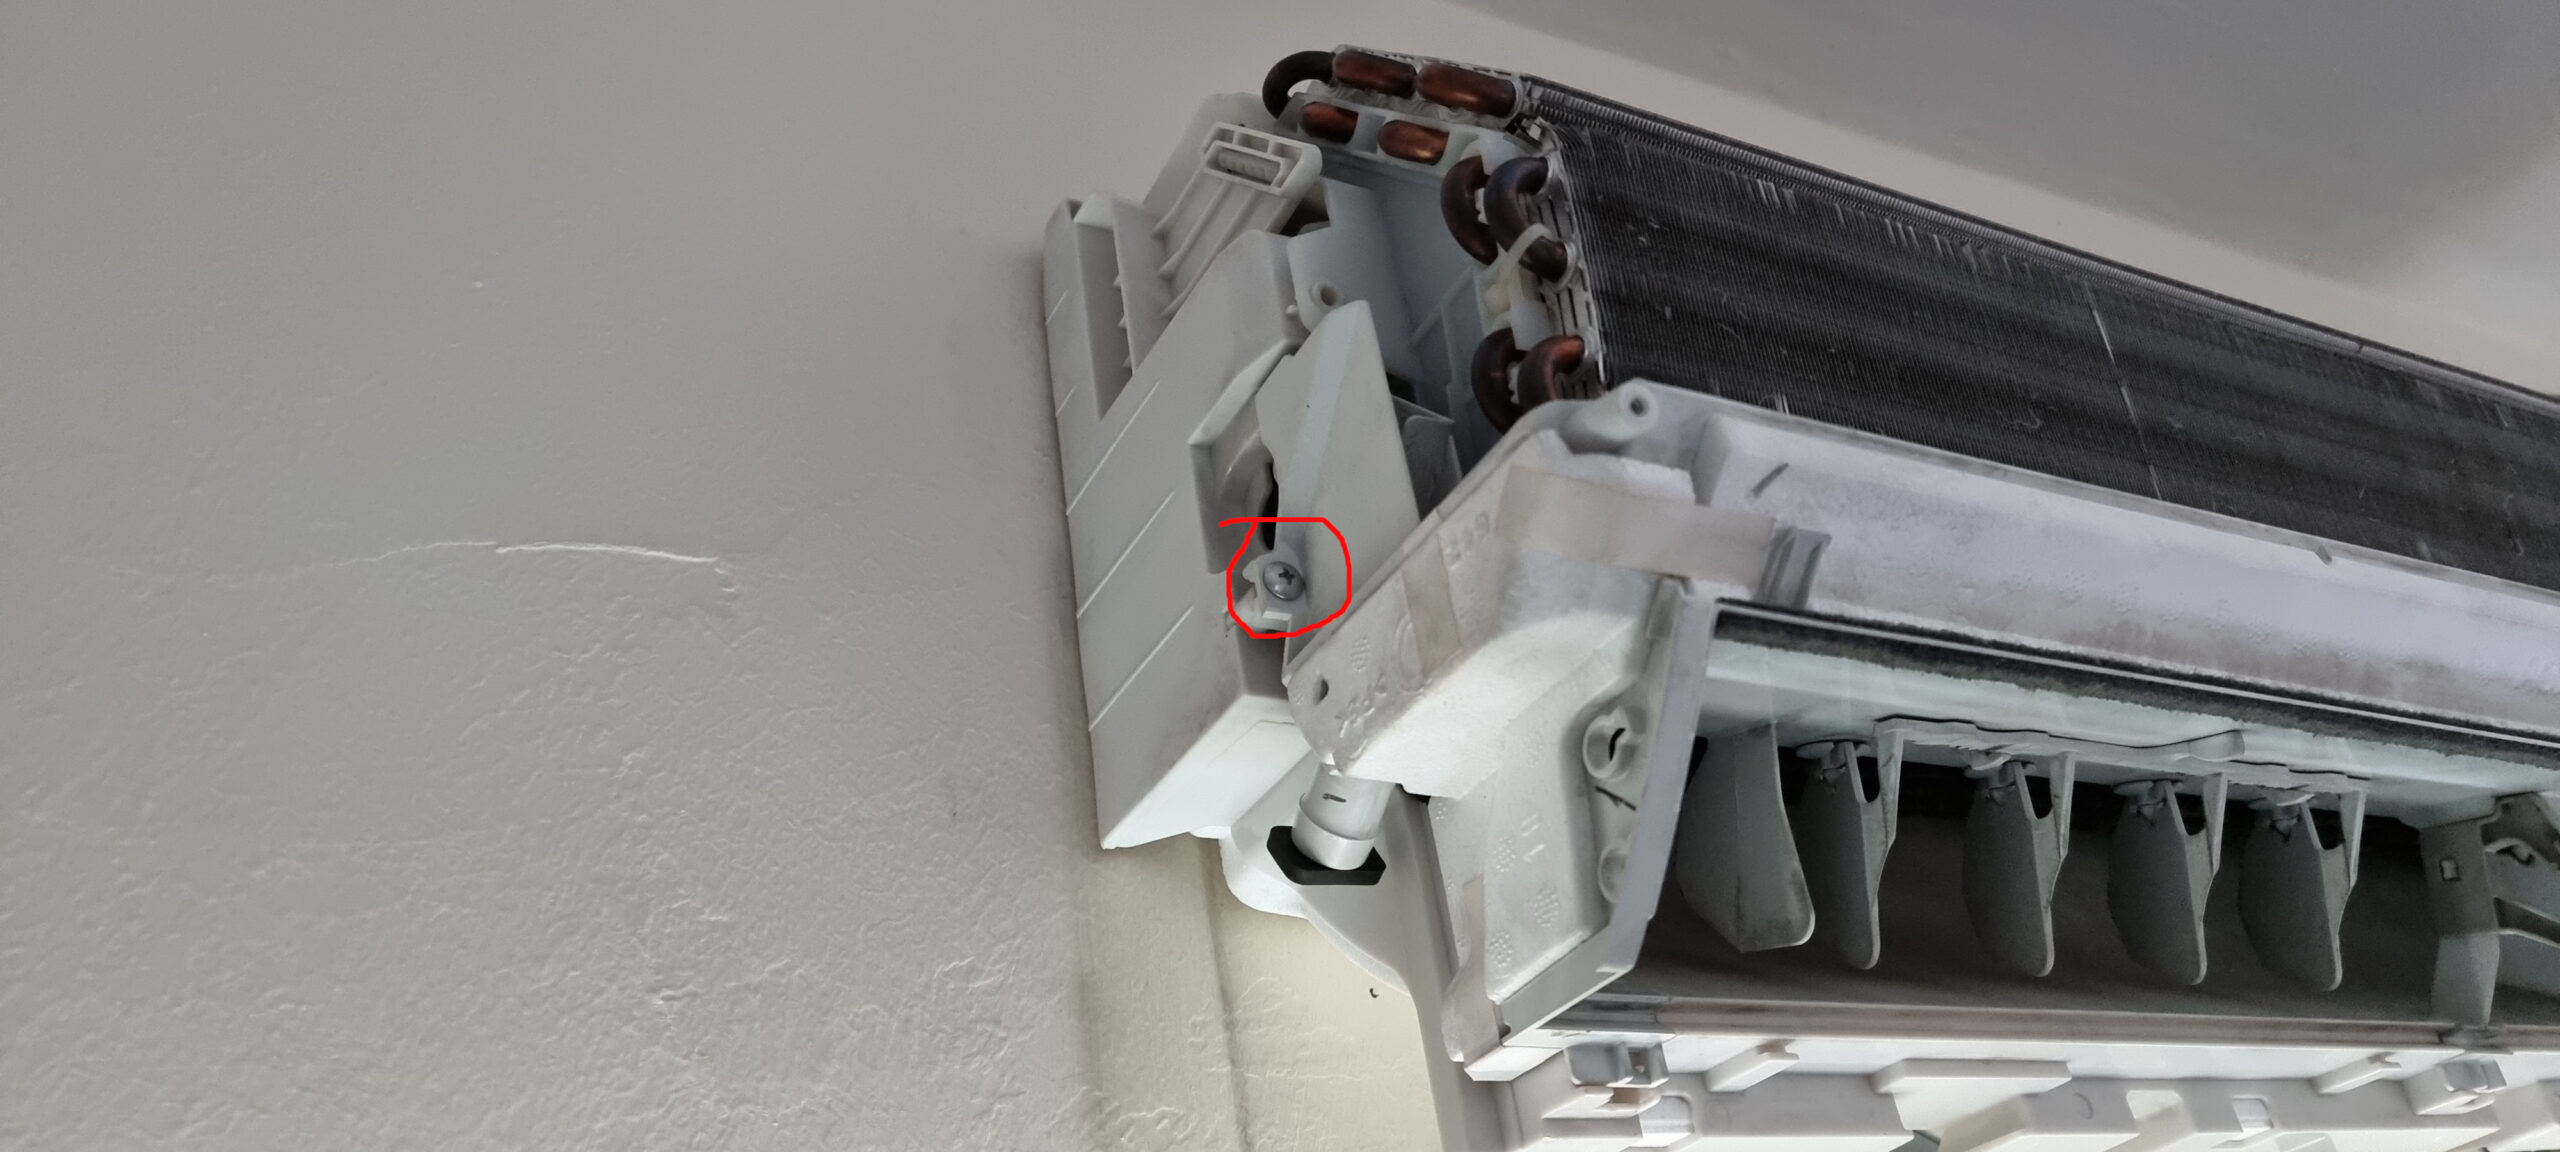
-
The drainage tray is sitting on three tabs at the bottom. Lift the tabs and pull them slightly forwards to release them:
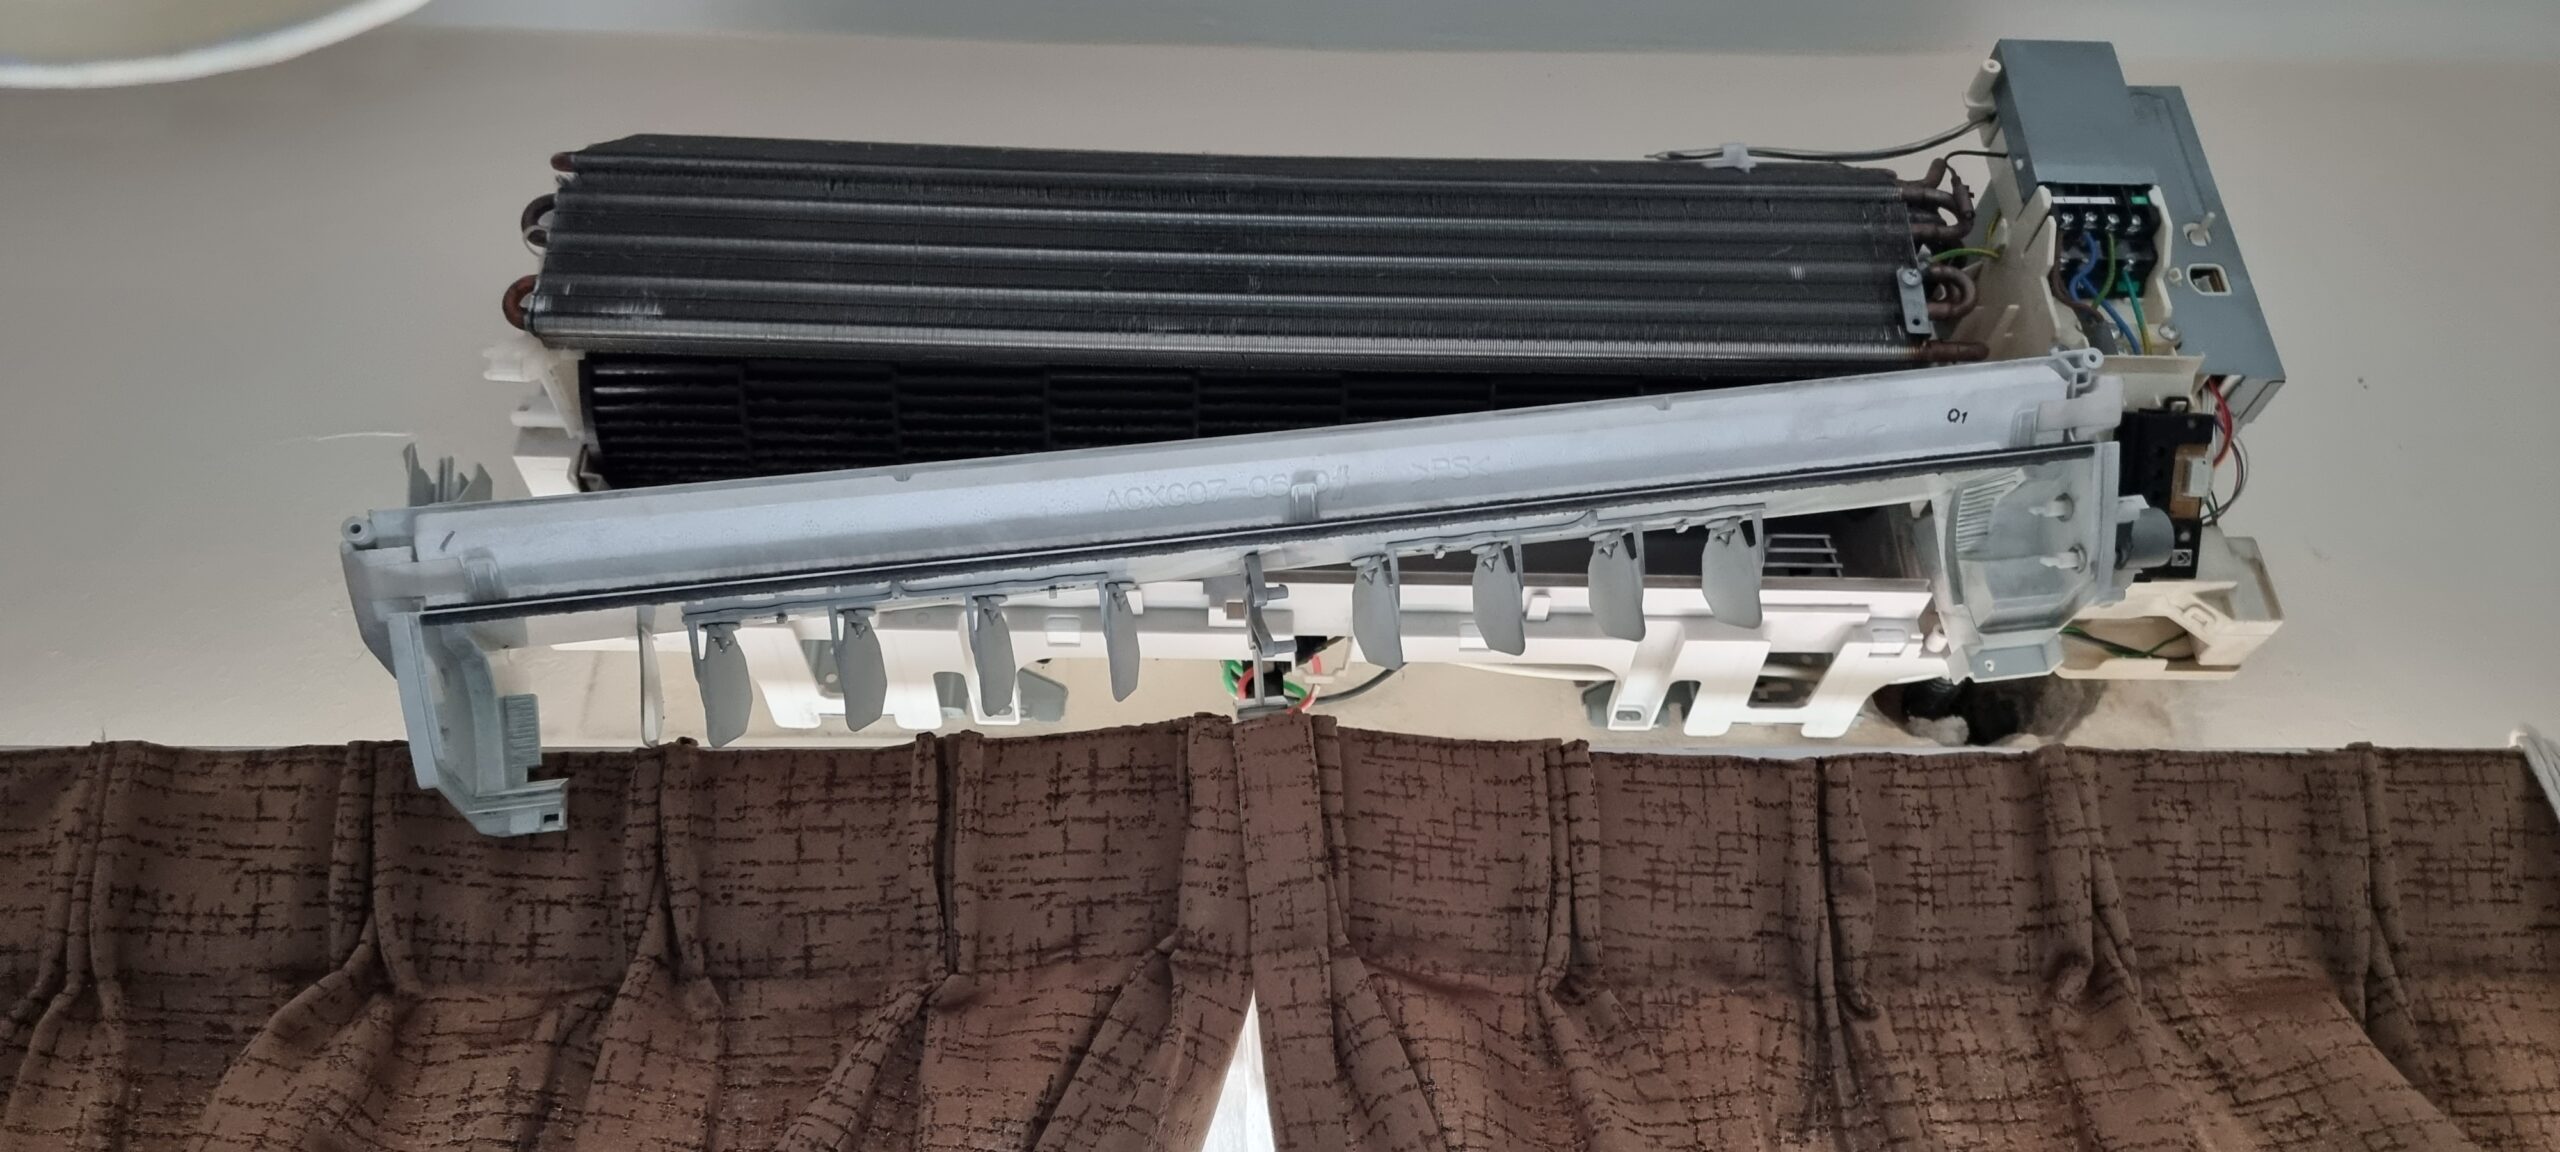
At this point the drainage tray will come lose if you pull it forwards and up. HOWEVER …
-
Watch out for water that may still be in the drainage tray!
-
On the right side, it is connected to the drain hose that carries water out of the unit. Because the drain hose simply plugs into the outlet on the drainage tray, it can come loose easily.
-
It is attached to the stepper motor (that drives the flaps), which is in turn attached to the electronics.
You have two choices here:
-
Detach the drainage tray enough to get access to the blower unit
-
. If it is attached quite securely to the drainage hose, this may be enough to support it in place.
-
In which case you end up with something like this.
-
-
-
Warning: if the drainage hose comes off, the drainage tray may fall and yank the cable on the stepper motor. I’ve seen some people secure the drainage tray in place with some string to prevent it falling off.
-
-
Remove the entire drainage tray.
-
Remove the two screws holding the stepper motor to the drainage tray.
-
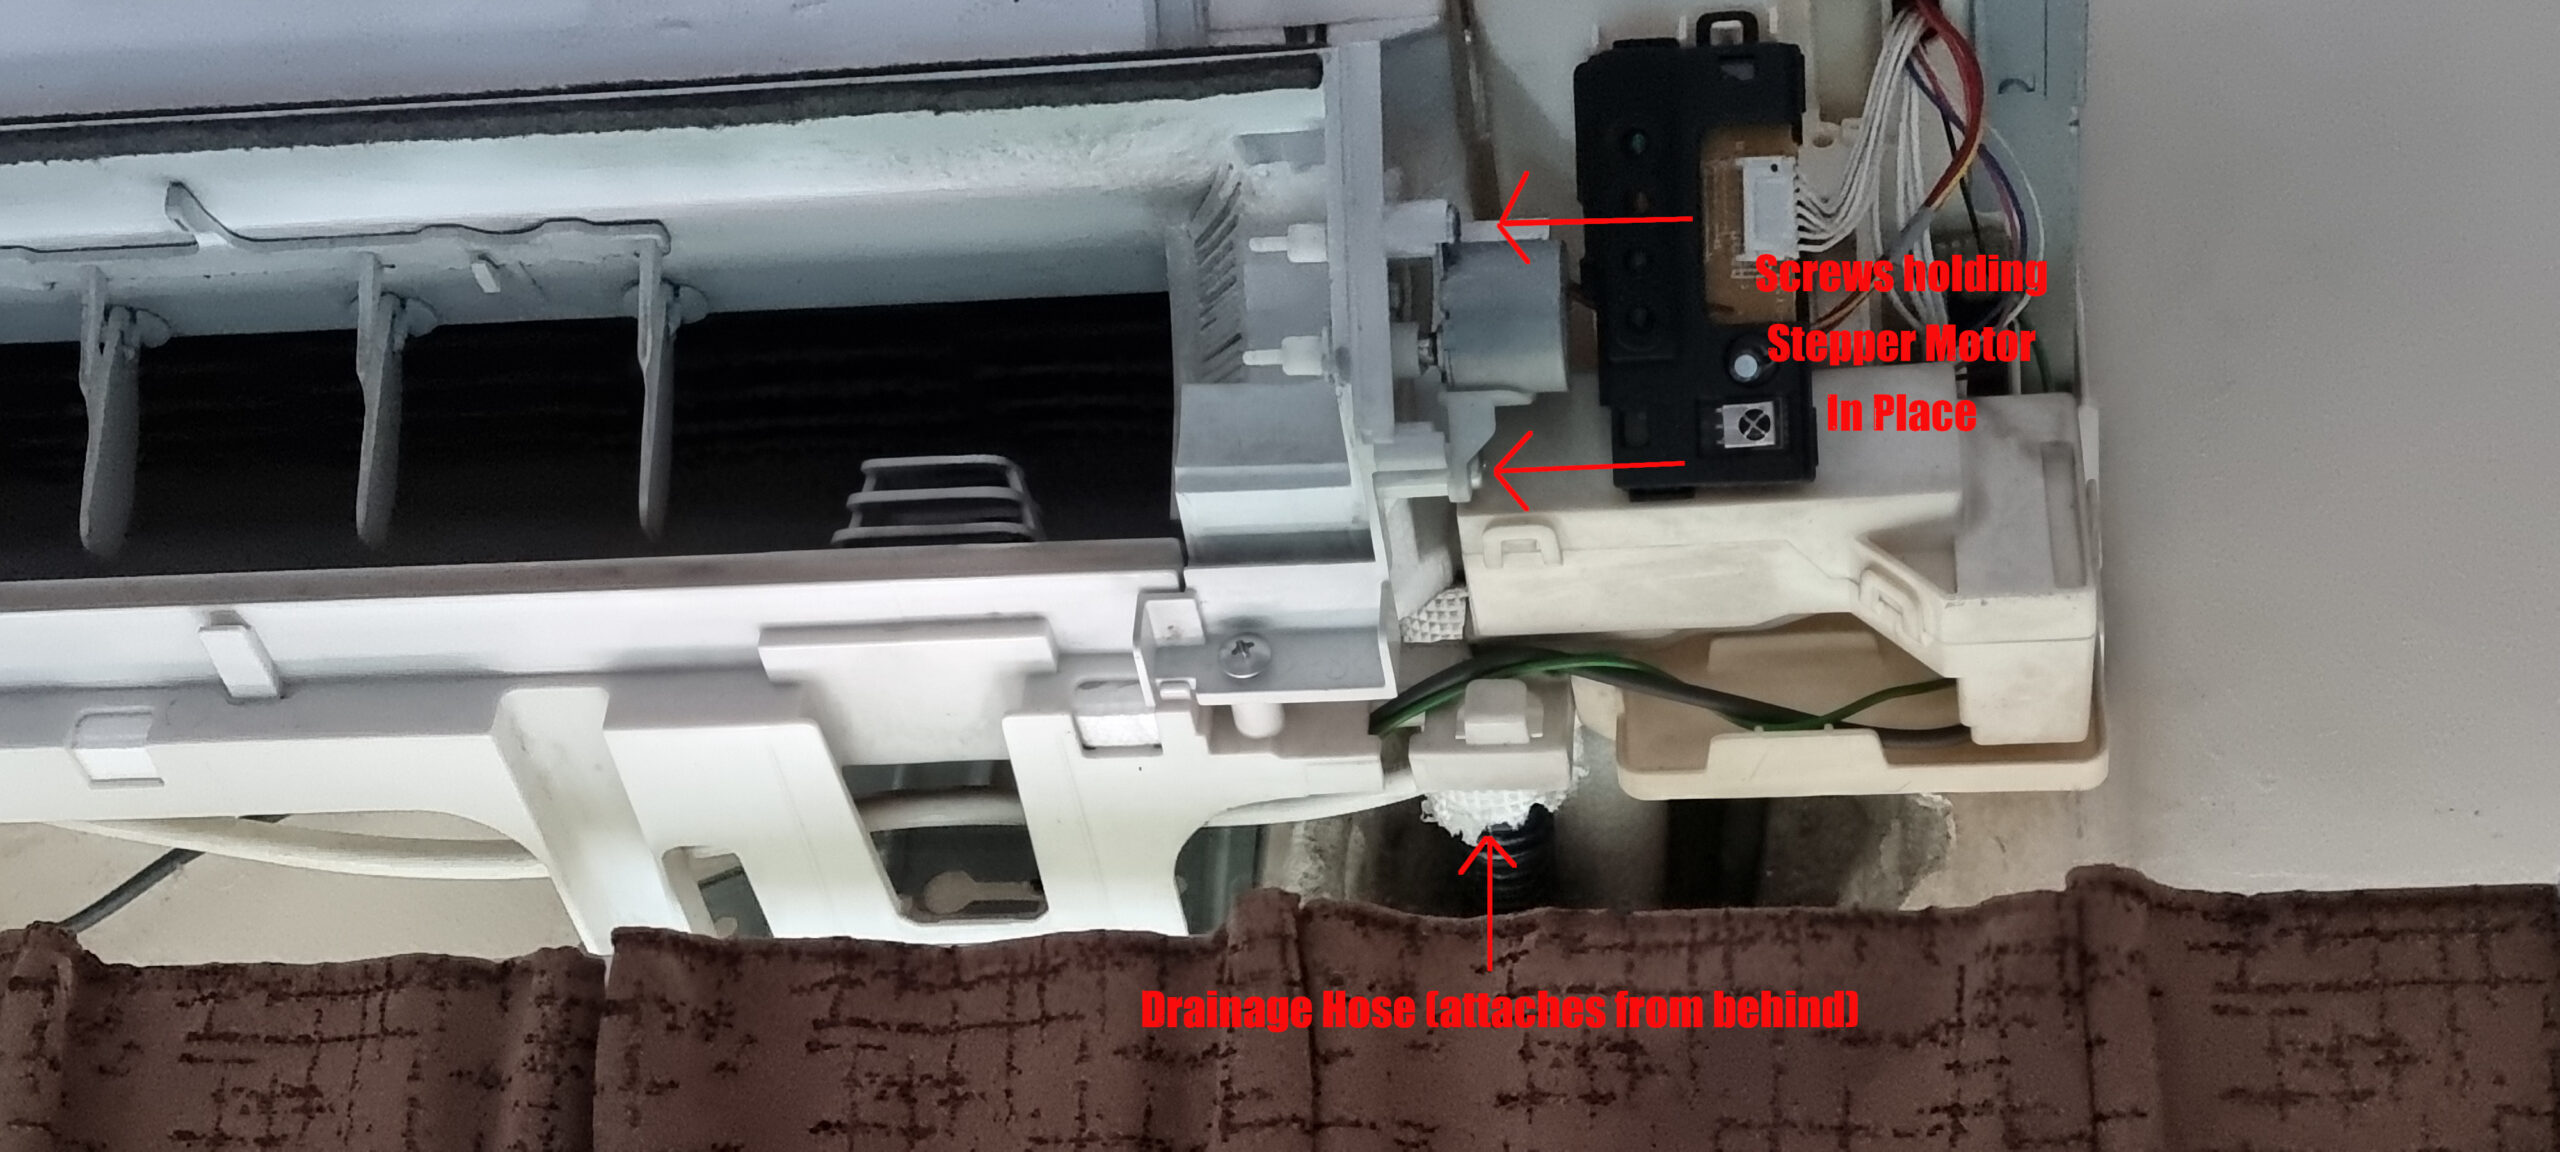
-
-
Pull the entire drainage tray out and forwards. You may need to detach the drainage hose if it doesn’t come off by itself.
-
Reattaching the drainage hose can be a bit of a pain so I recommend the partial method.
Releasing the Blower Roller Fan from it’s Motor
Now you can see clearly the dust that has accumulated on the Blower Roller Fan:
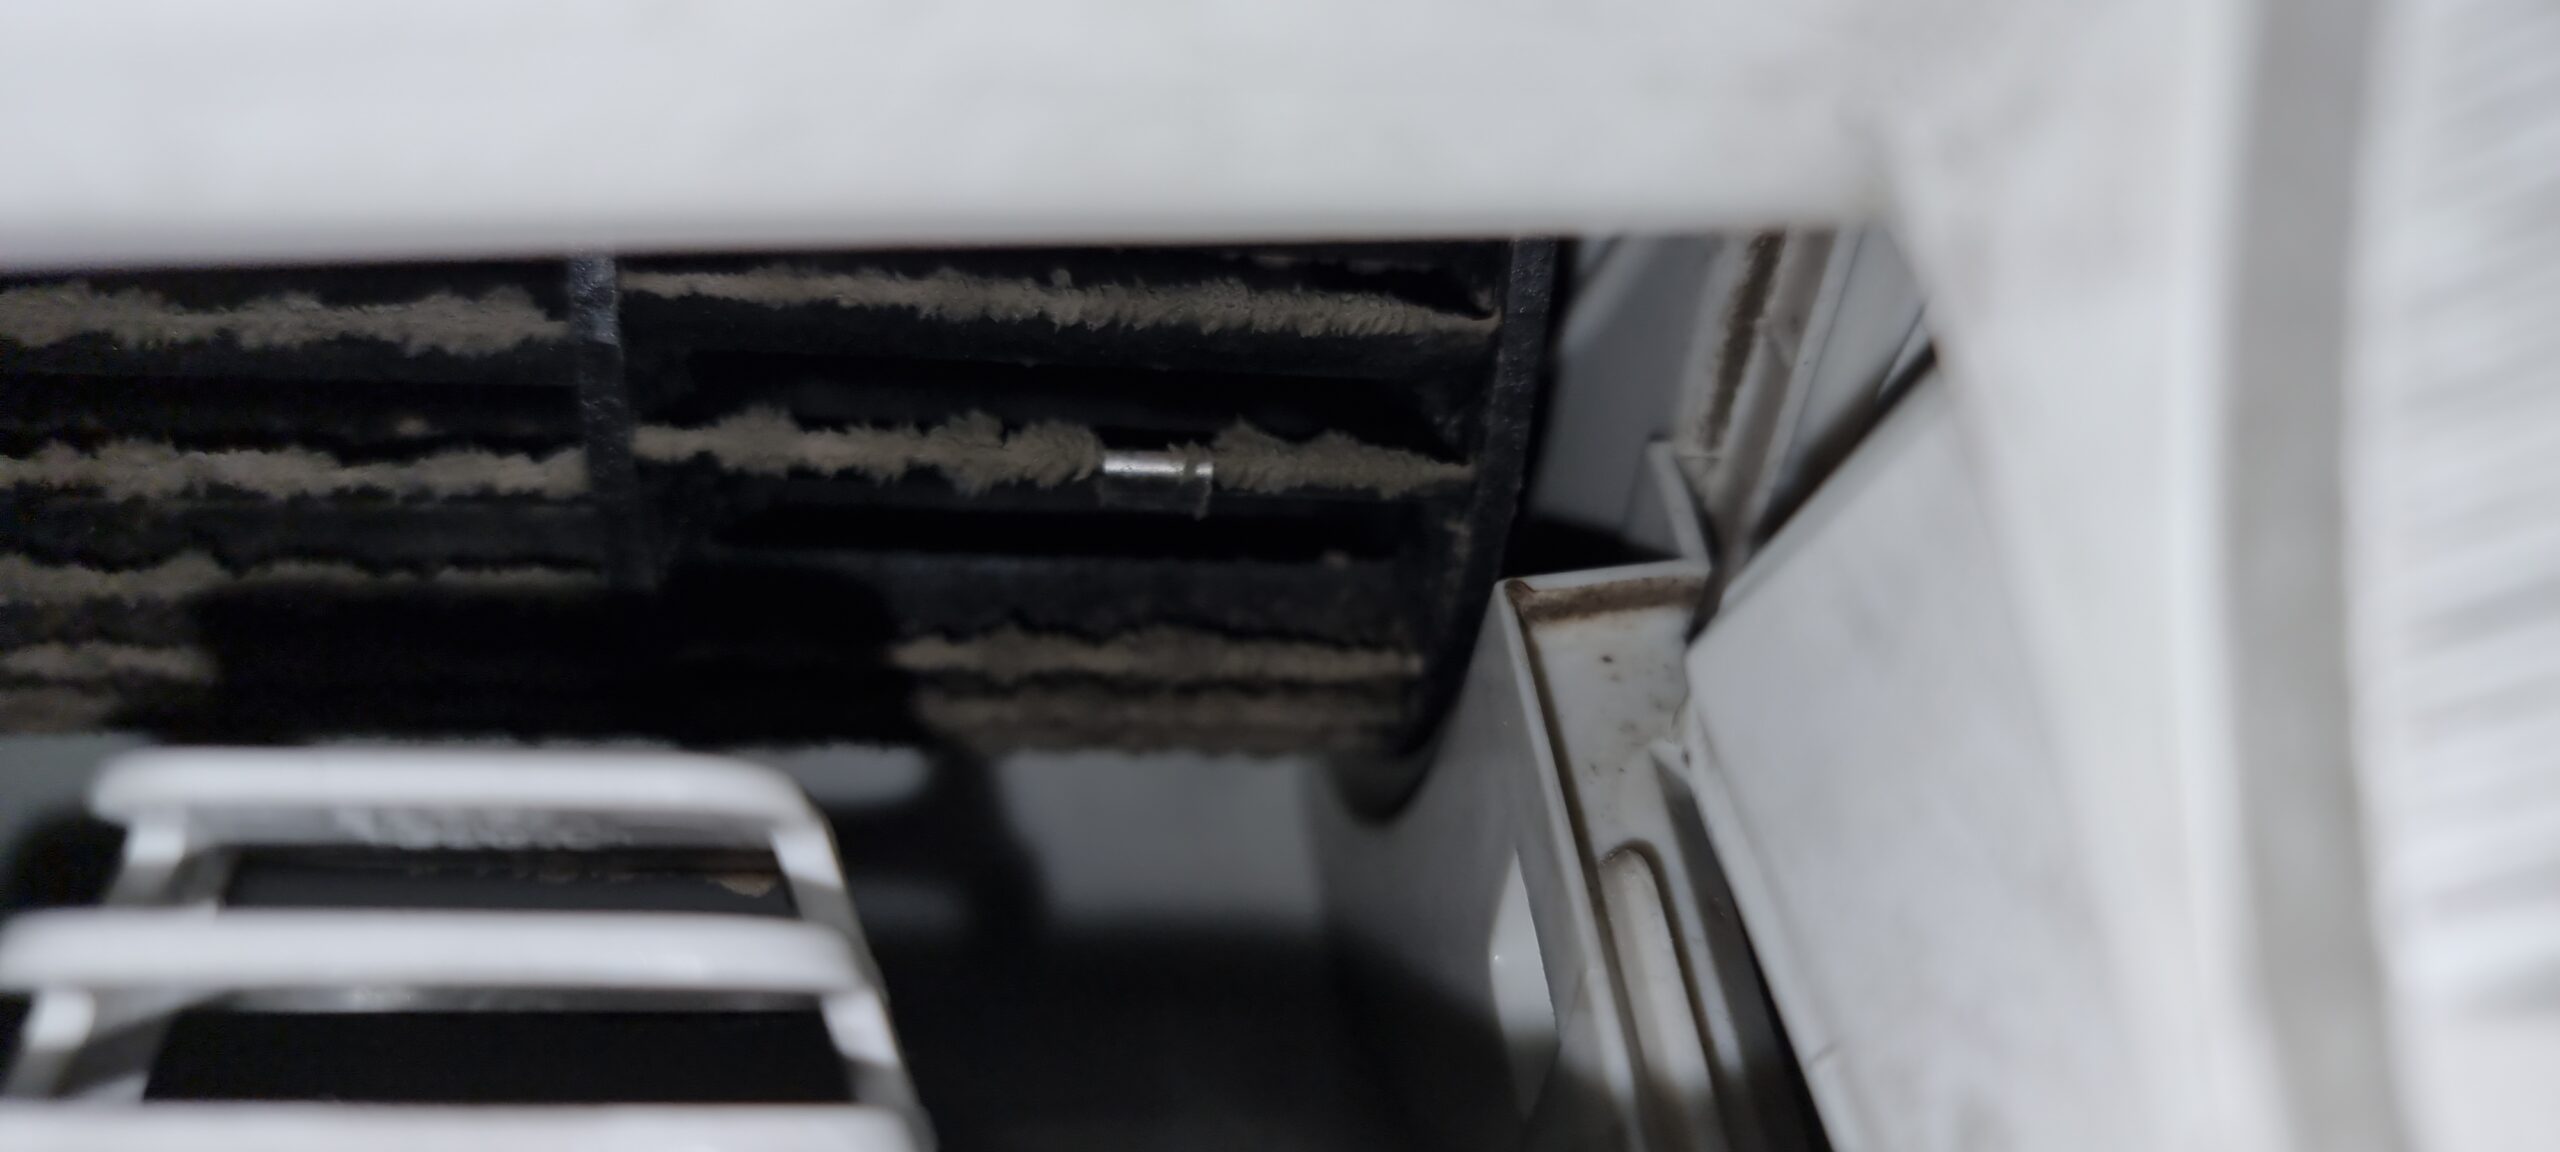
It may not look like much, but it makes a huge difference to the performance of the Blower Roller Fan.
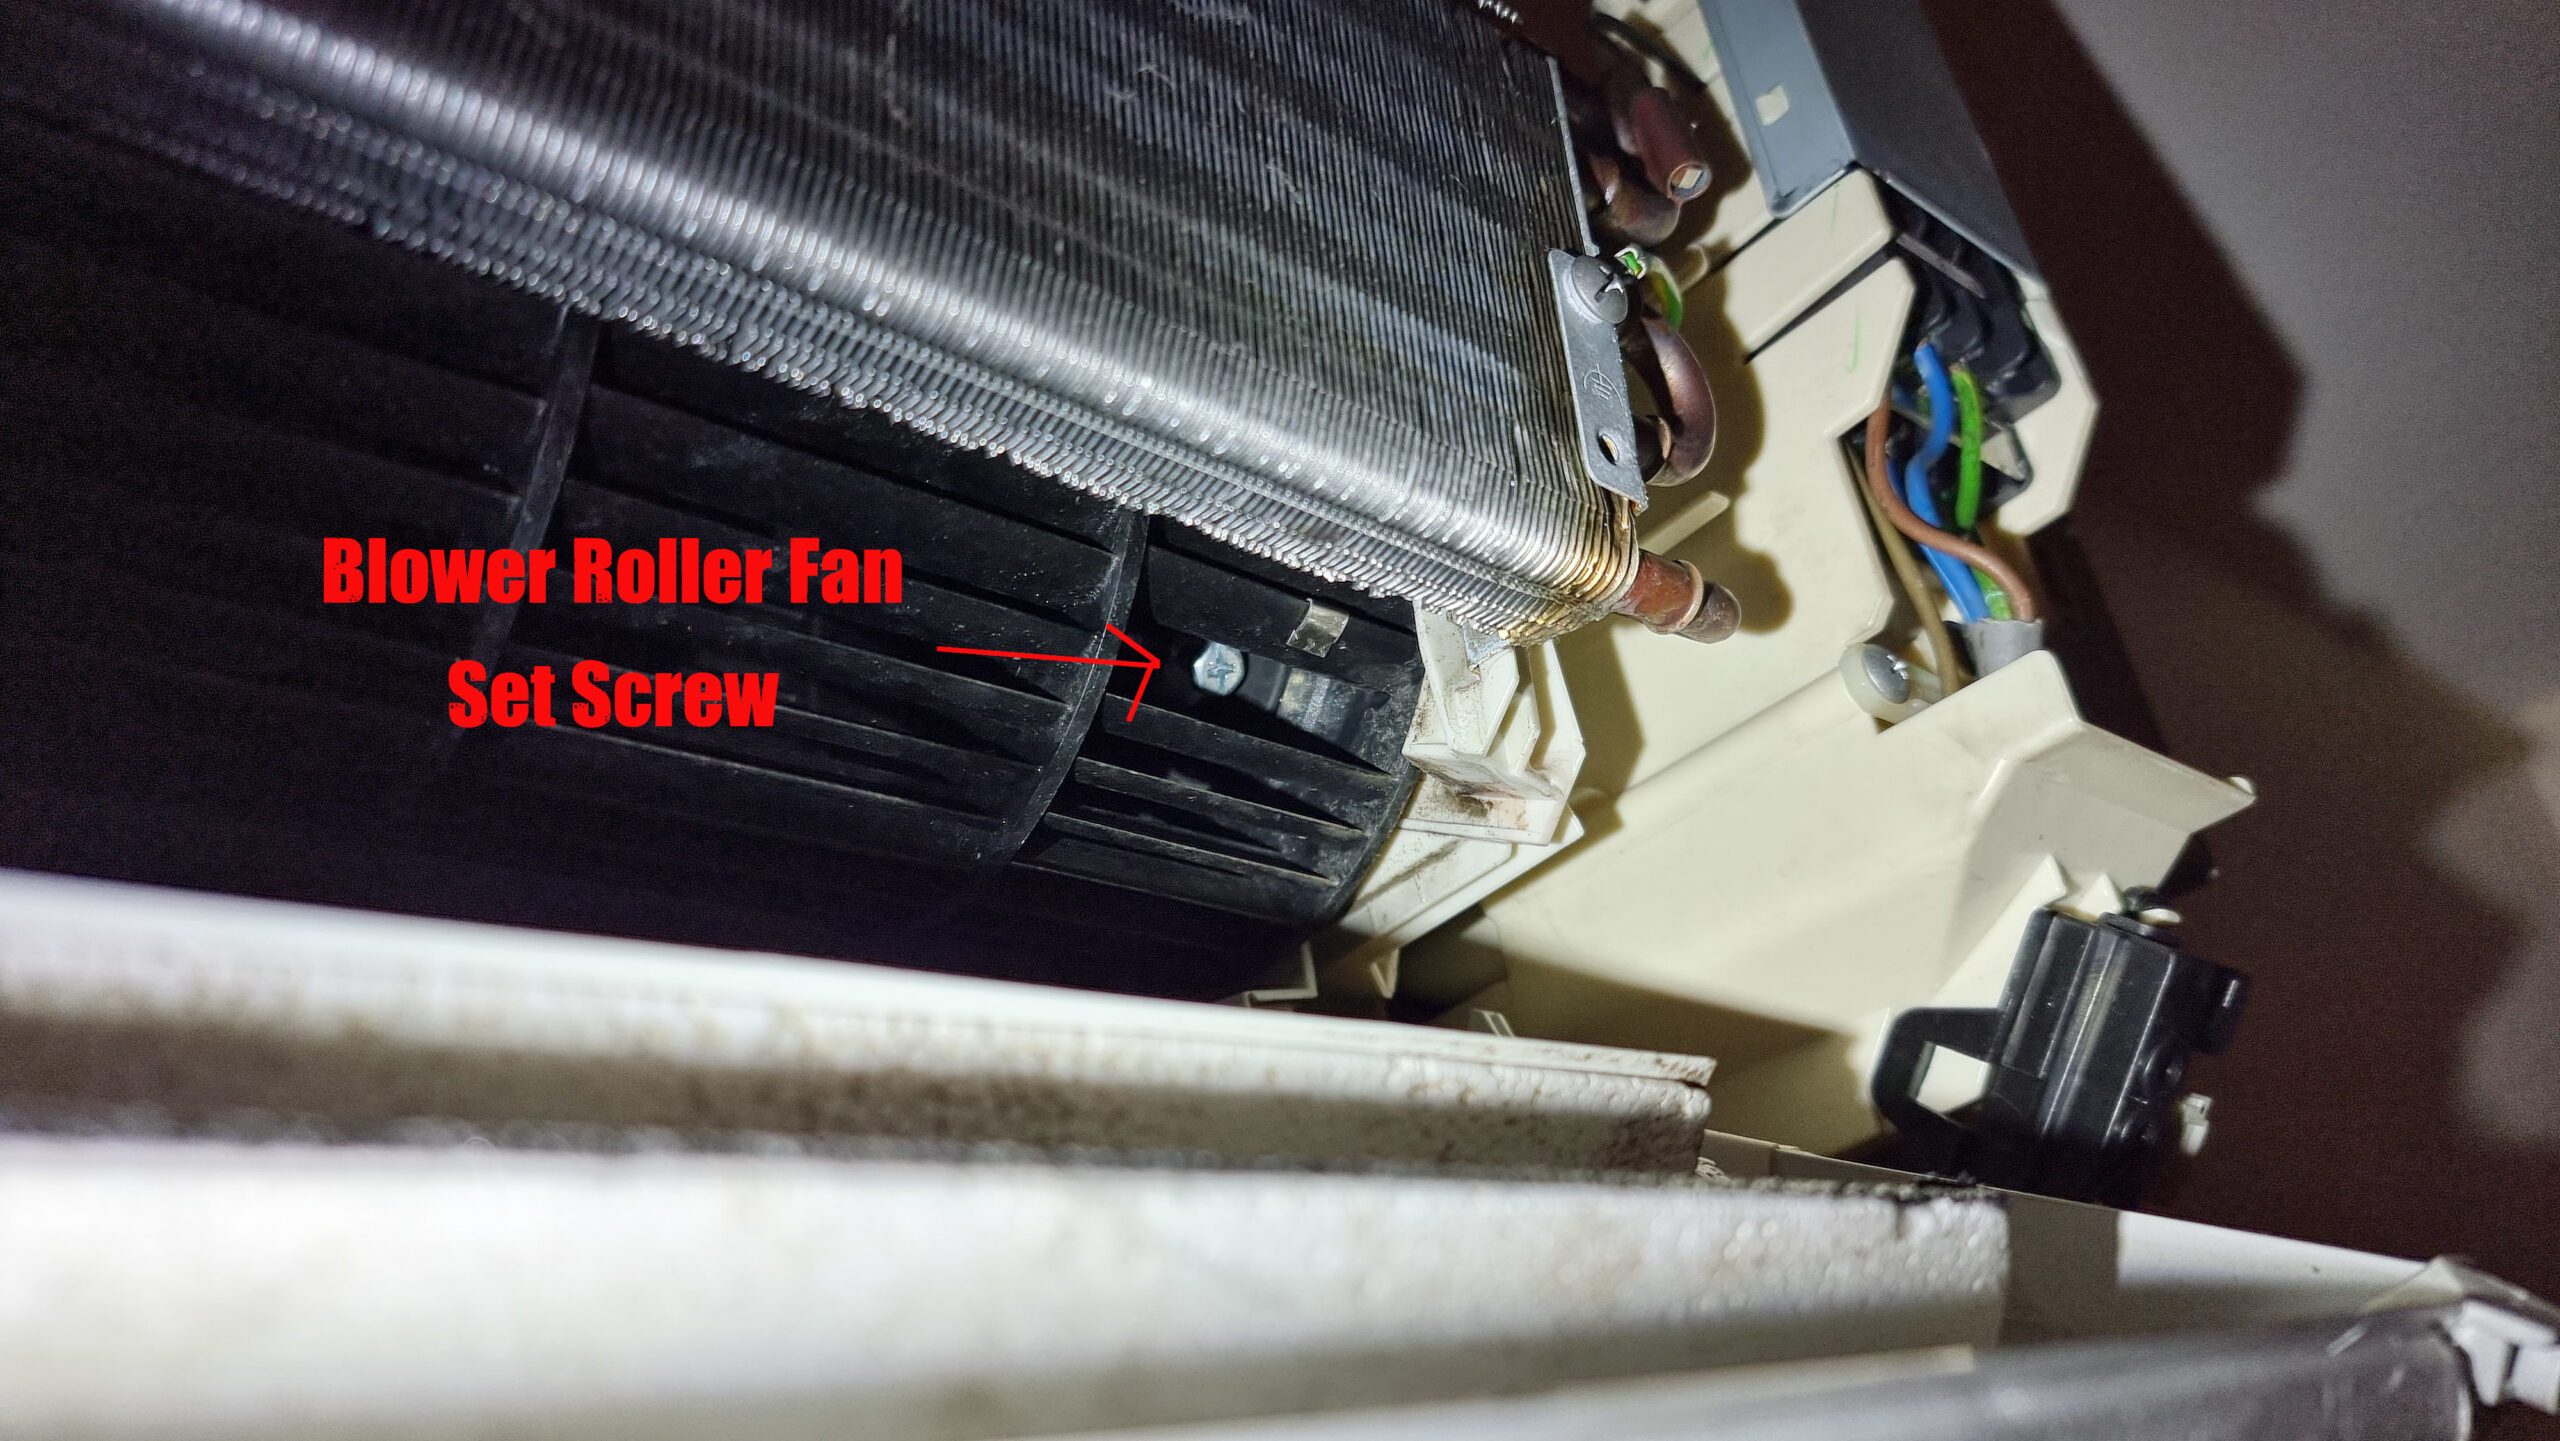
Now we need to loosen the Blower Roller Fan from the motor. With the Drainage Tray is out of the way, rotate the blower fan manually until you see this “gap” in the blades on the right hand side.
This is a set screw that attaches the Blower Roller Fan to the Blower Motor’s spindle. You need to loosen it with a long thin screw driver. It doesn’t have to be removed completely, just loosen enough so that it is not pressed hard against the motor spindle.
Move the Cooling Coils Out Of The Way
The Cooling Coils sit above and in front of the Blower Roller Fan and blocks its removal. You don’t want to mess with the Cooling Coils too much since it is connected to the gas tubes and all that. We just need to shift it ever so slightly forwards so that the Blower Roller Fan can be removed.
On the left hand side you will see this bit where a “tab” on the Cooling Coils fits into a tab from the aircond casing. Push the tab on the aircond casing gently to the left until the tab from the Cooling coils is released:
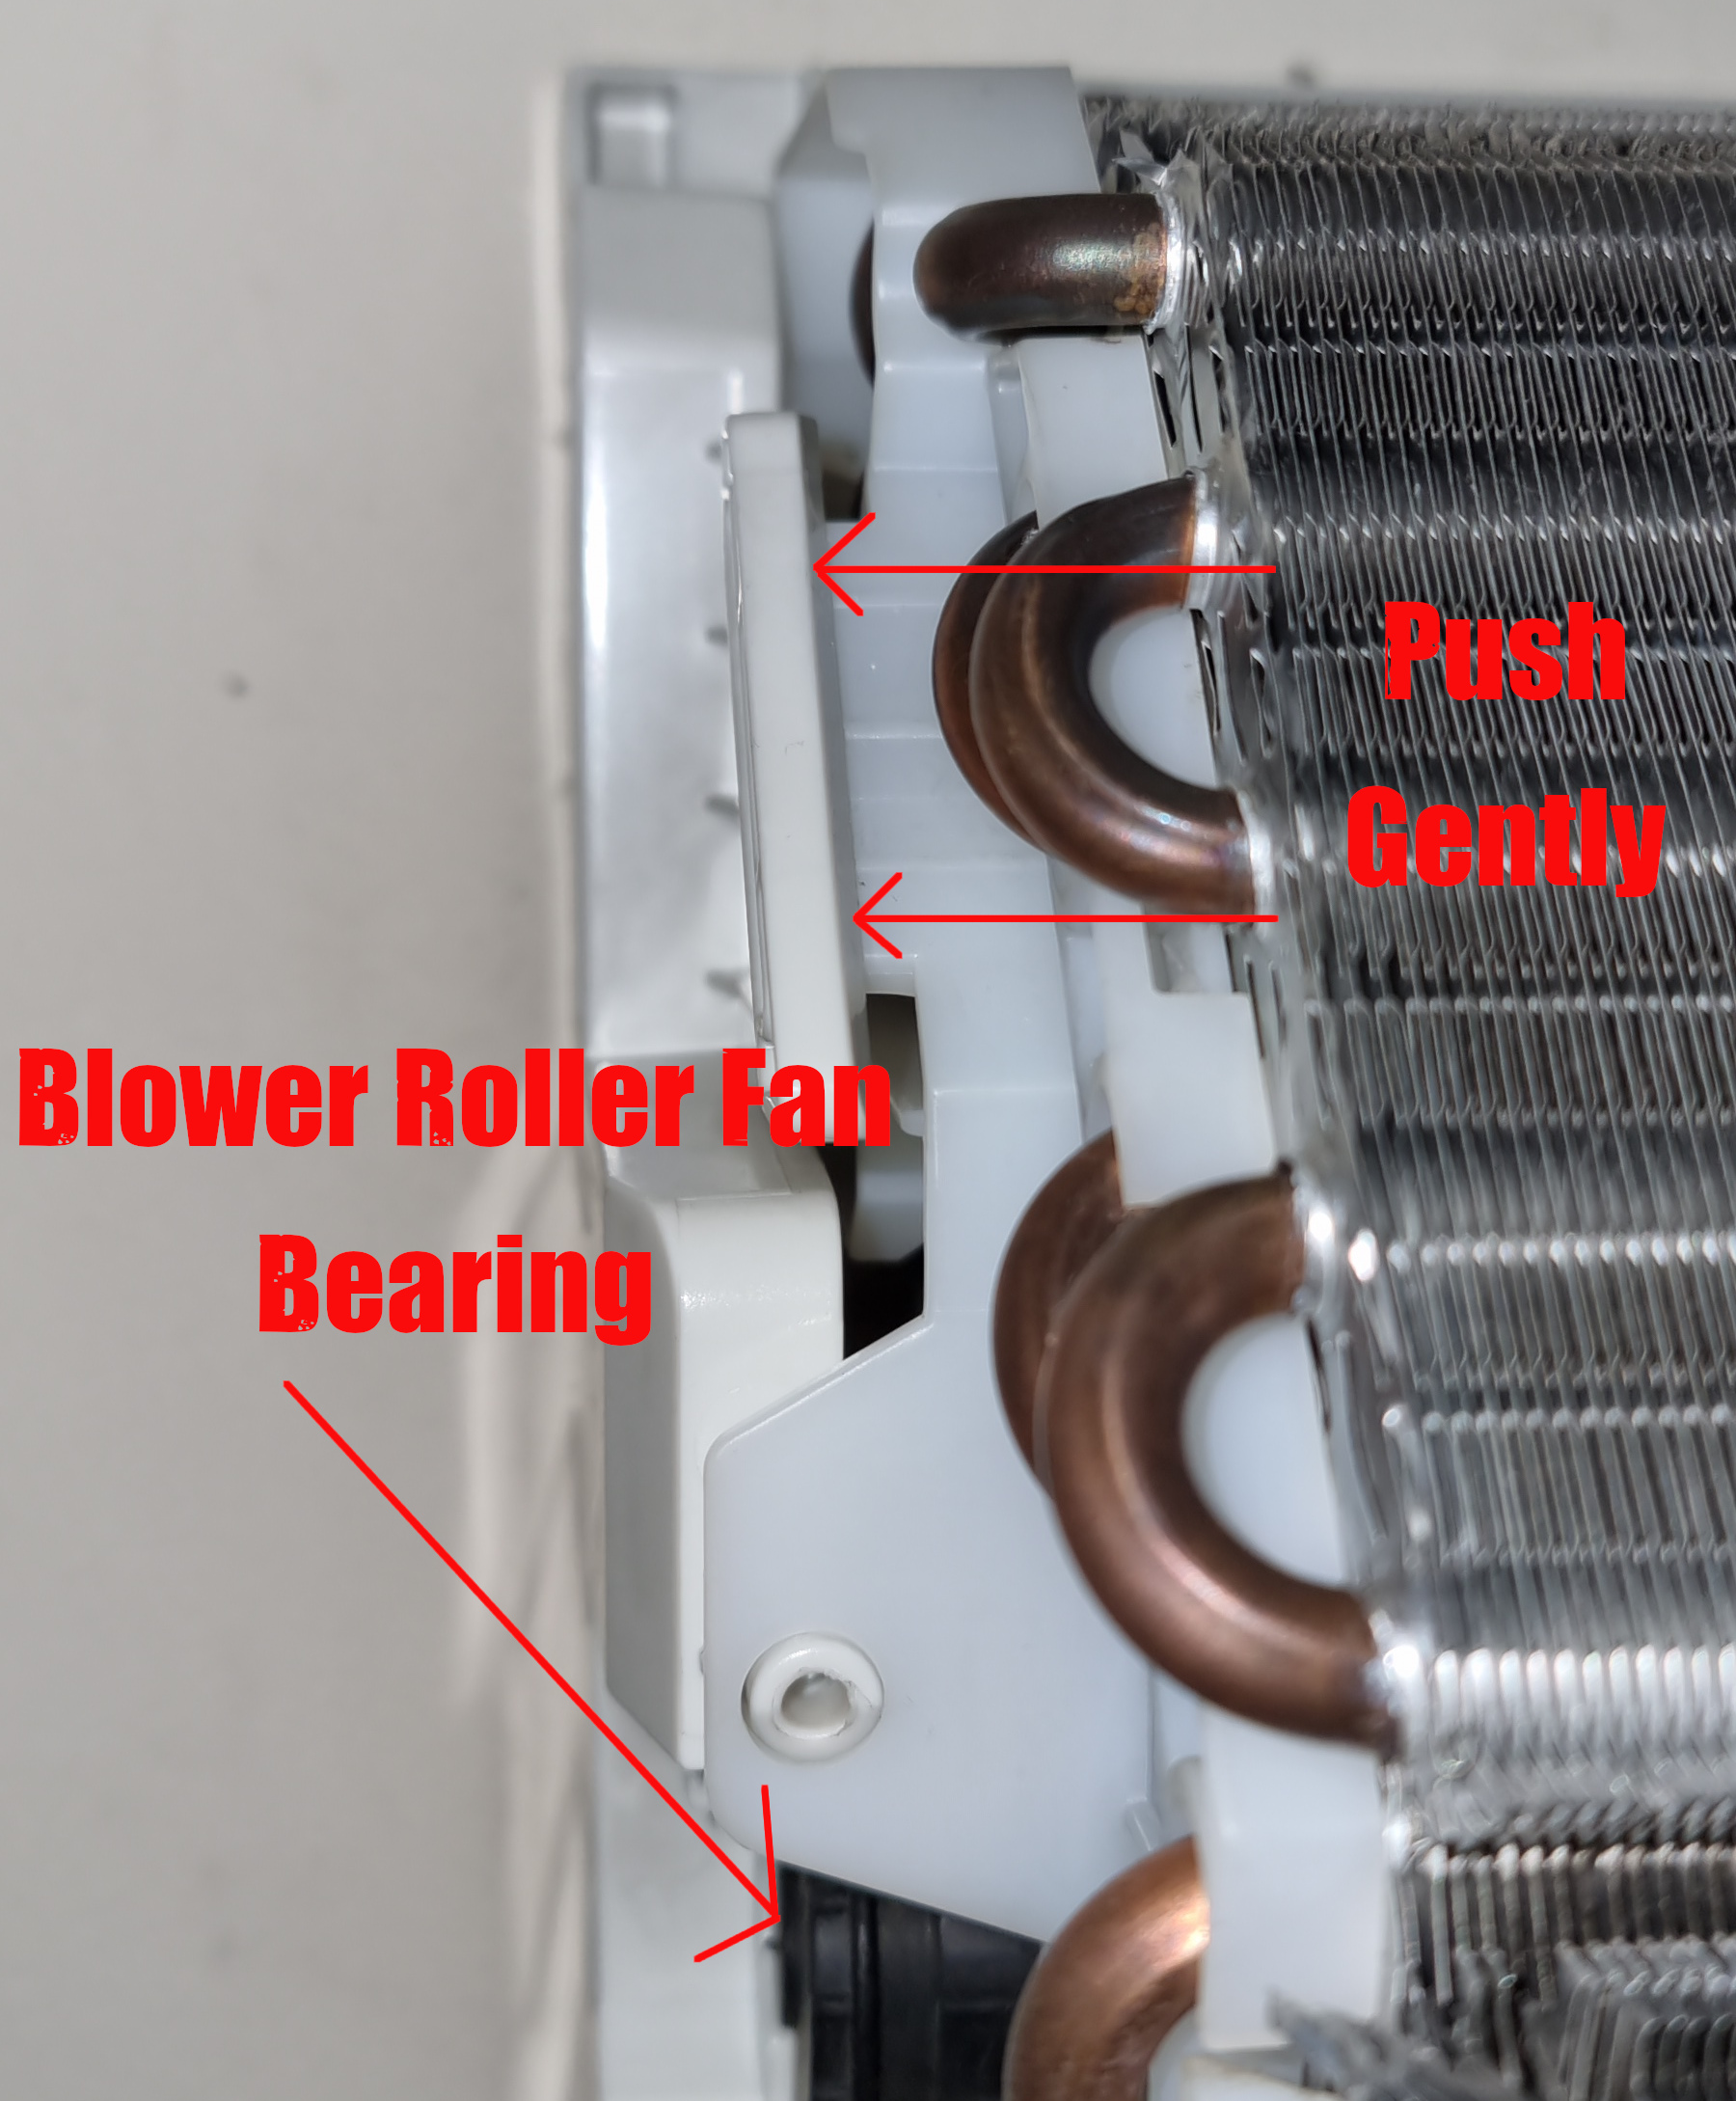
Now you can gently shift the left side of the Cooling Coil forwards just a little bit. The goal is to make enough space so that the Roller Fan Bearing (the black rubber thing at the bottom) can be lifted out from its “seat”.
Now very carefully:
-
Lift the Blower Roller Fan Bearing out of its seat by pulling it forwards
-
Slide the Blower Roller Fan out of the unit by pulling it all the way to the left.
The Blower Roller Fan is now out!
Note: The plastic/rubber bearing at the end of the Blower Roller Fan comes off, so you might want to remove it before washing the Blower Roller Fan.
Wash Blower Roller Fan
Use a mild detergent and a jet of water from a shower hose to thoroughly clean the Blower Roller Fan. After all that work this is very satisfying …
A lot of dust came out, more than was initially visible (Note: This was my third round of cleaning it “for video purposes” yet there were still bits of sticky dust).
Be sure to shoot the water from different angles to get all the sticky dust out.
(Optional) Clean Cooling fins
You can also use a brush and clean the Cooling Fins, and then use a vacuum cleaner and wet cloth to remove the sticky dust bits.
If you want to use a spray foam cleaner or detergent on it, don’t forget that the water will drip down below the cooling fins, so your Drainage Tray must be reinstalled with the Drain Hose connected first or you’ll have a mess on the floor.
My Cooling Fins were very clean (it helps if you wash your filters every few weeks) so I did not need to do this. Since it takes my blower approximately 6 months to get dirty enough to be unusable, I will leave it for another six months and then get the whole unit professionally serviced (i.e once a year). Don’t forget there’s also the outdoor compressor unit that needs to be serviced (given that mine hangs on the wall 14 floors up I will leave this to the professionals).
Put all the parts back together
Just work through the steps backwards to put everything back together. Some tips:
-
After you’ve put the Blower Roller Fan back in, spin it a bit and listen carefully. Make sure it spins freely and that it is not scratching or contacting anything. It may help to apply pressure and push it to the left when securing the set screw.
-
Make sure the set screw is tight.
-
Before you put the cover back on:
-
Check that your drainage hose is connected properly. Get a cup of two of water and pour it slowly into the Drainage Tray. All the water should disappear down the Drainage Hose and there should be no leaks.
-
It may be useful to also turns on the mains and run the aircond for a minute or two to see that everything is working properly (do not touch any of the exposed parts of the aircond while it is running). Switch off the mains again before you resume replacing the cover.
-
Results
-
Whereas before when the aircond fan speed was set to “powerful” I could only feel the air blowing out of the air-cond from 1-2 feet away, now I can feel it from across the room.
-
The entire room got cool within a few minutes.
-
When i woke up the next day, the room was cold. I checked my bedroom thermometer and it read 23.9C, which is close enough to the air-cond setting of 24C
-
I now have MYR150 of money to spend on toys … saved from calling the air-cond repair guy!
Originally created with EverNote at 20210903T070258Z