Compiling The ExtPlane Plugin (on Linux and Windows)
There appears to be quite a bit of updates going on with the ExtPlane plugin source code in the last few months, and it turned out some of these are needed to fix some of the bugs I am facing when using it. Unfortunately, to get the latest and greatest version, you have to compile it yourself. Here are my notes on how to go about compiling the plugin on Linux and Windows.
Note: If you are using my Pi-XPlane-FMC-CDU, you can just use the pre-compiled binaries linked to in my post here. This post is more for those who would like to know more about the compilation process, and/or want to compile it themselves.
Compiling for Linux
I was able to compile it for Linux quite easily, on my Ubuntu 16.04 desktop PC. Starting with a fresh Ubuntu install:
- Update OS
- sudo apt-get update
- sudo apt-get upgrade
- Install dependencies
- sudo apt-get install git
- sudo apt-get install qt5-qmake qt5-default qtbase5-dev
- Install ExtPlane SDK
- cd
- mkdir src
- cd src
- wget http://developer.x-plane.com/wp-content/plugins/code-sample-generation/sample_templates/XPSDK300.zip
- unzip XPSDK300.zip
- mv SDK XPlaneSDK
- rm XPSDK300.zip
- Clone the ExtPlane Source Code
- git clone https://github.com/vranki/ExtPlane.git
- cd ExtPlane
- qmake
- make
- And that’s it … the linux-version of the plugin can be found in extplane-plugin/extplane/64/win.xpl.
Compiling for Windows
The last time I actually compiled anything for windows, the compiler had the name “Borland” in it
😃. But since my proper X-Plane Flight Sim setup runs on a dedicated WIndows PC, I need a WIndows ExtPlane plugin also. After a few false starts (Visual Studio Community Edition …😃), here are my notes on setting up a Linux-ish Windows build environment as well as compiling the ExtPlane plugin.
These notes are for a Fresh Windows 7 (fully updated) with just a Chrome browser installed.
- Install MSYS2. MSYS2 is an environment for building and packaging lots of open-source software. It provides a GNU toolchain that lets you build native windows apps, and also provides a UNIX-ish environment to build them in.
- browse to http://www.msys2.org
- Click on the “msys2-x86_64-20161025.exe” button at the top (x86_64 indicates a 64-bit version) and run the downloaded installer.
- Press Next, and install into “C:msys64“.
- Press Next. Press Finish when done.
- Using Windows Explorer, open C:MSYS64 and right-drag the “msys2.exe” and “mingw64.exe” to your desktop, and create shortcuts. Both of these can be used to open a shell prompt. They differ in the paths and environment they have set up, in particular “mingw64” has /mingw64/bin on its path, which is where the 64-bit compiler resides. Use “mingw64” when building stuff.
- Update your msys2 packages:
- In a MSYS2 terminal:
- update package db and core packages:
- pacman -Syu
- I was prompted to remove “catgets” and “libcatgets“, and just agreed to it.
- I was also prompted to close the window at the end of the update.
- update other packages
- pacman -Suu
- Install vim
- pacman -S vim
- ln -s /usr/bin/vim /usr/bin/vi
- update package db and core packages:
- In a MSYS2 terminal:
- Configure OpenSSH Service. This lets you ssh into a windows box into a msys2/mingw64 terminal. Pretend your Windows box is Linux !
- Right-click on the msys2 shell icon, and “Run as Administrator”
- Install the following packages:
- pacman -S openssh cygrunsrv mingw-w64-x86_64-editrights
- Execute this script to set things up automatically
- wget https://gist.github.com/samhocevar/00eec26d9e9988d080ac/raw/3dfeffef2bec8134d38cad8ff92f931b228ee7ba/gistfile1.sh -O z.sh
- sh z.sh
- rm z.sh
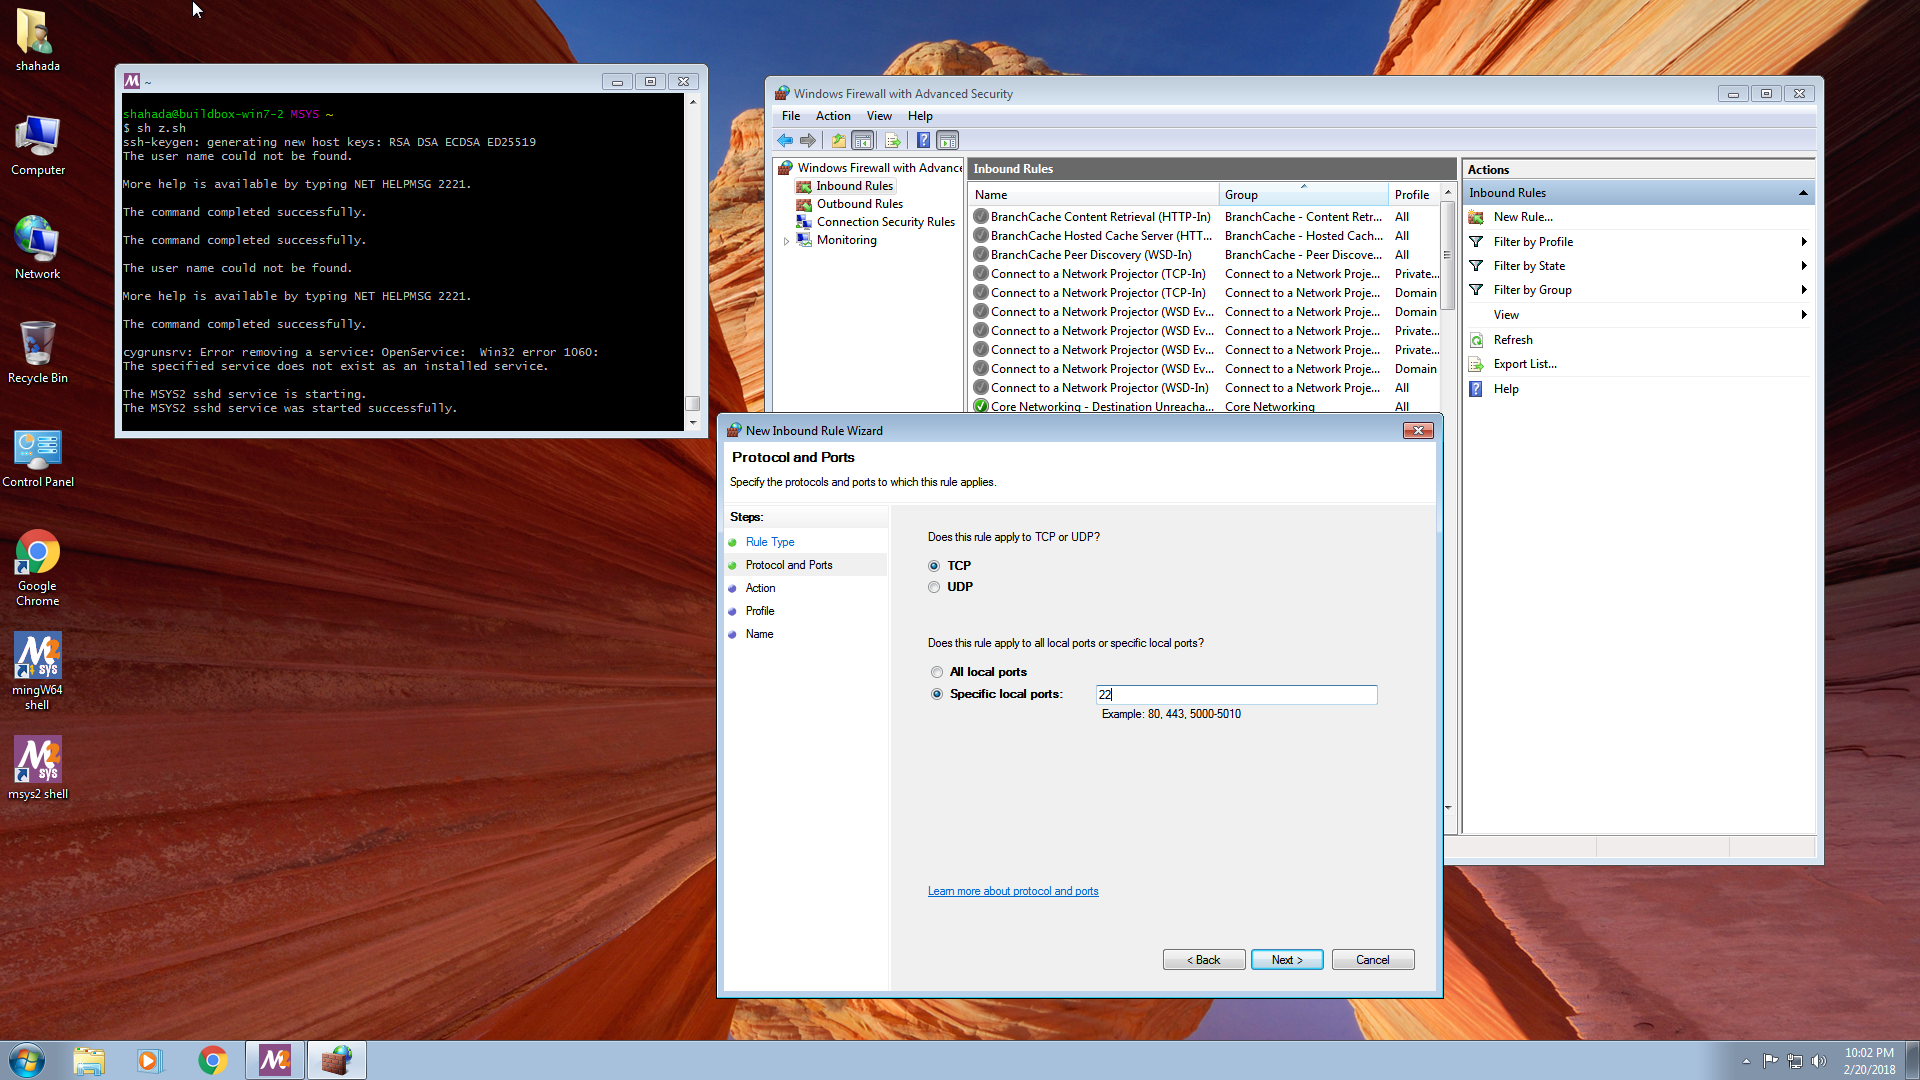
- Open Port 22 to allow ssh connections to your Windows PC
- Start -> Run -> “Windows Firewall with Advanced Security”
- Select “Inbound Rules”, the right-click “Inbound Rules” and choose “New Rule”.
- Select Port, Next
- Select TCP, and specify local port “22”, Next
- Select “Allow the Connection”, Next
- Tick everything, Next
- Name this rule “Open Port 22 for ssh” and press Finish
- Install the following packages:
- Right-click on the msys2 shell icon, and “Run as Administrator”
-
-
- The default shell you get when you ssh in is msys2. To change it to mingw64:
- edit /etc/ssh/sshd_config:
- find the line set PermitUserEnvironment, remove the “#” and change “no” to “yes”
- Set the environment variable MSYSTEM:
- mkdir ~/.ssh
- echo “MSYSTEM=MINGW64” > ~/.ssh/environment
- restart the service:
- net stop sshd
- net start sshd
- edit /etc/ssh/sshd_config:
- You can now ssh into your windows machine !Â
- The default shell you get when you ssh in is msys2. To change it to mingw64:
-
- Install toolchain and development tools
- In a msys shell:
- pacman -S –needed base-devel mingw-w64-x86_64-toolchain
- I pressed ENTER at all the prompts
- pacman -S git
- pacman -S unzip
- In a msys shell:
- Install qt5
- in a msys shell:
- pacman -SÂ mingw-w64-x86_64-qt5
- in a msys shell:
Now we are ready to build the Windows version of the ExtPlane plugin. The instructions below download the XPlaneSDK and ExtPlane git repository (what I actually did was to share the “src” folder from my Ubuntu machine (using Samba) and mounted it as “s:” on the Windows machine).
- in a mingw64 shell:
- Download X-Plane SDK
- cd
- mkdir src
- cd src
- wget http://developer.x-plane.com/wp-content/plugins/code-sample-generation/sample_templates/XPSDK300.zip
- unzip XPSDK300.zip
- mv SDK XPlaneSDK
- rm XPSDK300.zip
- Clone the ExtPlane Source Code
- git clone https://github.com/vranki/ExtPlane.git
- cd ExtPlane
- qmake
- make
- Download X-Plane SDK
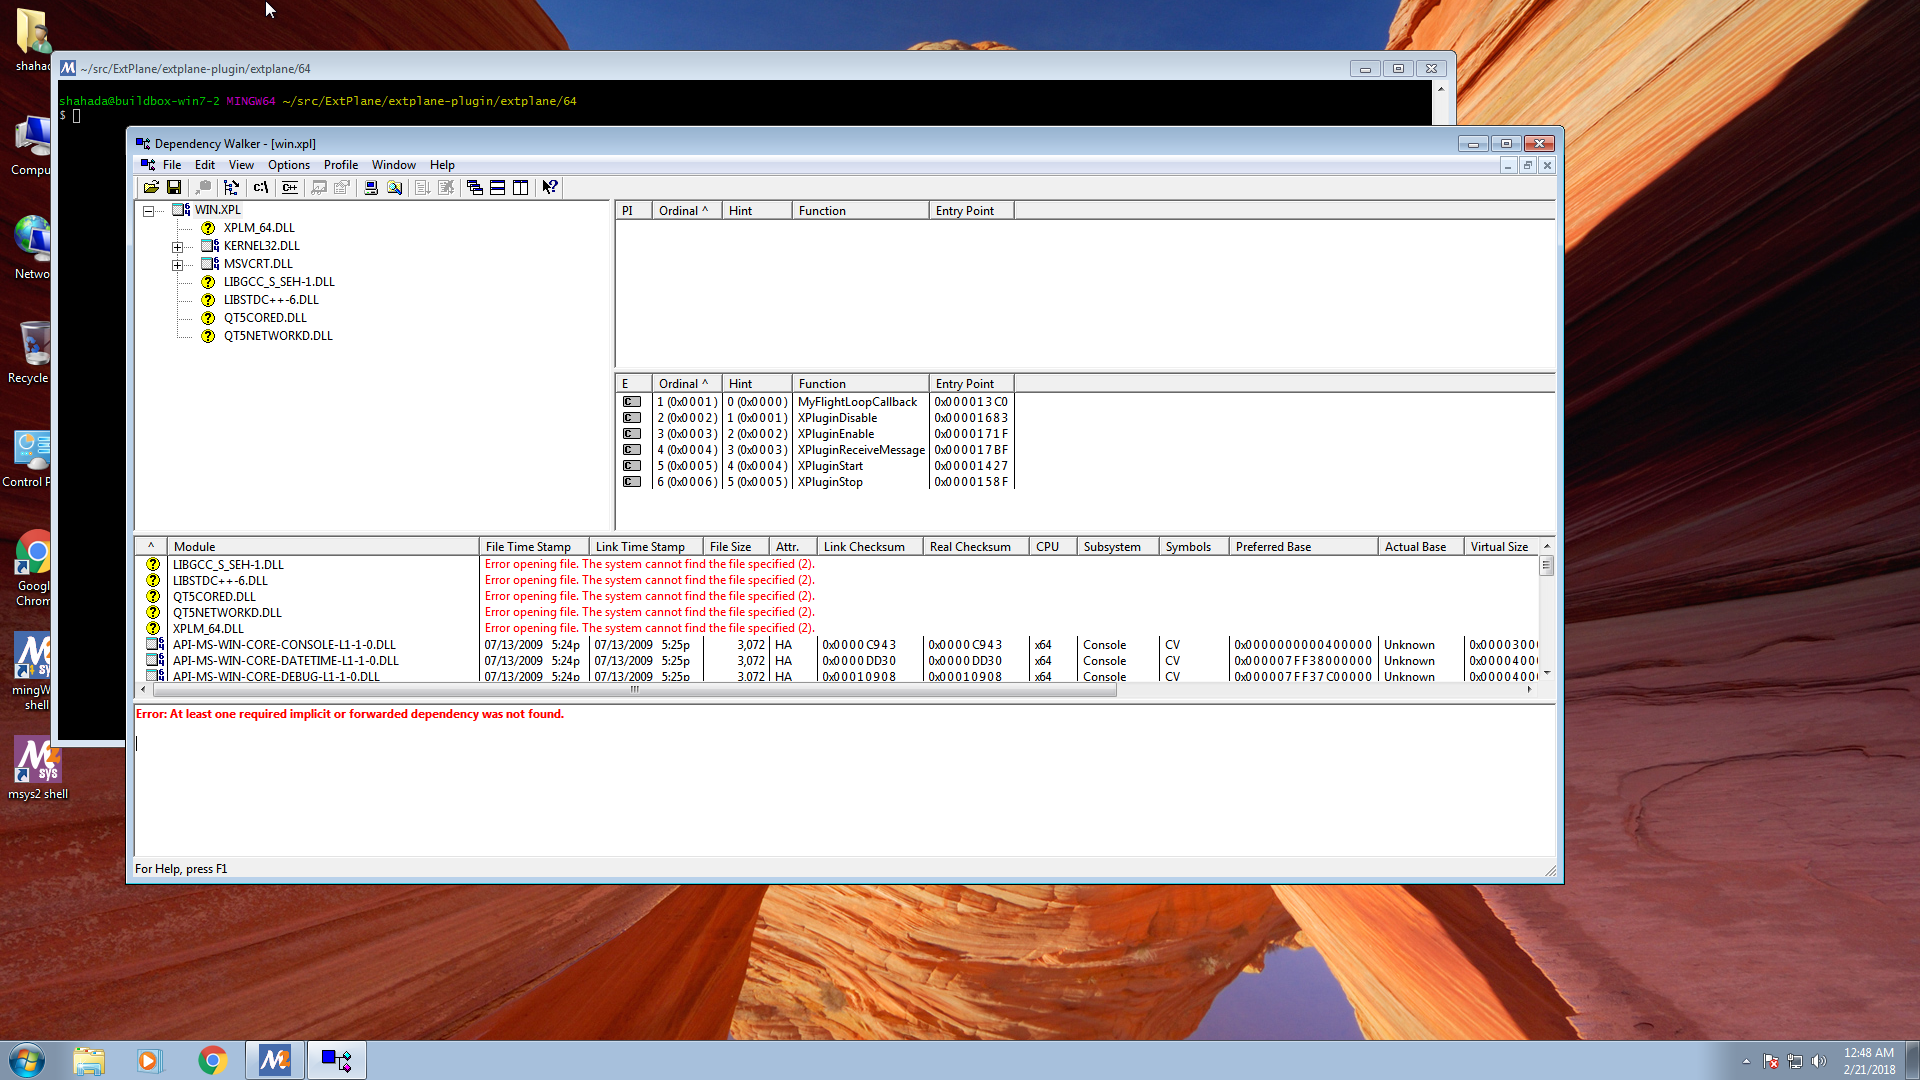
We now have the windows version of the plugin in the extplane-plugin/extplane/64/win.xpl, which is actually just a renamed .DLL file. However, this .DLL has dependencies on other .DLLs, and won’t be able to run under x-plane if those other .DLLs are not present. To see those dependencies, install the Dependency Walker utility, and open the win.xpl file with it (Actually you are supposed to be able to use the “ldd” command for this, but it didn’t work on this .dll for me). It will list the dependent .dll files:
The fun doesn’t end there. Those dependent DLLs you copied in, also have their own dependent DLLs, so you will need to go through each one and find their dependencies, and then go through each of those, and so on. One thing that may help is to add the extplane-plugin/extplane/64/ folder into the Dependency Walker’s path, so only those that are really missing will turn up in yellow. It can be frustrating, but almost everything you need will be somewhere in the /mingw64/bin folder.
For this build of ExtPlane, here are the dependent .DLLs I found:
- XPLM_64.DLL is the stub used by the X-Plane SDK to compile this. When actually run, it will be provided by the Flight Sim itself, so we don’t need to worry about it.
- LIBGCC_S_SEH-1.DLL (the C runtime),
- LIBSTDC++-6.DLL (the C++ runtime),Â
- QT5CORED.DLL
- QT5NETWORKD.DLL
- LIBICUIN58.DLL
- LIBICUUC58.DLL
- LIBPCRE2-16-0.DLL
- LIBWINPTHREAD-1.DLL
- QT5CORED.DLL
- QT5NETWORKD.DLL
- ZLIB1.DLL
- LIBUCIDT58.DLL
Copy them to the same folder where the plugin is located (~/src/ExtPlane/extplane-plugin/extplane/64/). I’m not sure if all of them are strictly needed or not.
Compiling for Mac OS X
Send me a Mac and I will write this part up! 😍
Putting it all Together
Copy the src/ExtPlane/extplane-plugin/extplane into your X-Plane Flight simulator’s Resources/Plugins directory. I like to rename it with the commit details and the date so it is easy to tell subsequent versions apart.
Notes
- Since the ubuntu and windows machine are scriptable, it should be possible to write a script that will automatically pull the latest copy, build all the versions for each platform and zip it up properly.
- I’m not sure if the linux version has any dependencies. If someone has a clean linux machine with just X-Plane it would be good to test this out. Let me know the results.
- This is my first attempting this, so I would appreciate any feedback you may have in the comments below.
Originally created with EverNote at 20180221T114912Z